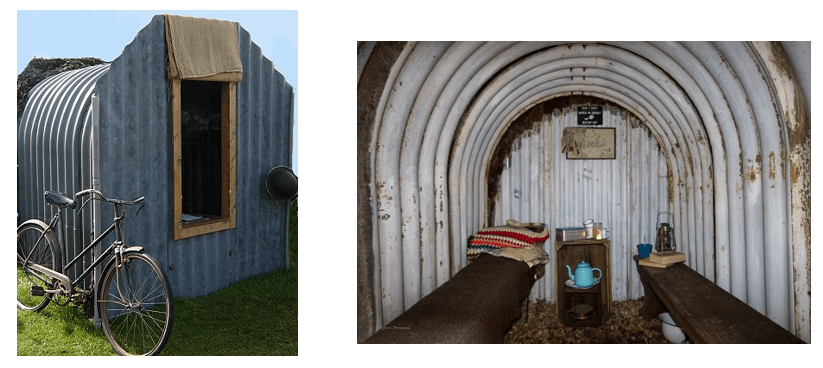
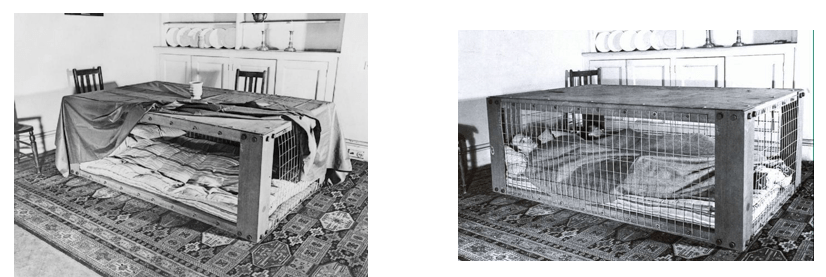
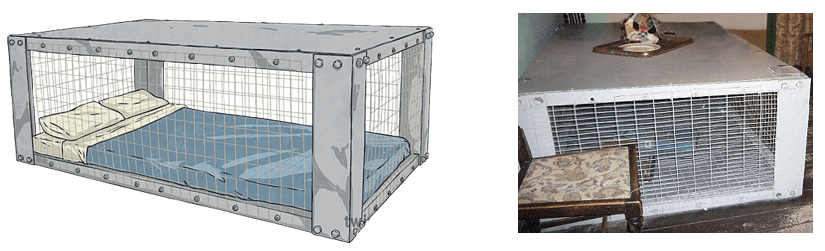
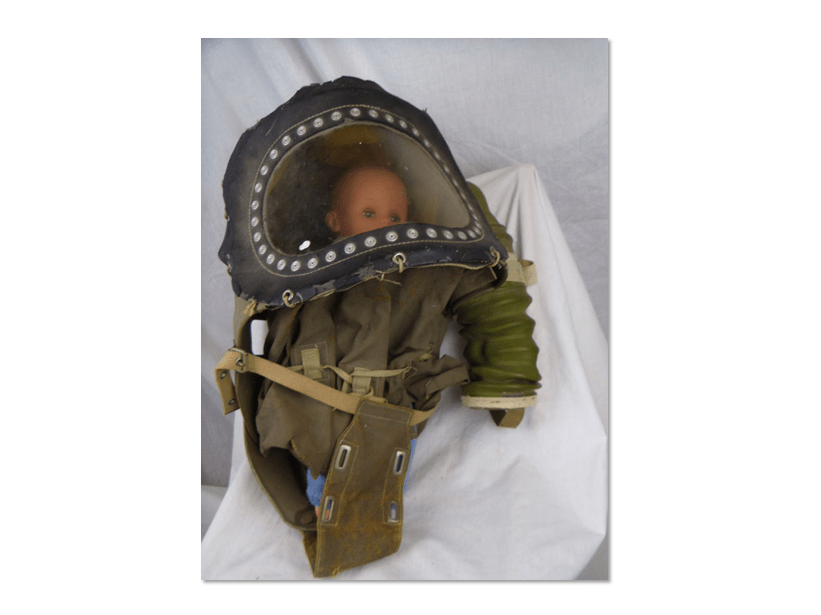
were approximately 2m long, 1.2m wide & 0.75m high
could also be used as a table
were meant for people to sheltered underneath it during a raid
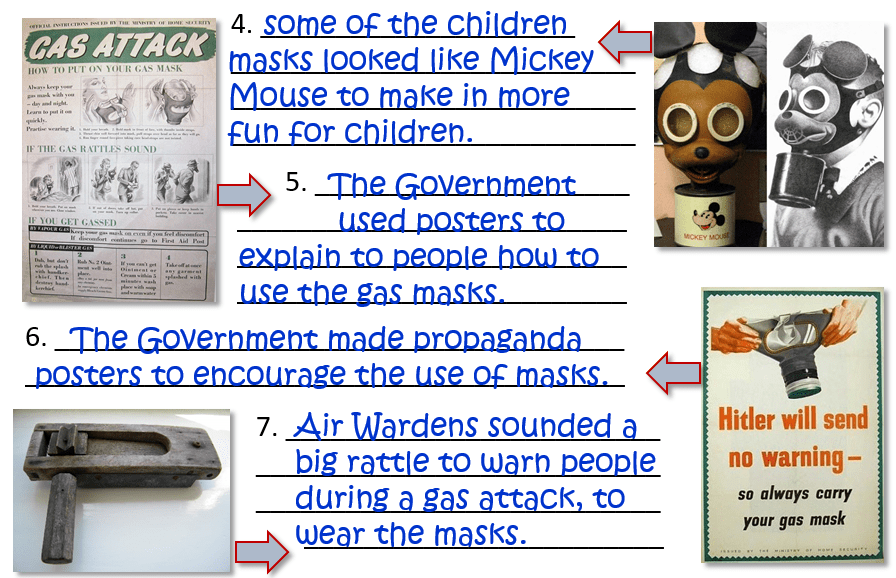
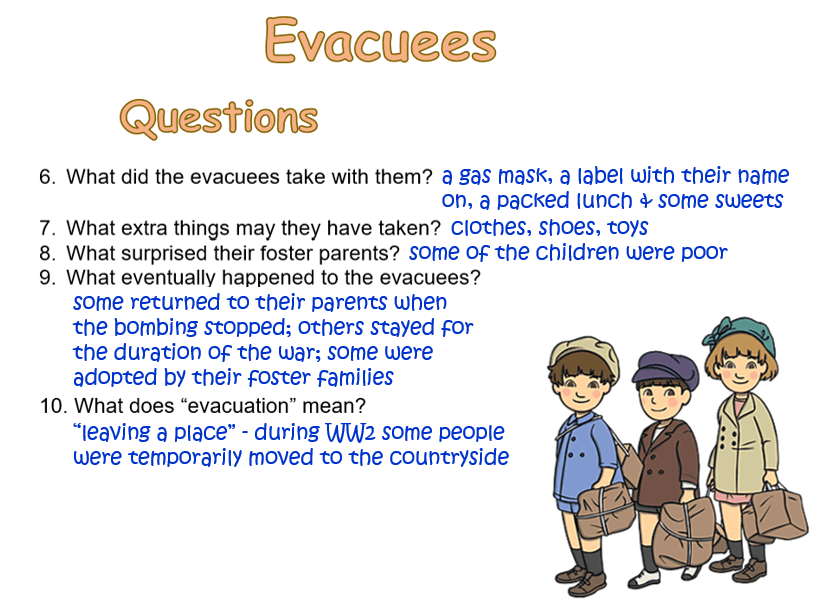
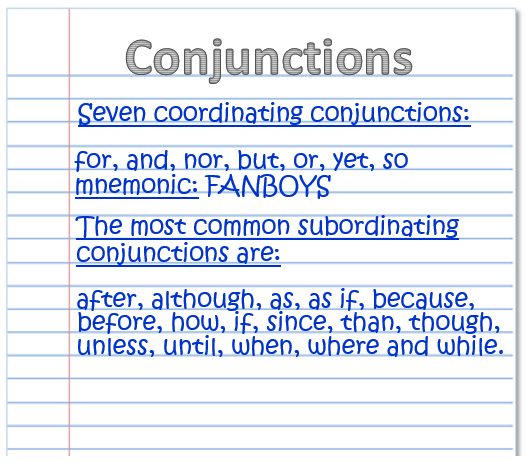
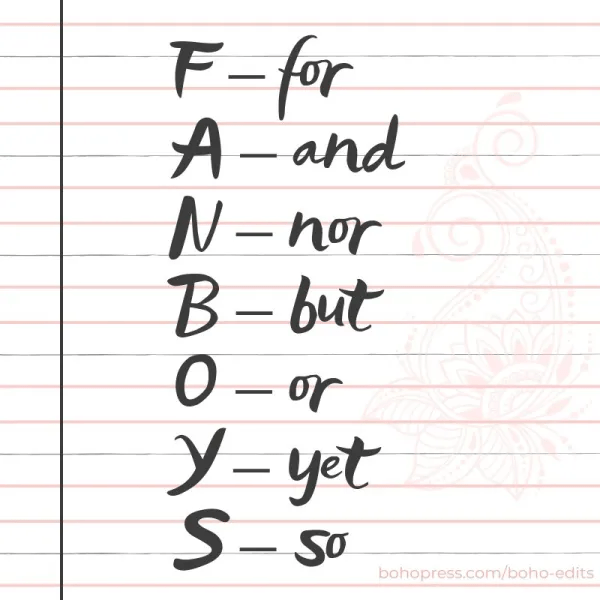
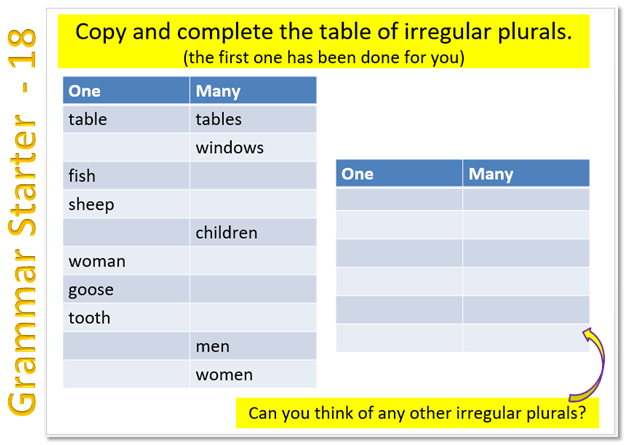
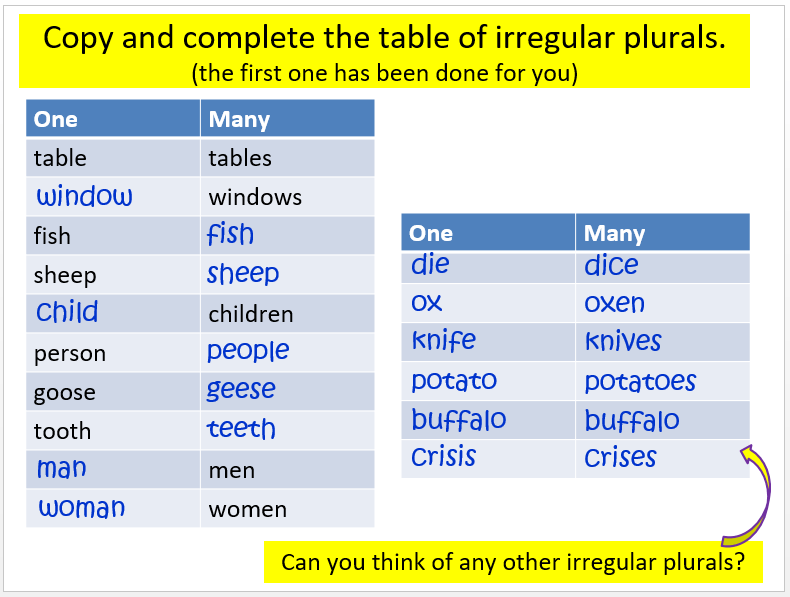
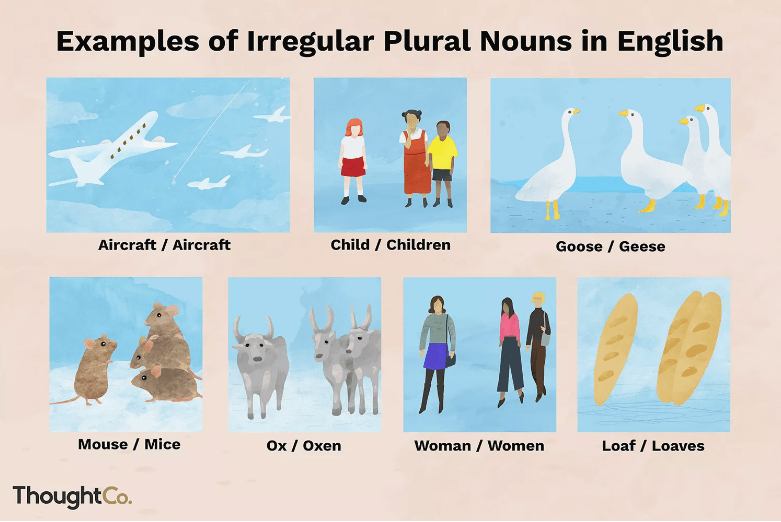
6.
From the following videos you can learn more about Morrison shelters.
-1-
Imperial War Museum Morrison shelter. (0:54 minutes long)
-2-
Morrison shelter & Anderson shelter compared… (0:41 minutes long)
7.
Finally, let’s look at…
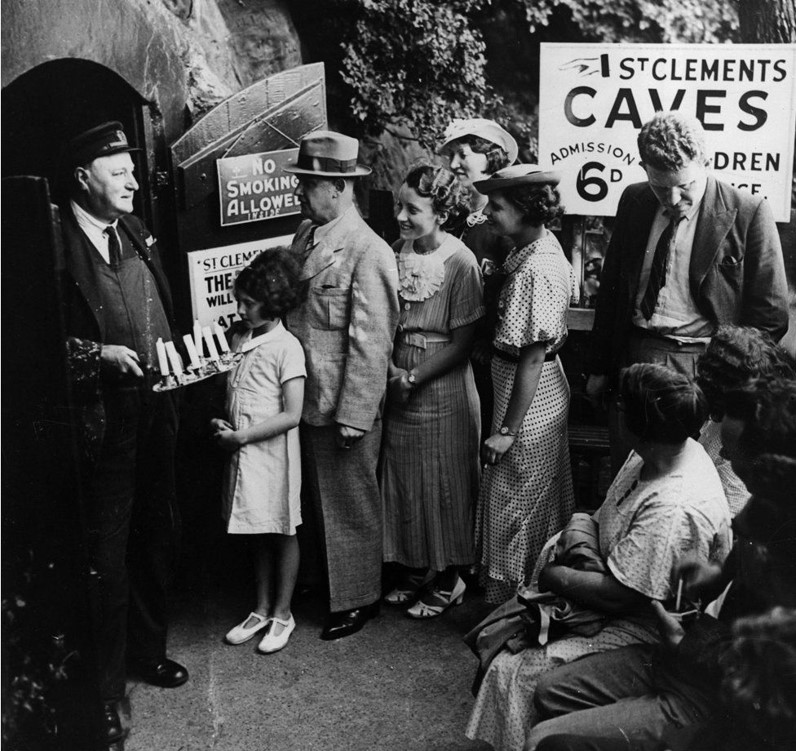
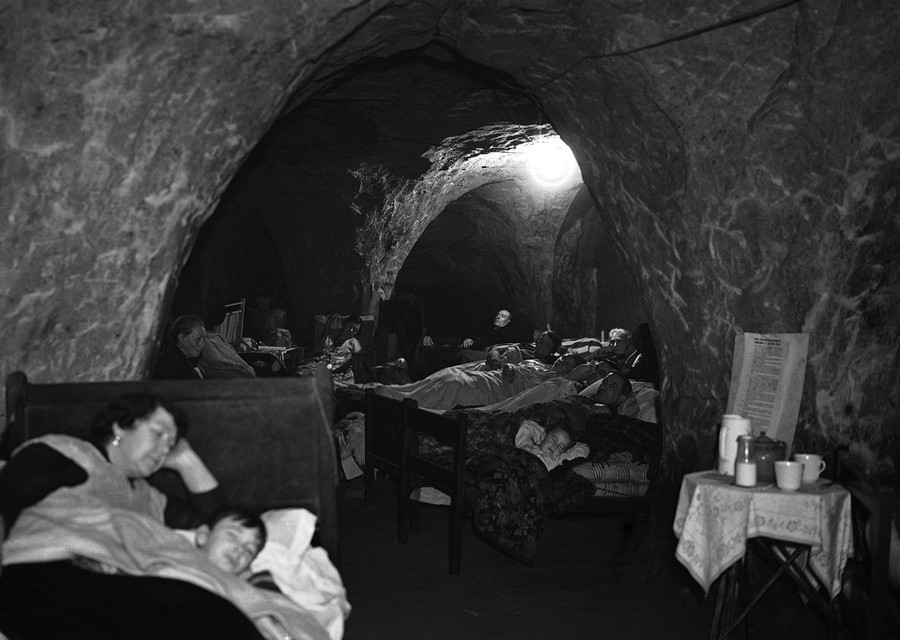
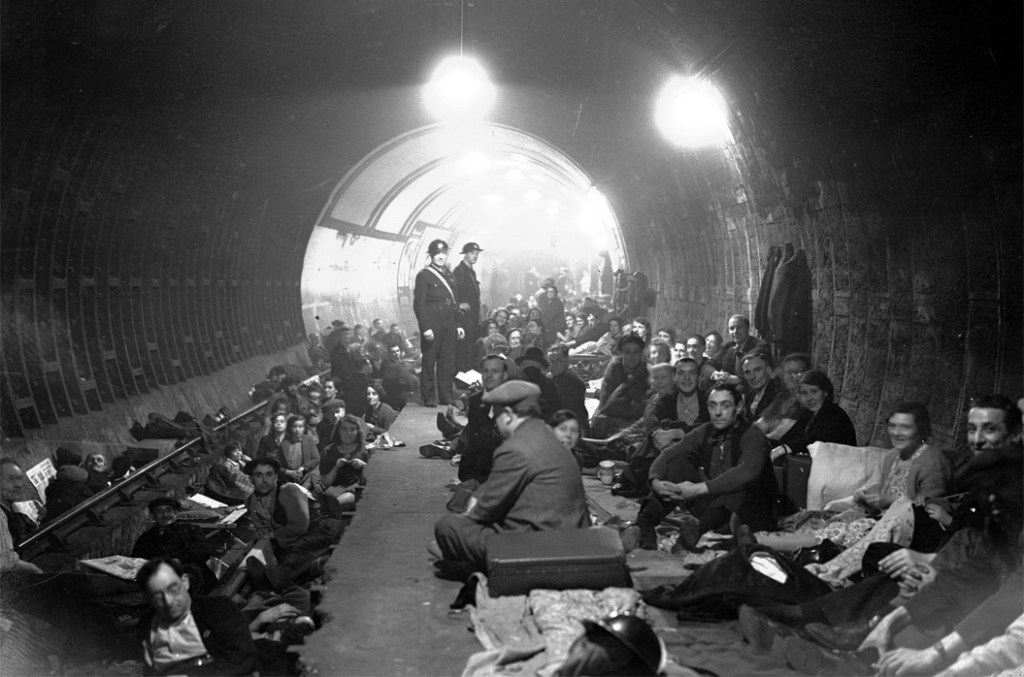
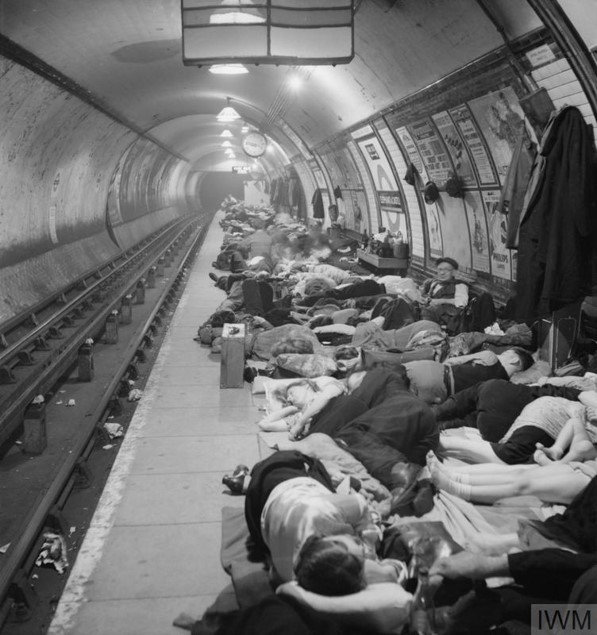
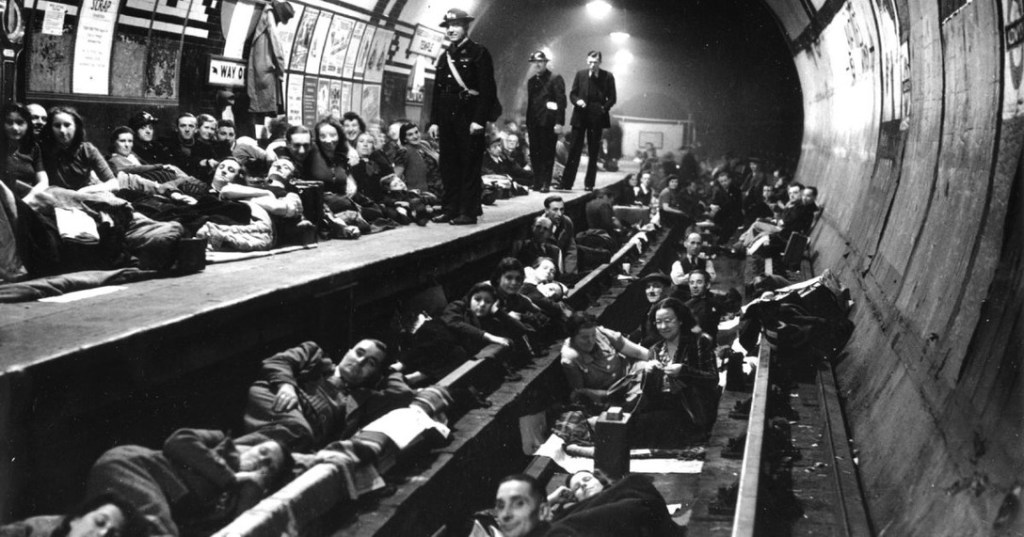
Anderson shelters & Morrison shelters did not always offer very good protection from high explosive bombs. Deeper shelters were needed, So, people also sheltered in:
8.
From the following videos you can learn more about alternative shelters during WW1.
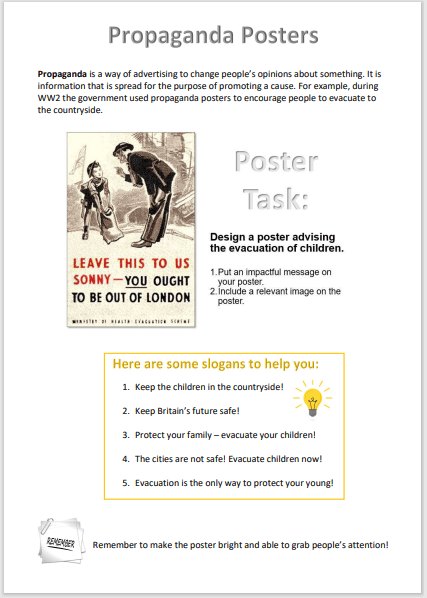
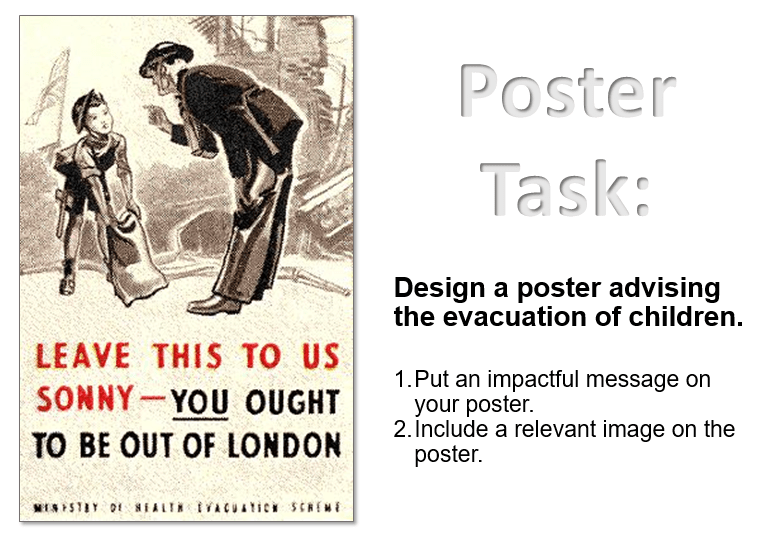
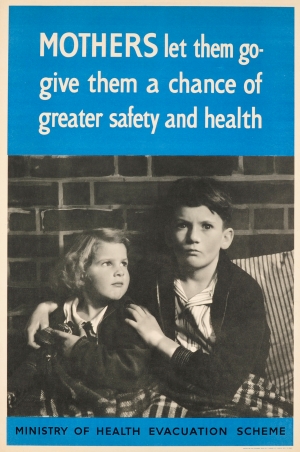
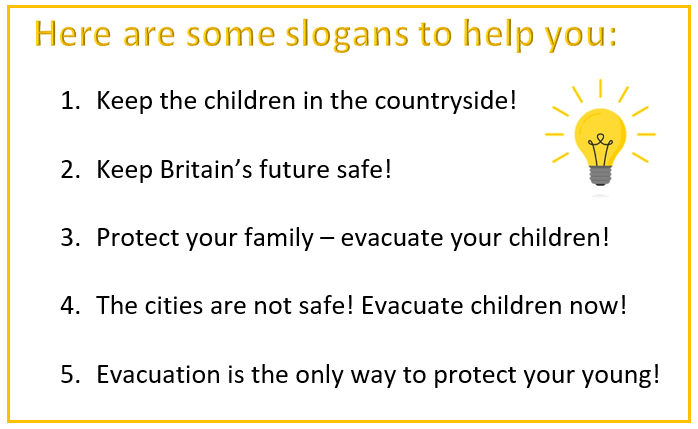
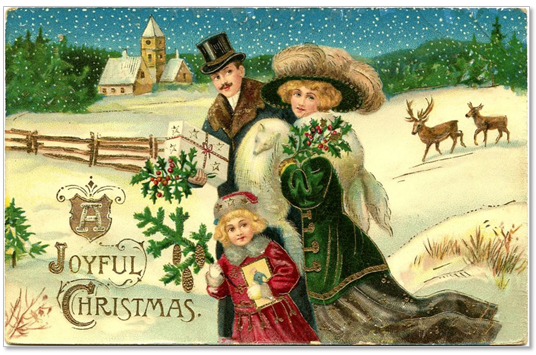
Design a poster (with a clever slogan) to encourage parents to send their children to the countryside. The poster must show your understanding of how important evacuation was. It must also be visually impressive!
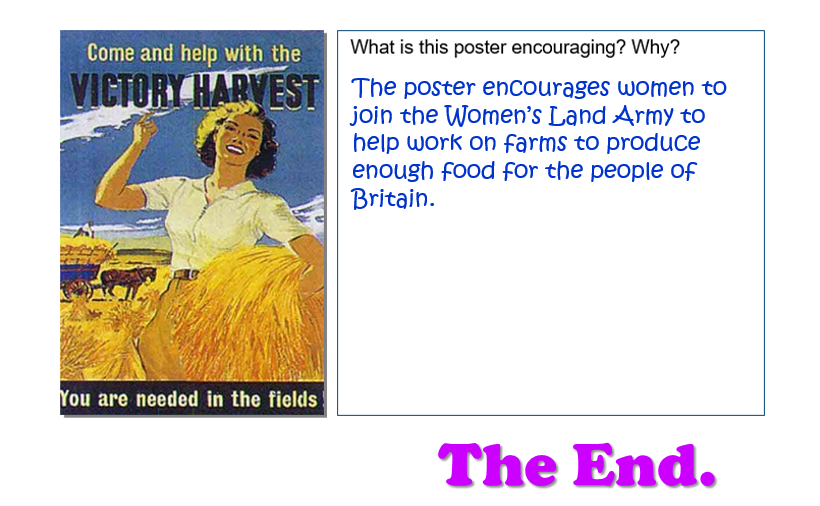
Propaganda is a way of advertising to change people’s opinions about something. It is information that is spread for the purpose of promoting a cause. For example, during WW2 the government used propaganda posters to encourage people to evacuate to the countryside.
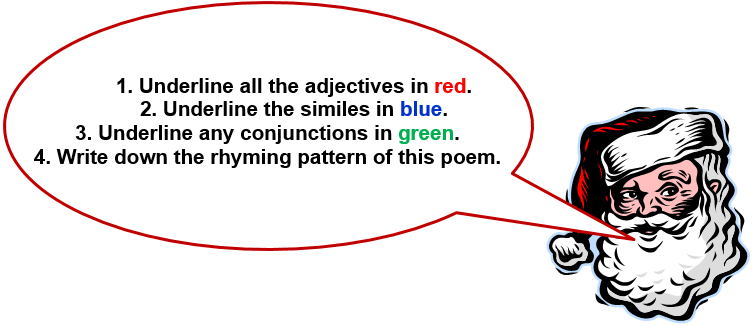
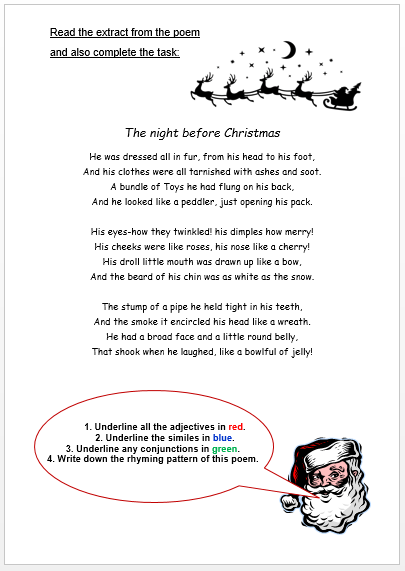
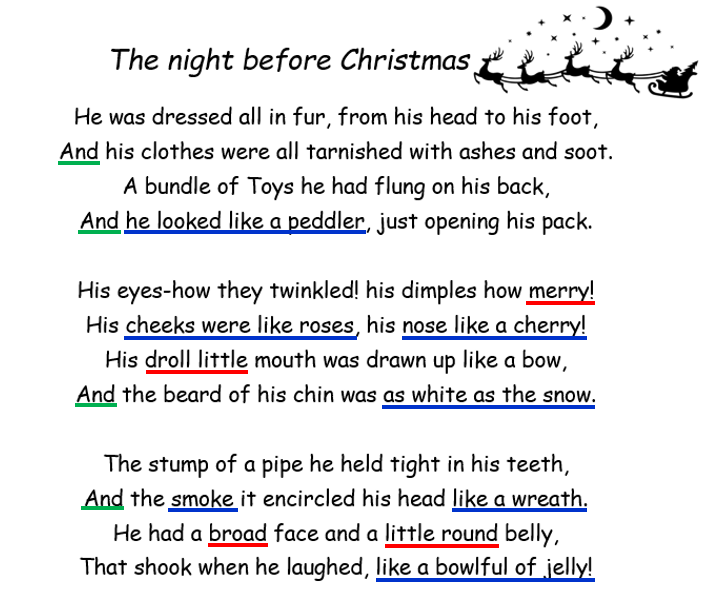
Read the information and instructions carefully. Then complete the task on A4 paper.
to …begin to plan & create descriptive language choices for our next task
to …record relevant information for Chapter 2
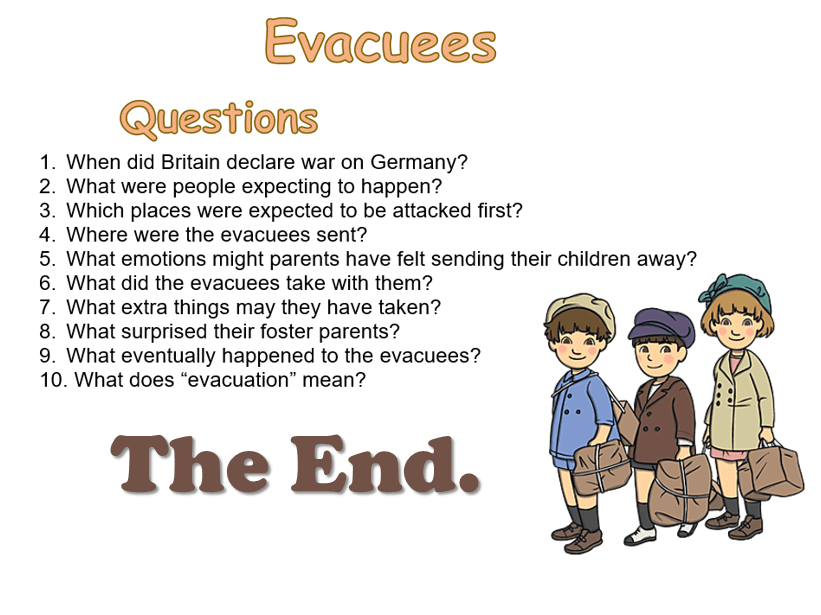
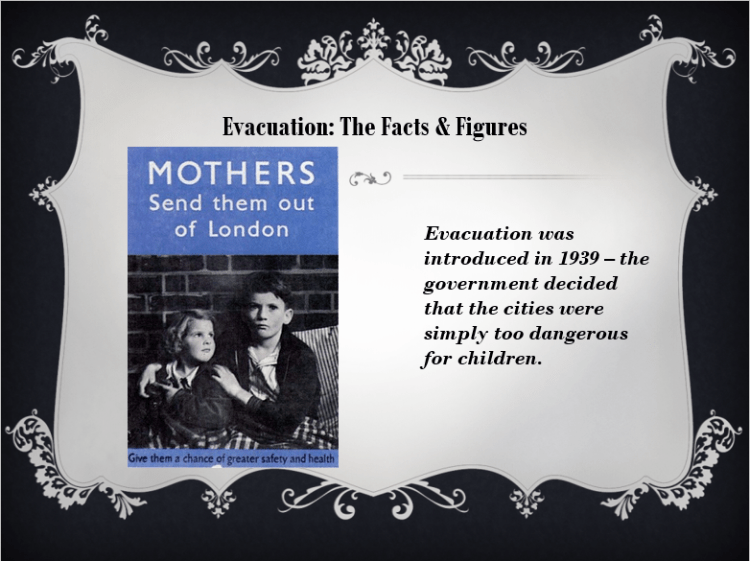
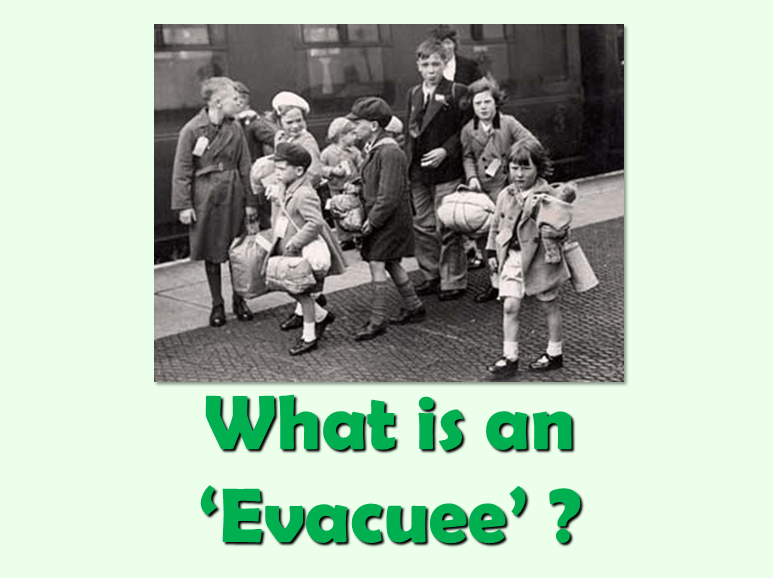
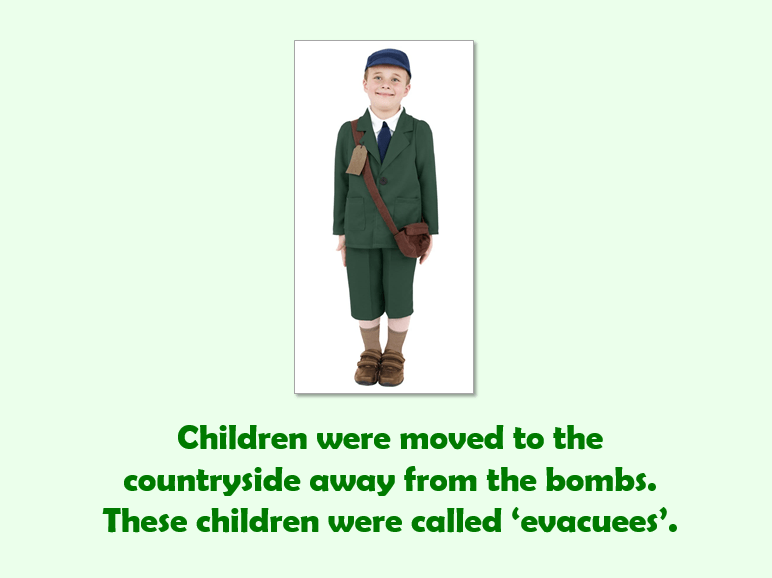
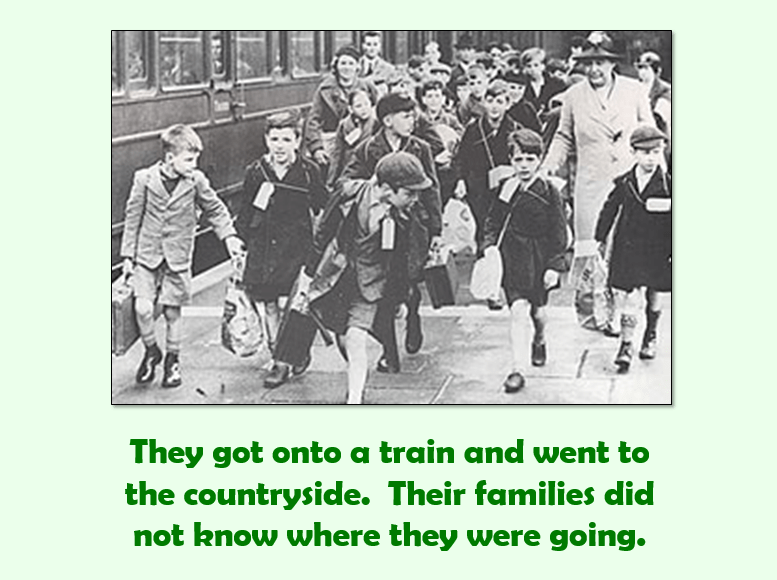
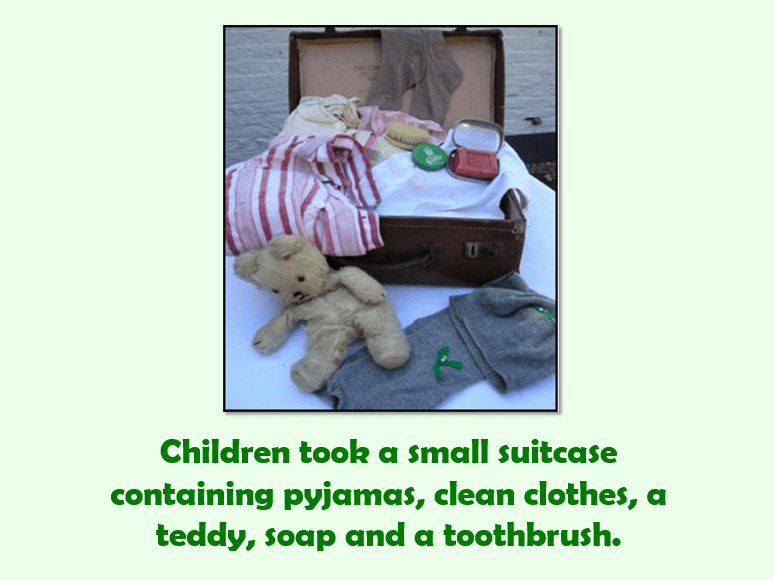
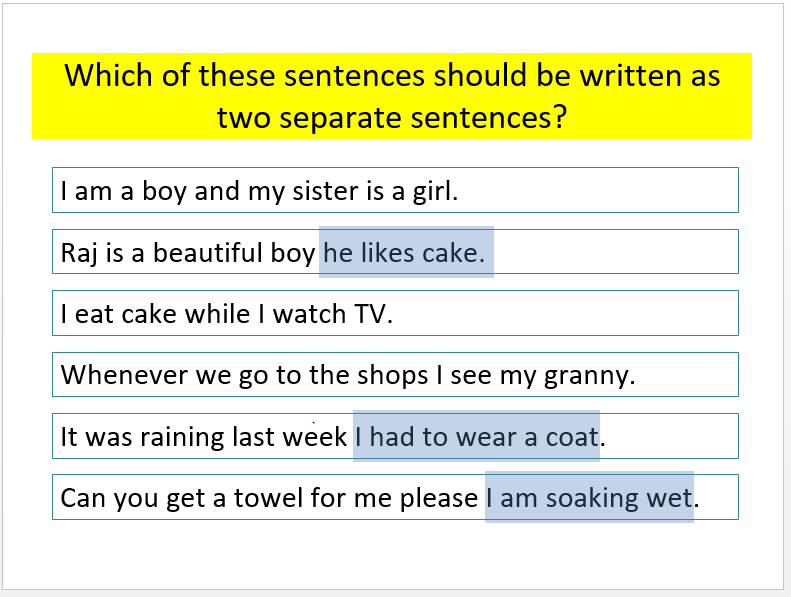
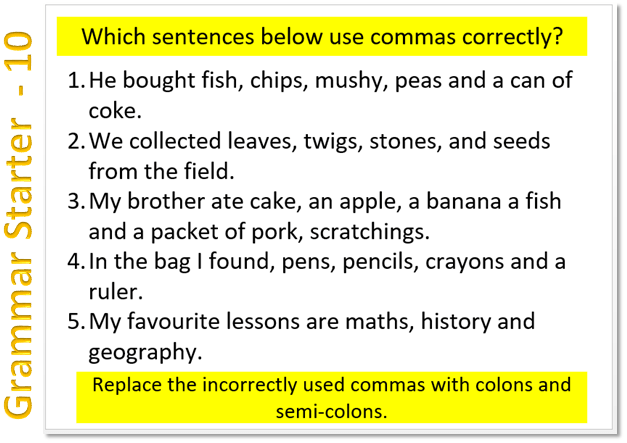
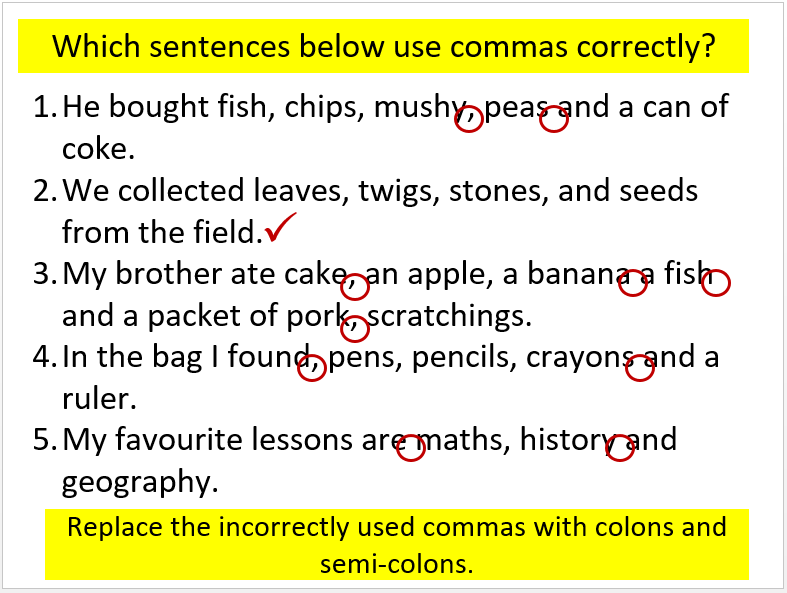
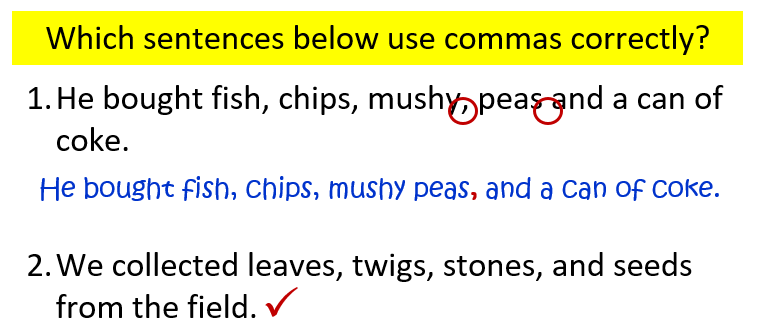
1.
A reminder…
2.
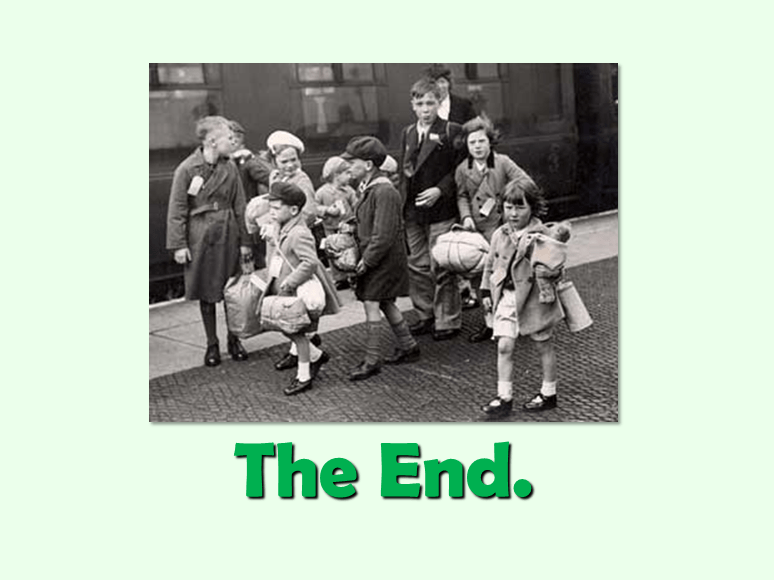
Let’s see what we can learn about the evacuations from the video below.
Evacuating The Children (1940). (1:13 minutes long)
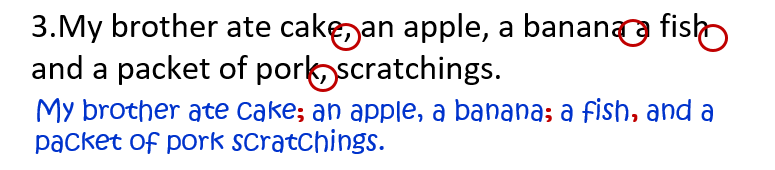
3.
You will now do a short play involving an interview with some evacuees on their way to the countryside. First decide who will take which part in the play. Then read the script in your group. Finally, prepare to show the short dramatization to the rest of the class.
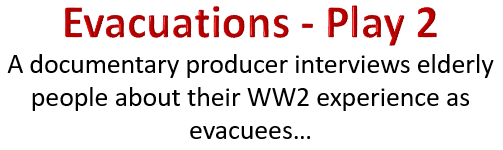
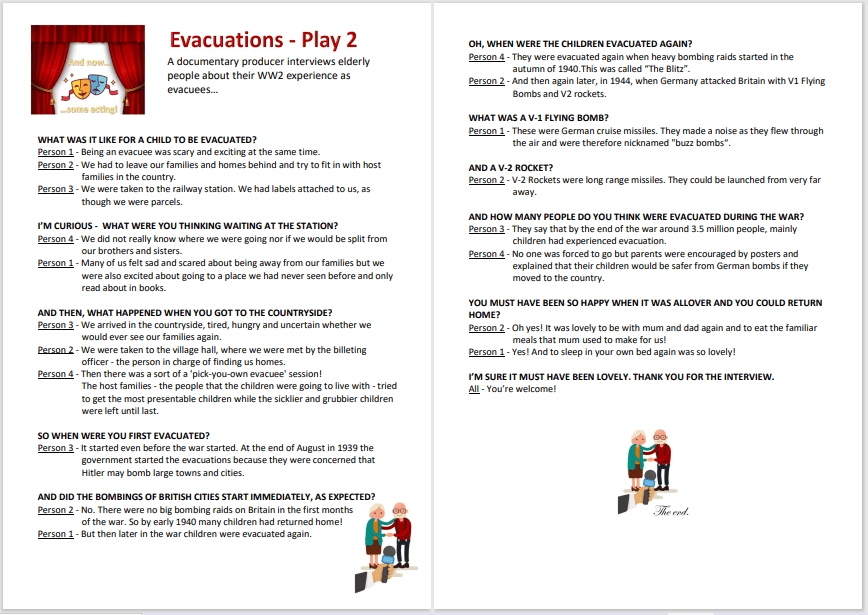
Let’s do another short play. This one is also an interview, but it involves elderly people who reflect on their experiences as evacuees. First decide who will take which part in the play. Then read the script in your group. Finally, prepare to show the short dramatization to the rest of the class.
Now, let’s do a rap about Evacuation! The rap also reflects on the experiences of evacuees. First decide who will take which part in the rap. Then read the script in your group. Finally, prepare to perform the rap to the rest of the class.
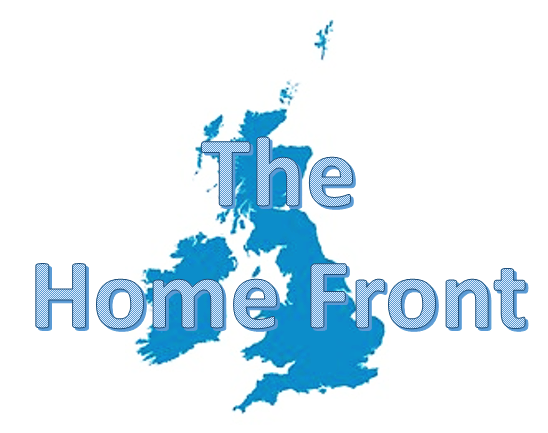
Today we are going to look at the “home-front” in more detail…
to learn what the home-front was
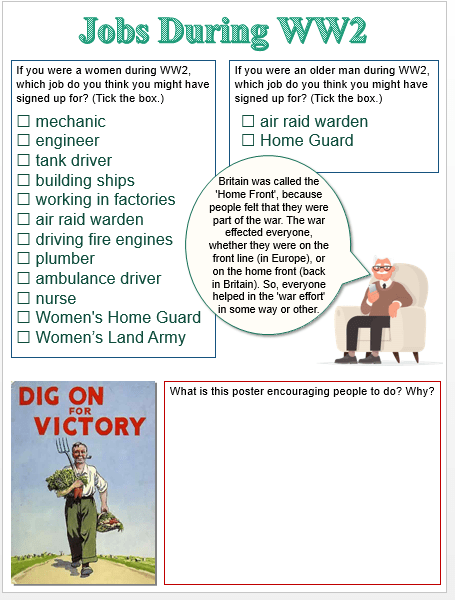
to examine what sort of jobs people did back in Britain to help in the war effort
1.
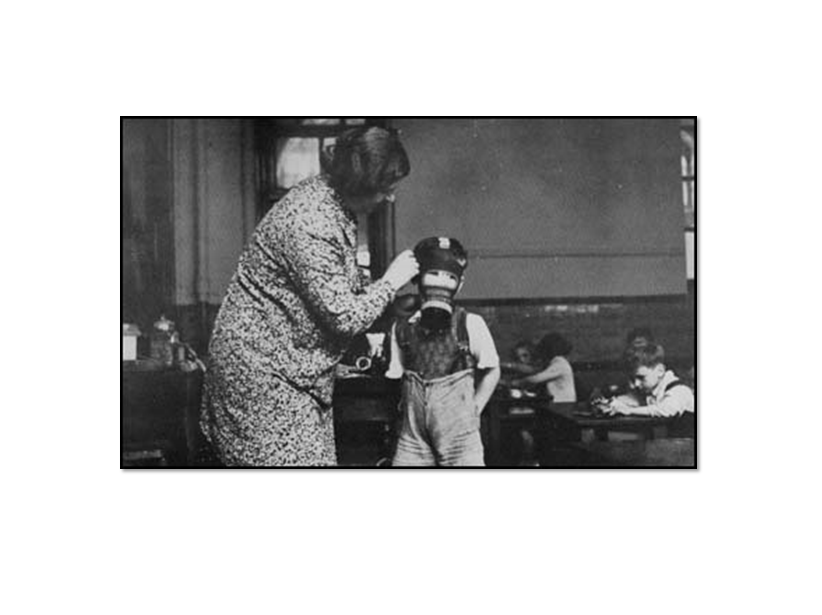
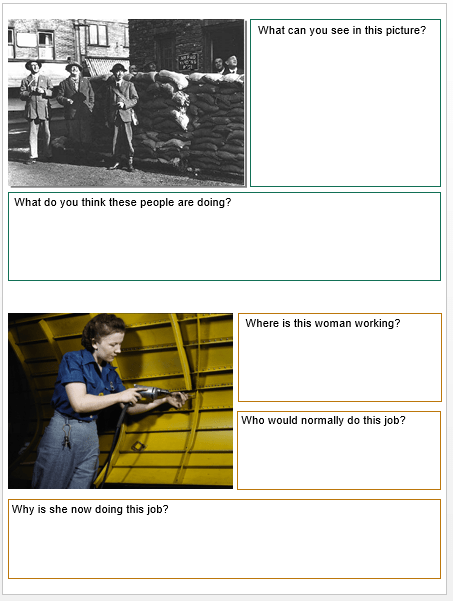
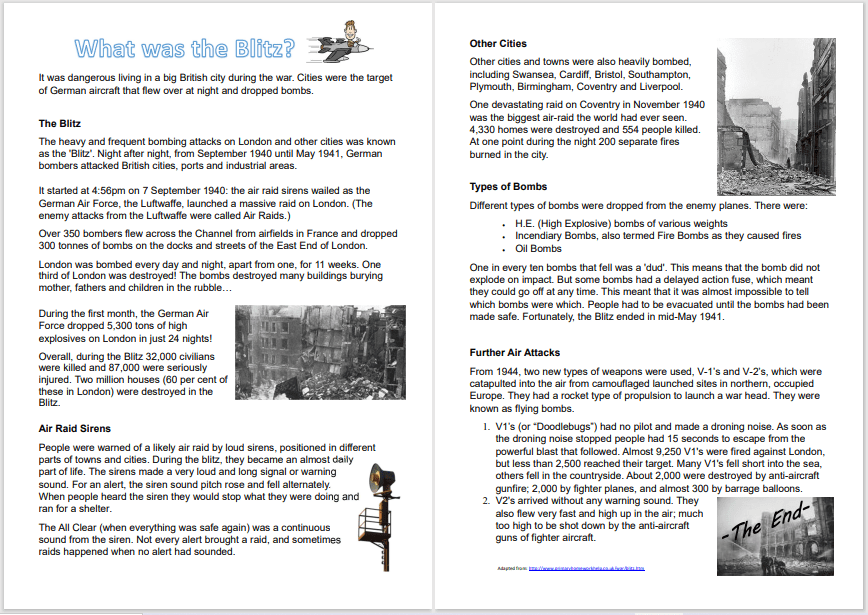
One can easily think that the ‘Home Front‘ must have been a safe place, but it was not because bombing raids destroyed homes and killed many people.
Everyone tried to help in the ‘war effort’. For example, because men were now fighting in the war, women helped to do a variety of jobs that would usually be done by men.
Men who were not fighting in battles on the main land did a variety of jobs on the home front. For example, some were ARP Wardens and other served in the Home Guard.
2.
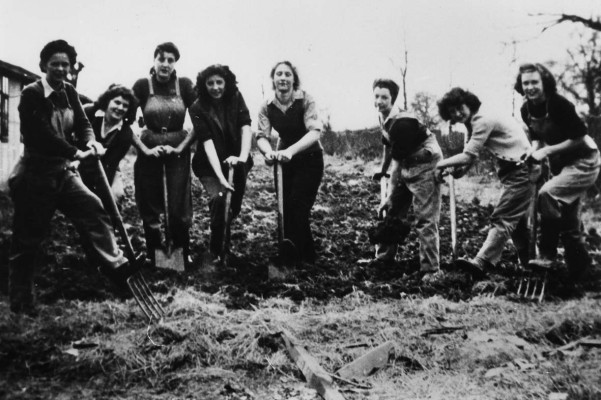
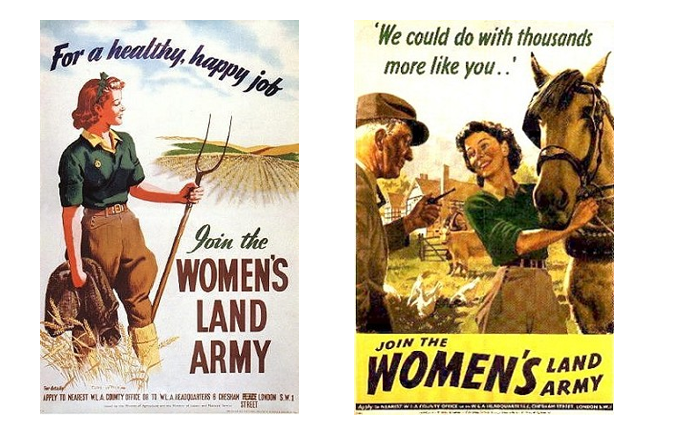
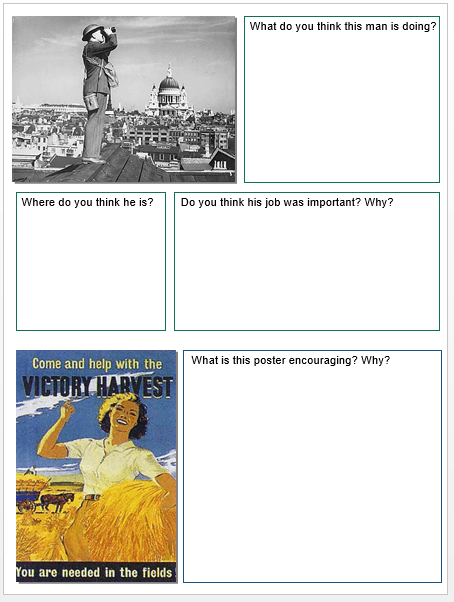
Let’s start by looking how women helped in the ‘war effort’ during WW2. Women help on the home front as “Land Girls”. This meant that they worked as farm workers.
With the men fighting on the battle fronts, more help was needed on farms in order to increase the amount of food grown within Britain. So, the government started what was called the Women’s Land Army.
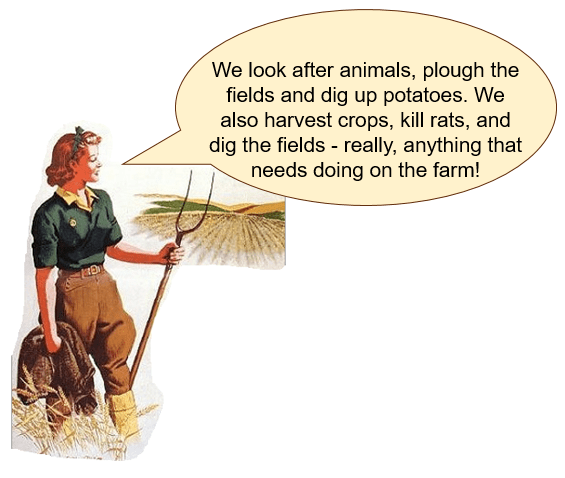
Here are some of the jobs the Land Army had to do:
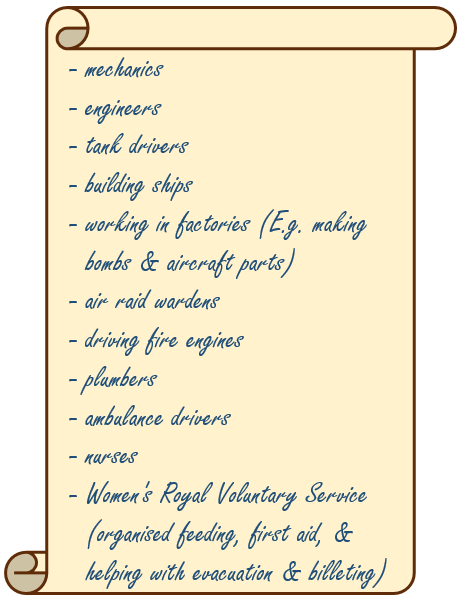
Women also had to do other important jobs. Here is a long list of some of the jobs women did during the war:
Before the war, job opportunities for women were limited, as most women were ‘housewives’. Those who were employed elsewhere were mainly nurses, domestic servants, or shop assistants.
However, as men joined the army to fight, women were called upon to fill their jobs.
3.
Let’s see what else we can learn about the role women played during the war.
How 80,000 women prevented… starving during WWII. (4:15 minutes long)
4.
And here is a fun song telling us more about women and WWII…
The WWII Girls Song. (2:16 minutes long)
5.
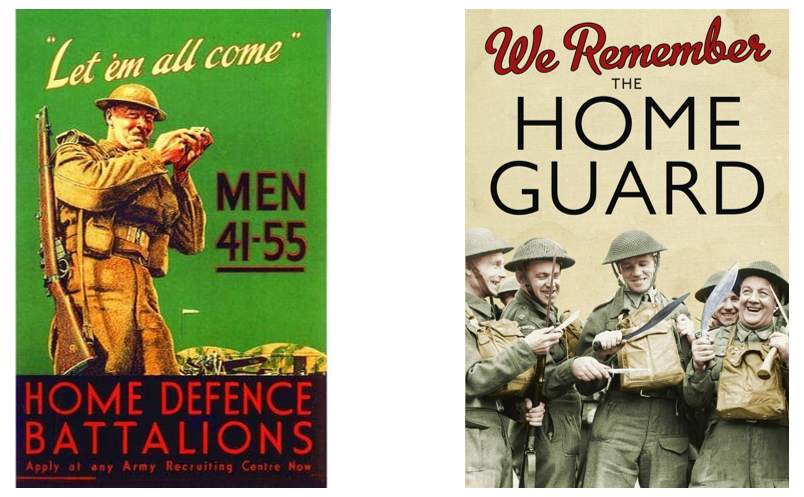
Let’s now also look at some of the jobs men did on the home front. For example, some men were ARP Wardens, and others were part of the Home Guard.
6.
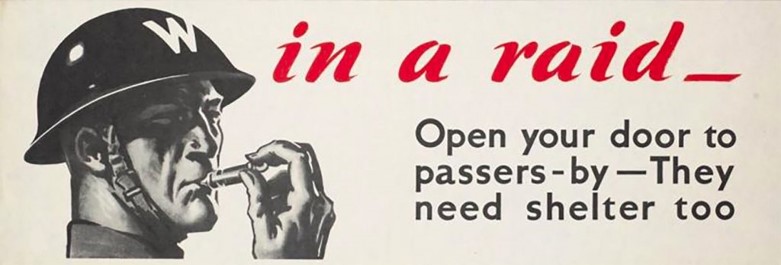
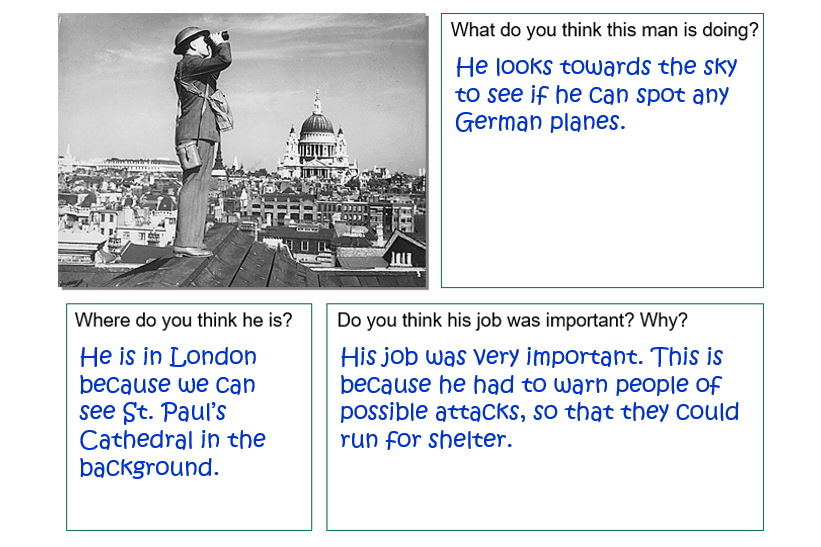
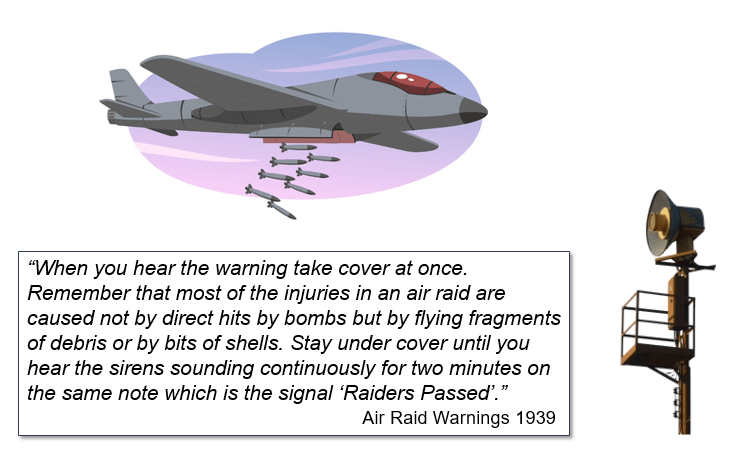
The ARP Wardens supervised the Blackout – they had to protect civilians from the danger of air-raids. (ARP stands for Air Raid Precaution.)
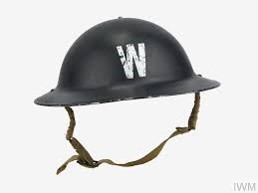
One could recognise an ARP Warden by the helmet: they wore helmets with a big W on the front.
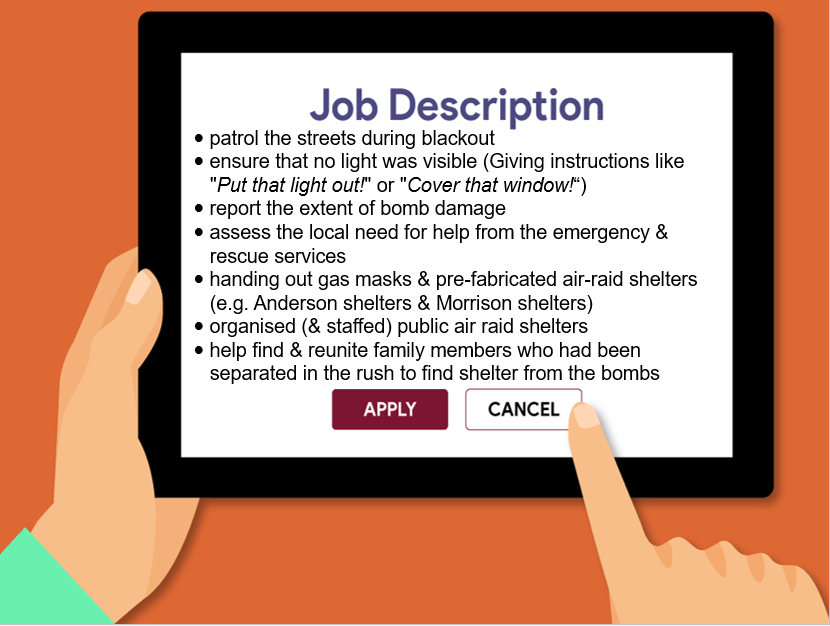
So, what exactly did ARP Wardens have to do?
Around 200,000 people volunteered to become ARP wardens. Some women were also ARP wardens. Eventually there were 1.4 million ARP wardens in Britain. Most ARP wardens were part time volunteers who had full time day jobs.
7.
Watch the following video clips to learn more about the ARP Wardens.
-1-
Liverpool ARP Warden. (2:16 minutes long)
-2-
Air Raid Warden. (3:50 minutes long)
8.
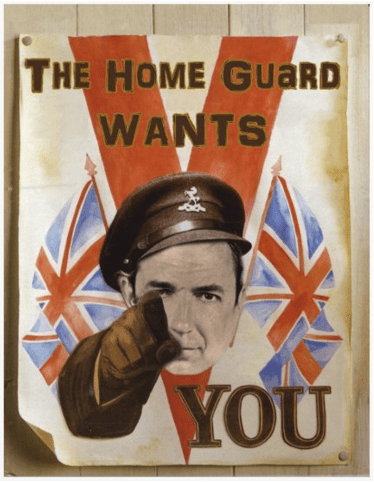
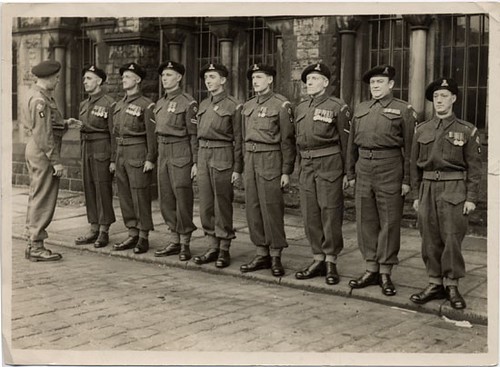
The Home Guard were volunteers who defended the five thousand miles of Britain coastline in case of invasion by Germany. Some of these men were in their sixties!
The men were given military style training. At first, they had no uniforms and little equipment. The public were invited to give their shotguns and pistols to the Home Guard and within a few months over 20,000 weapons were handed in. Many of the men made their own weapons too.
Who joined?
Many of the men who joined the Home Guard were those who could not join the regular army because their day time jobs were necessary to keep the country running. They included farm workers, bakers, teachers, grocers, bank staff and railway workers.
Other men who joined were either to young or too old to join the regular army.
In 1942 the Women’s Home Guard Auxiliaries were formed, and women were able to work with the Home Guard.
So, what exactly did the Home Guard have to do?
9.
Here are five top facts about the Home Guard!
The Home Guard – Top 5 Facts. (3:23 minutes long)
10.
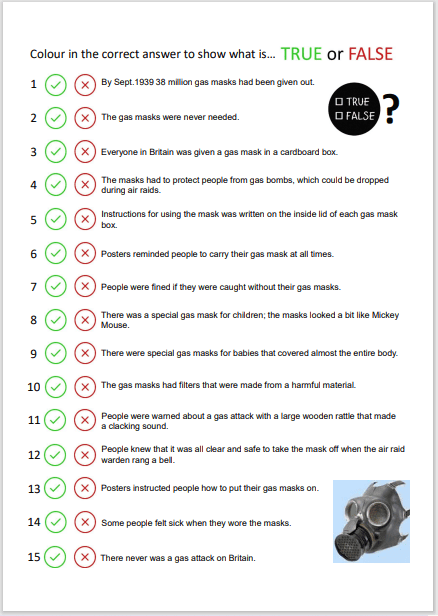
Complete the following worksheet to test your understanding of jobs that people did on the Home Front during WWII.
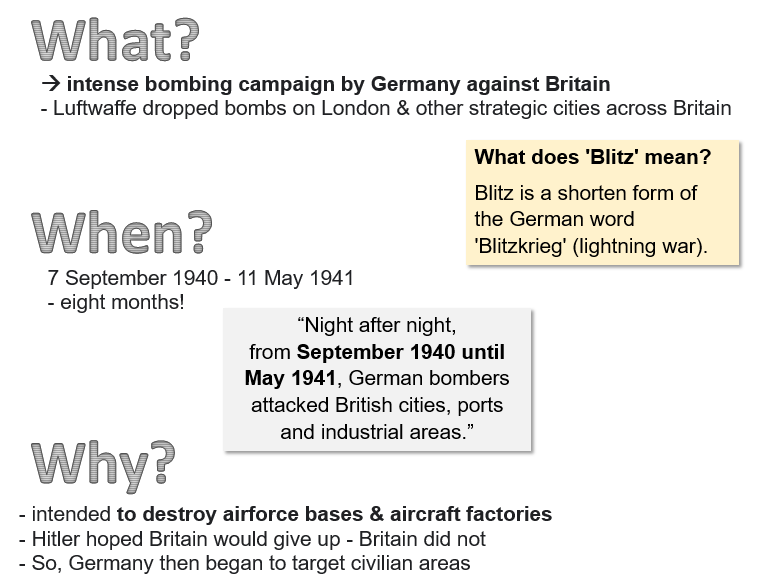
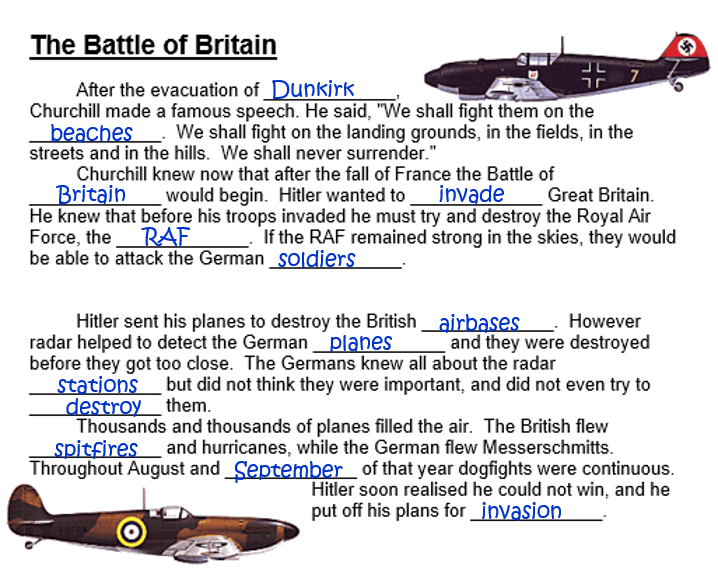
Today we are going to look at the Battle of Britain in more detail. WHY? Because our study will now focus more on Britain’s “home-front” involvement in the war.
to learn about Hitler’s plans to invade Britain
to examine the Battle of Britain in more detail
to introduce the Blitz
DID YOU KNOW…?
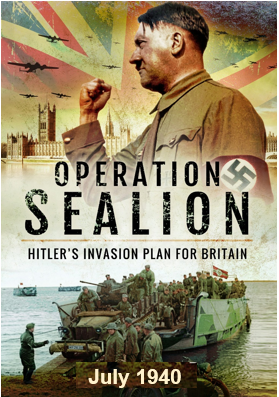
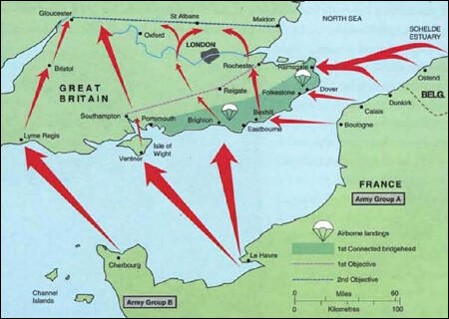
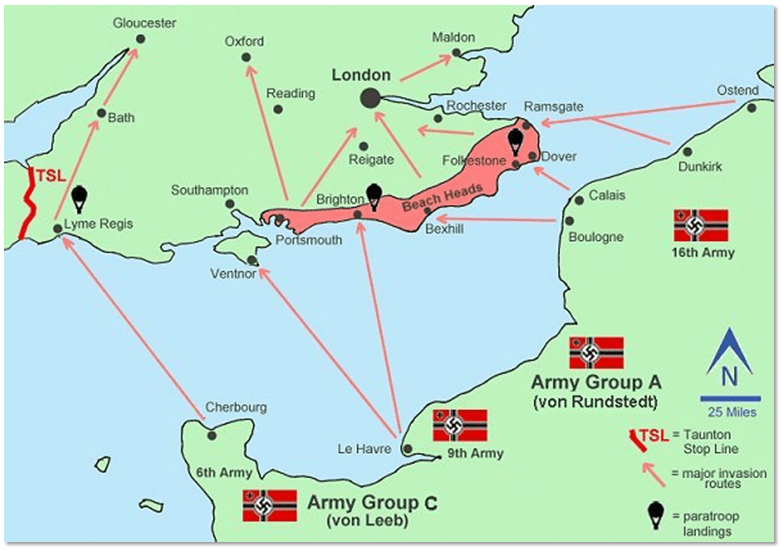
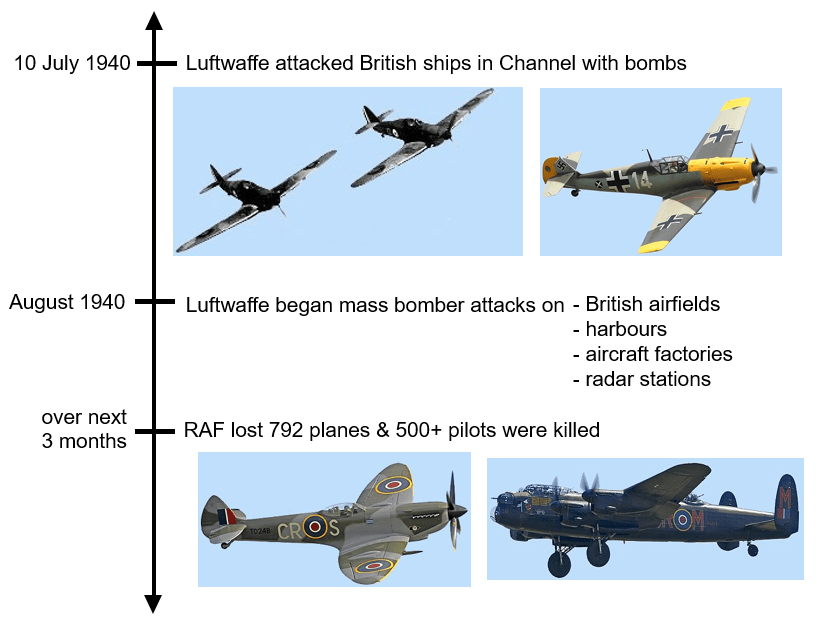
1.
Hitler wanted to invade Britain. So he came up with a plan.
It was called….
This is what Hitler planned to do:
First: the Luftwaffe (German air force) would destroy the RAF (Britain’s Royal Air Force)
(The invasion of Britain would be much easier if the RAF has been destroyed.)
Then: Navy would invade Britain
SO…this was the plan:
destroy the British air force
thus stop it sinking the ships that would carry German soldiers across the Channel
Once the Luftwaffe had destroyed the Royal Air Force (RAF) a sea and airborne invasion of Britain would begin…
2.
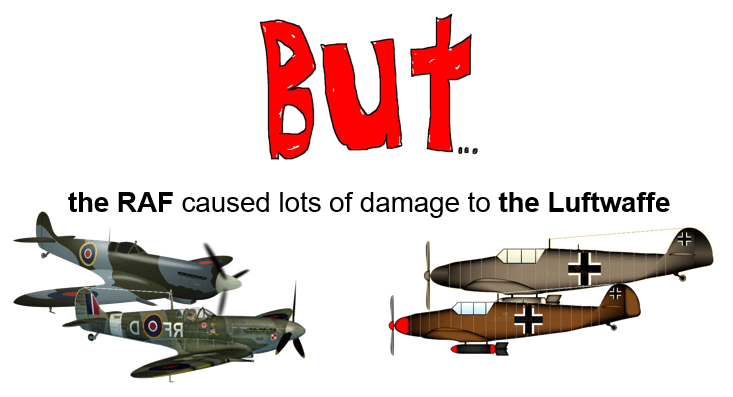
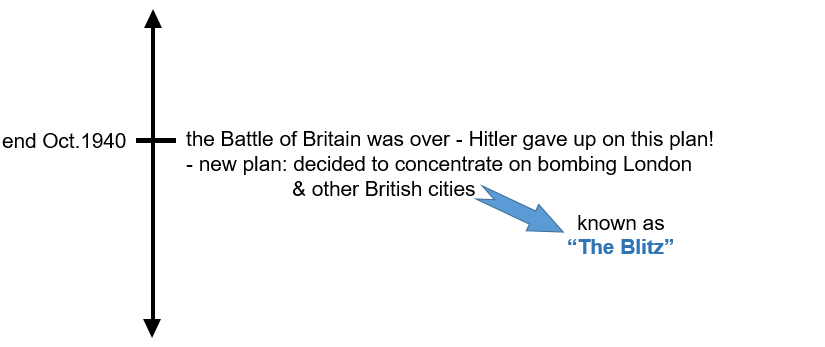
This is how the Battle of Britain developed:
3.
Let’s see what we can learn from the following videos about the Battle of Britain.
-1-
What was the Battle of Britain? (2:08 minutes long)
-2-
The Battle of Britain. (2:25 minutes long)
4.
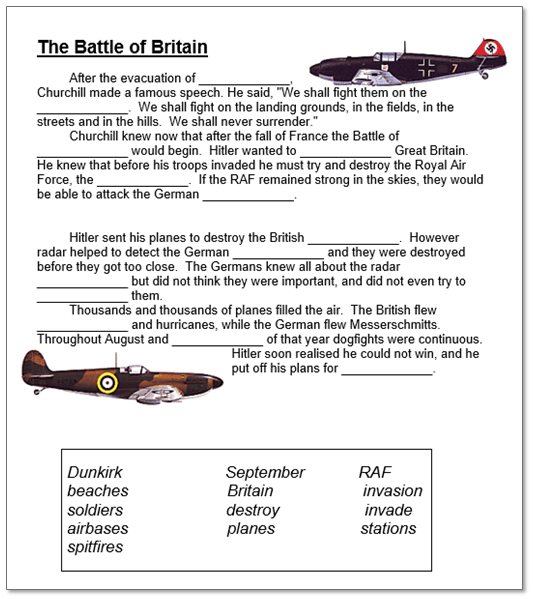
Complete the following task to test your knowledge of the Battle of Britain.
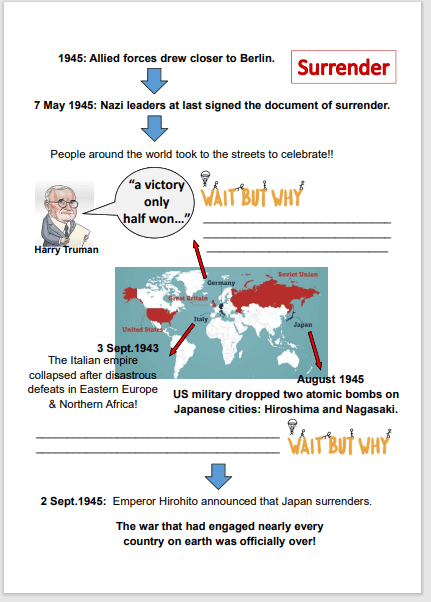
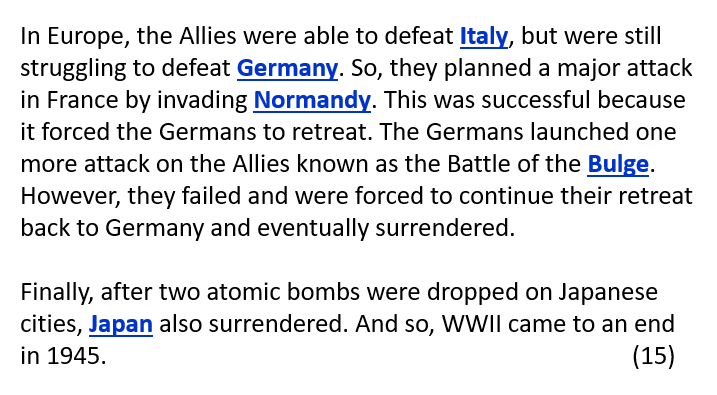
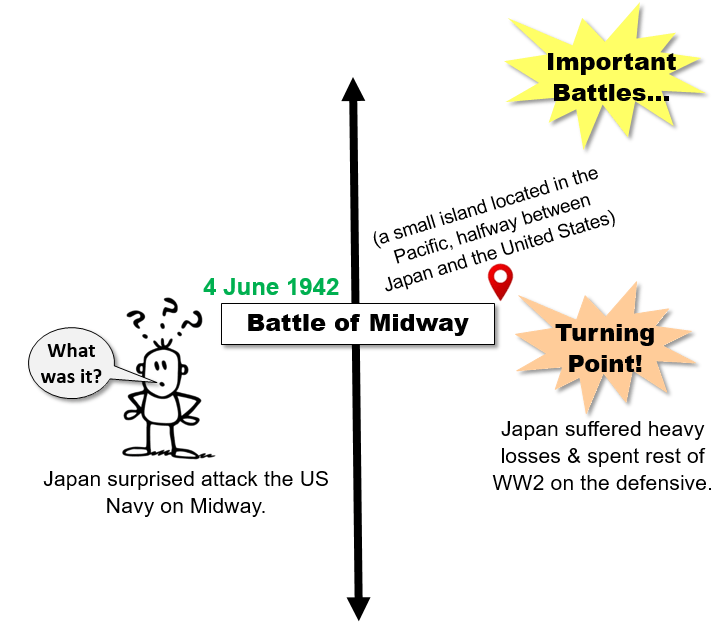
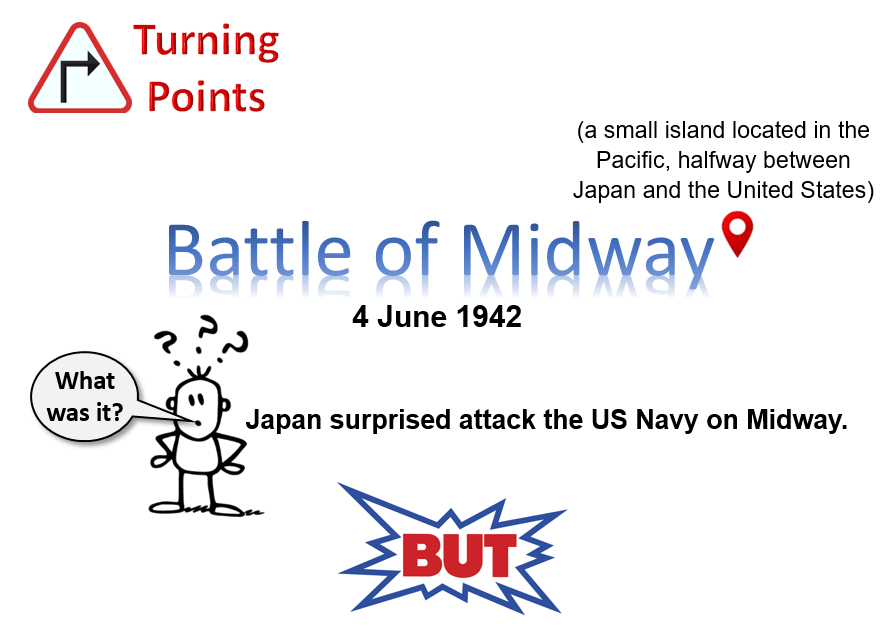
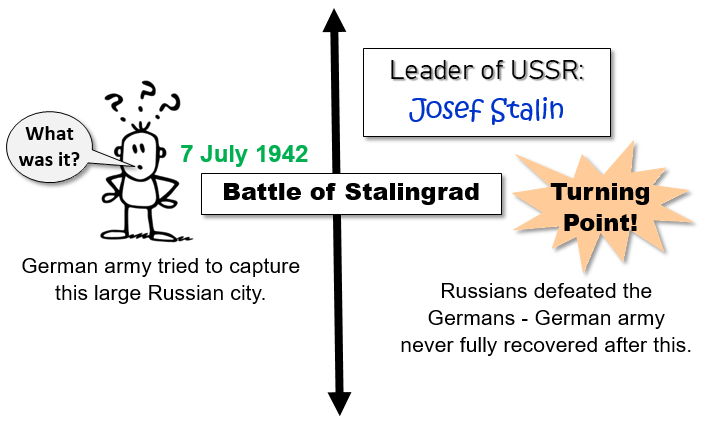
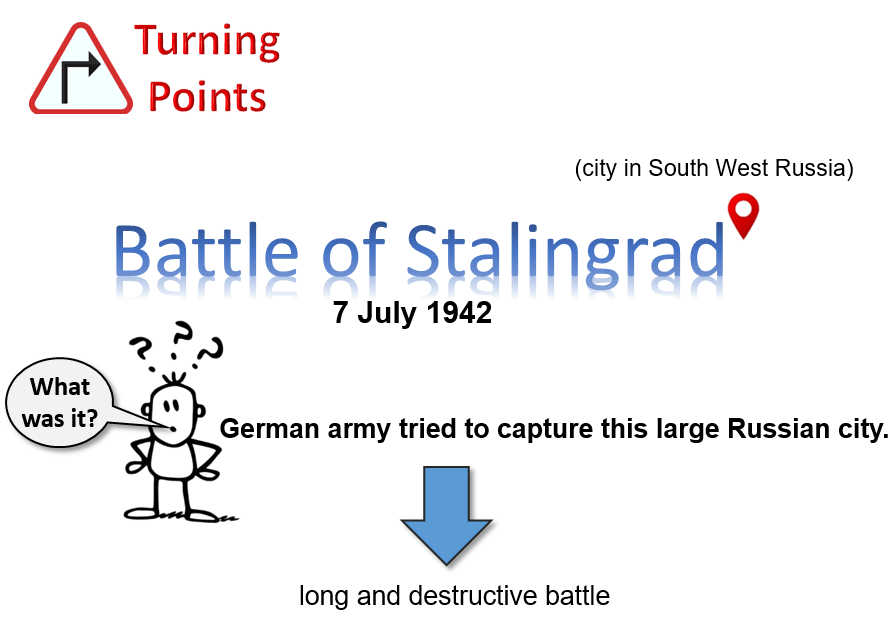
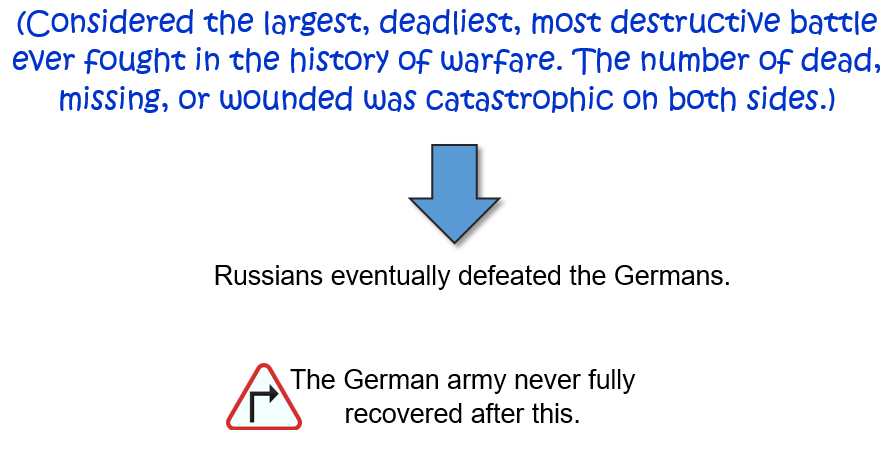
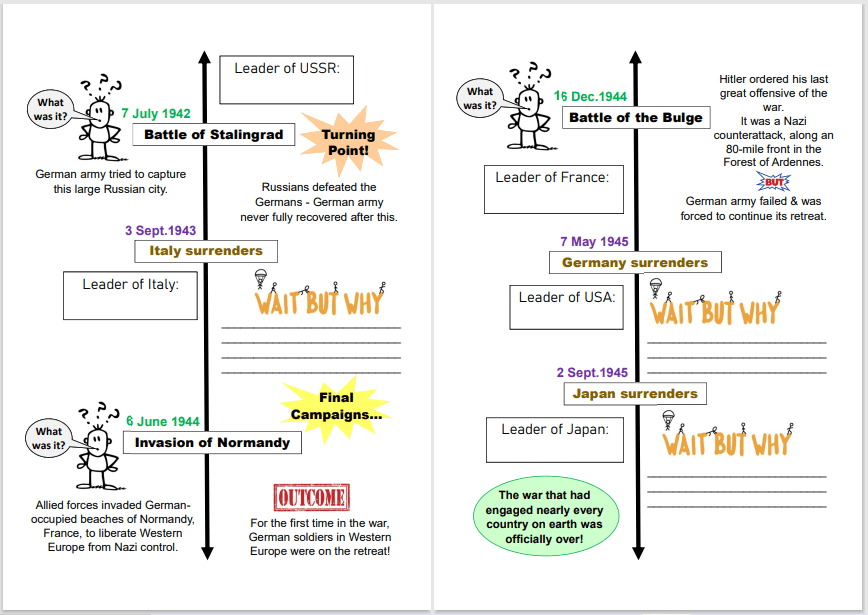
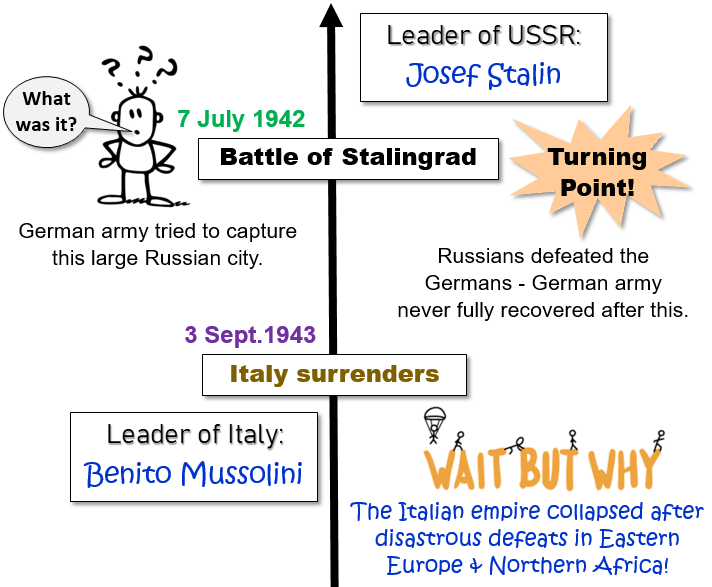
You can learn more about the Battle of Stalingrad by looking at the following film clip…
Battle of Stalingrad. (2:28 minutes long)
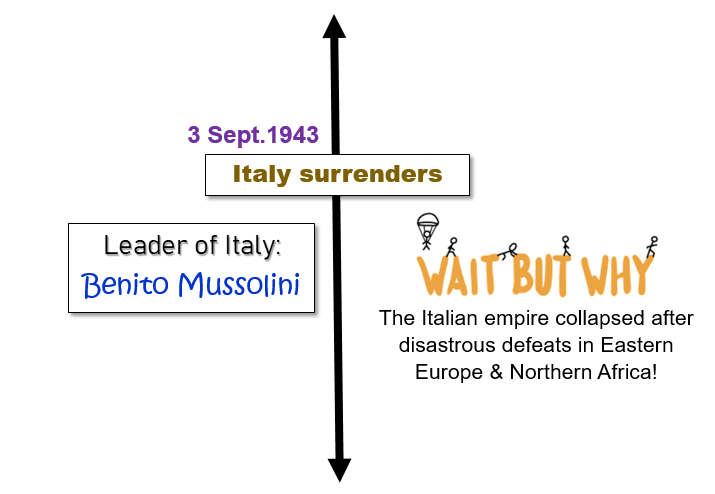
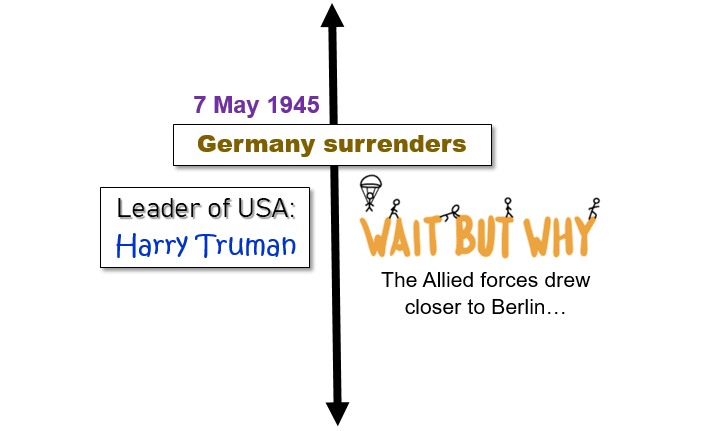
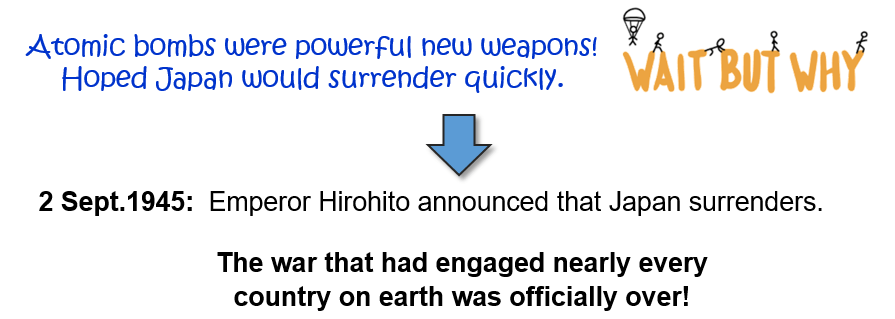
8.
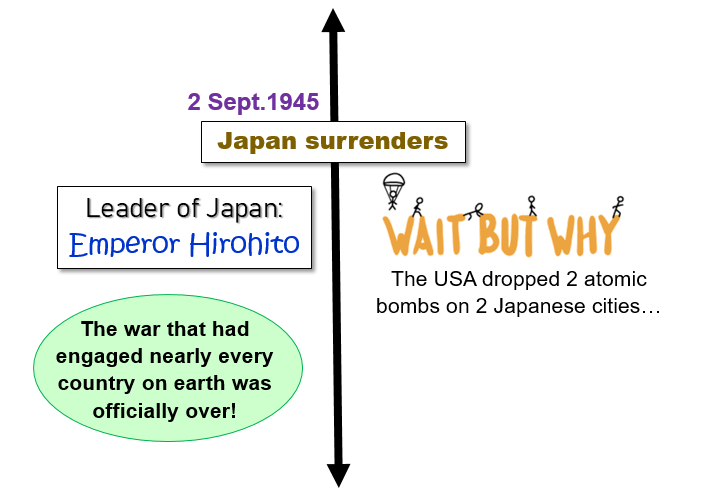
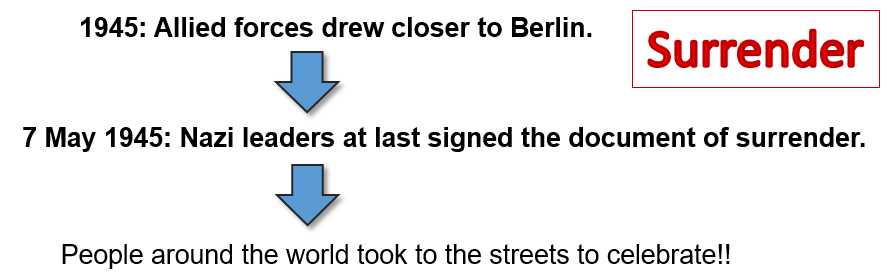
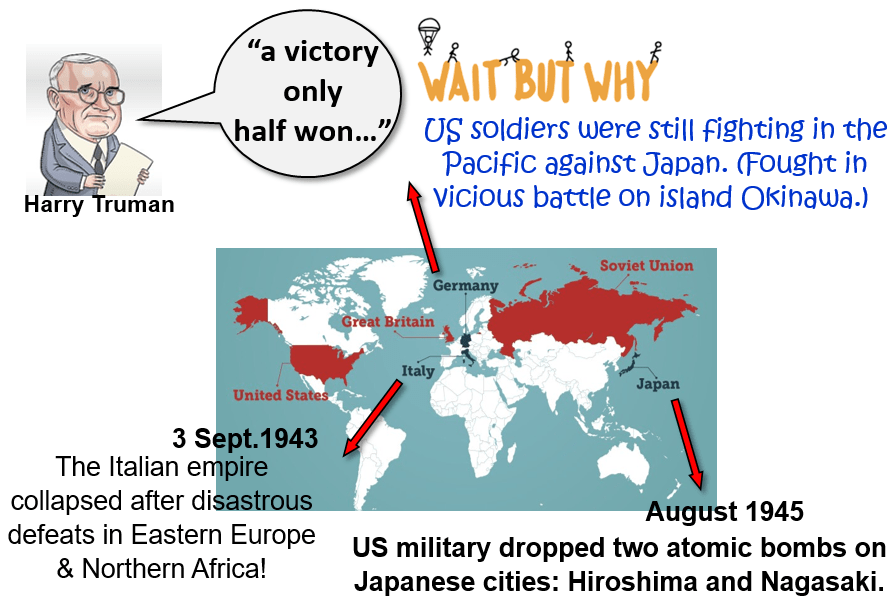
What happened next was perhaps the beginning of the end for the Axis powers. However, it would be two more years (almost to the day) before WW2 would be officially over!
9.
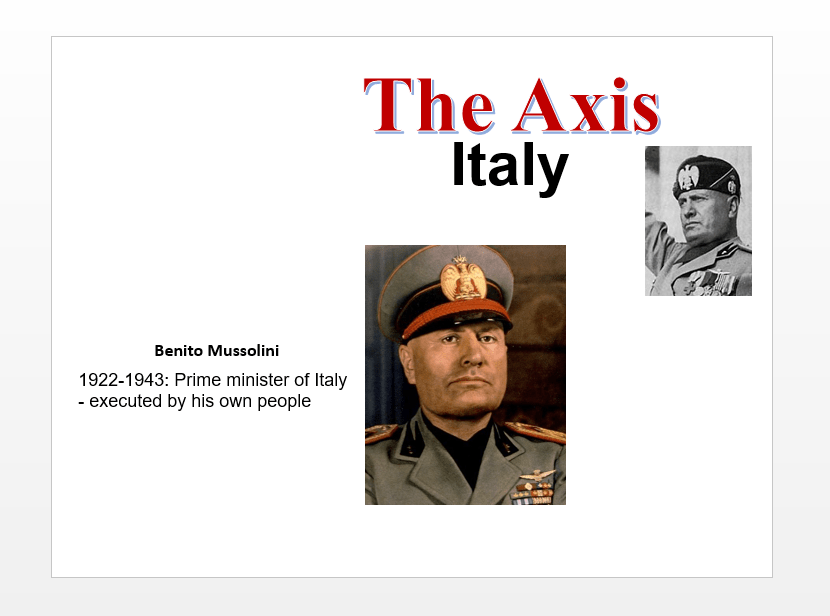
Here is a little bit about Italy’s defeat…
The World Wars – The Downfall of Mussolini and Italy’s defeat. (2:42 minutes long)
You can learn more about the Battle of Britain by looking at the following film clips…
-1-
The Battle of Britain Explained. (2:44 minutes long)
-2-
RAF Pilot Song. (2:47 minutes long)
-3-
The Battle of Britain. (2:25 minutes long)
5.
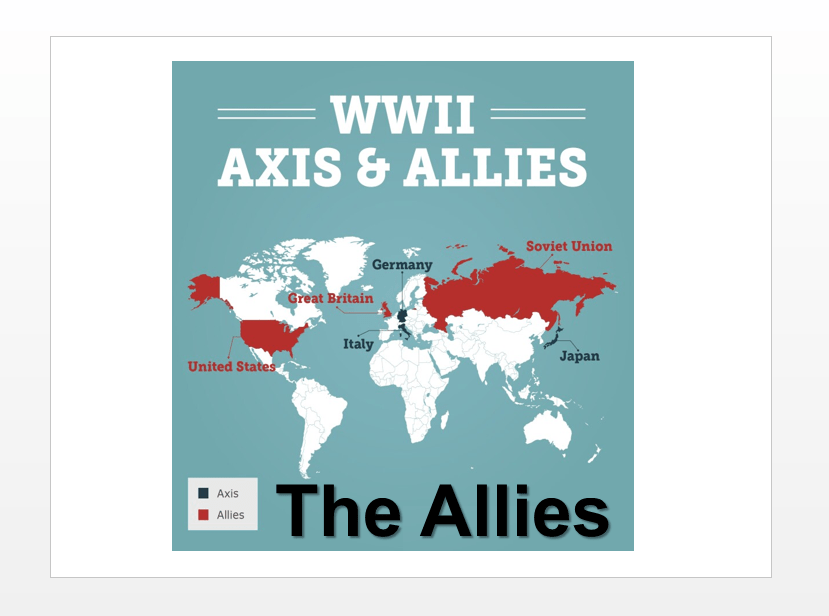
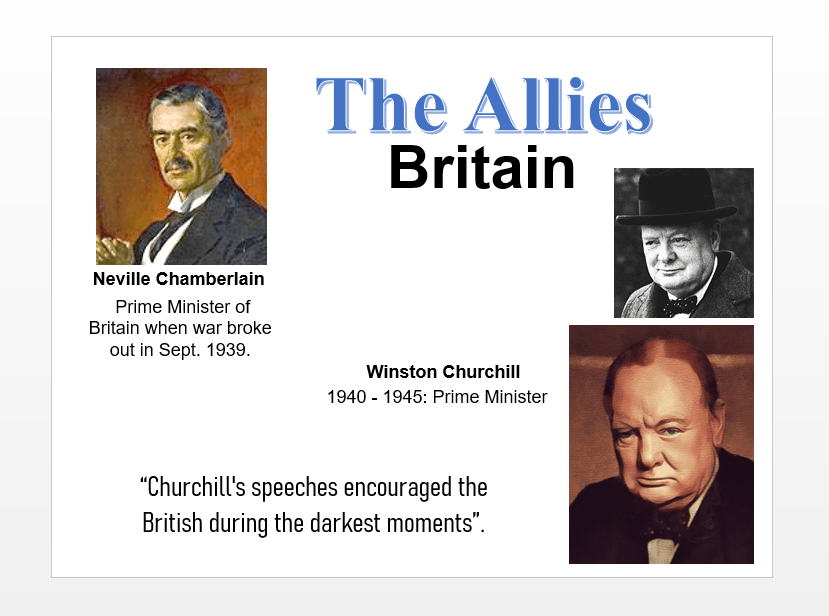
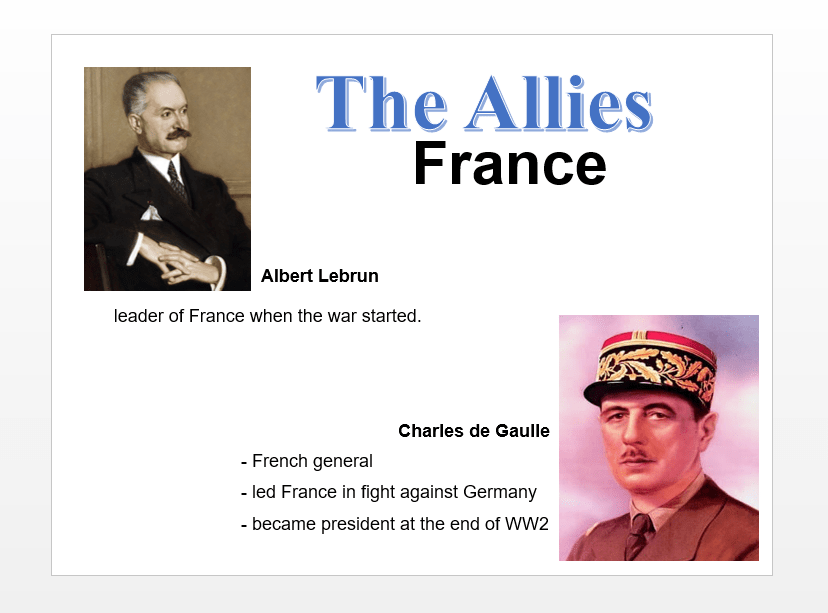
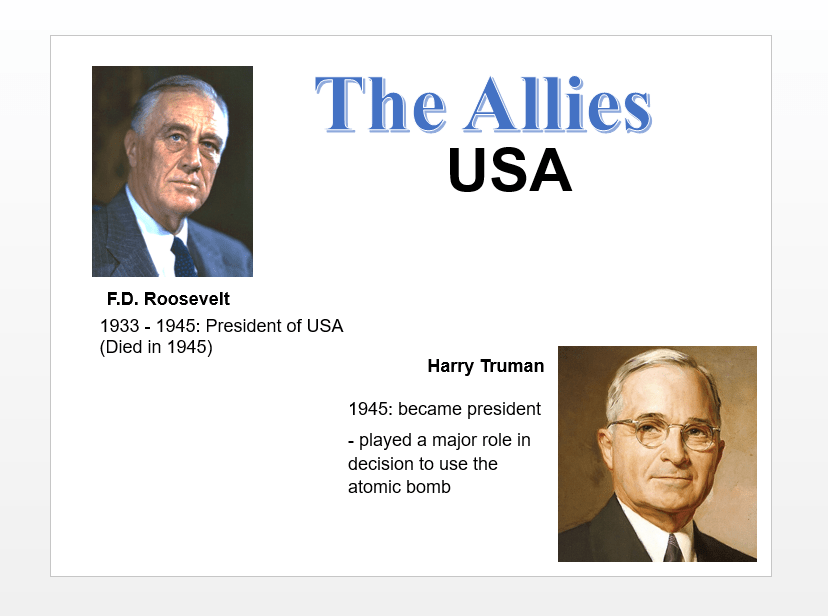
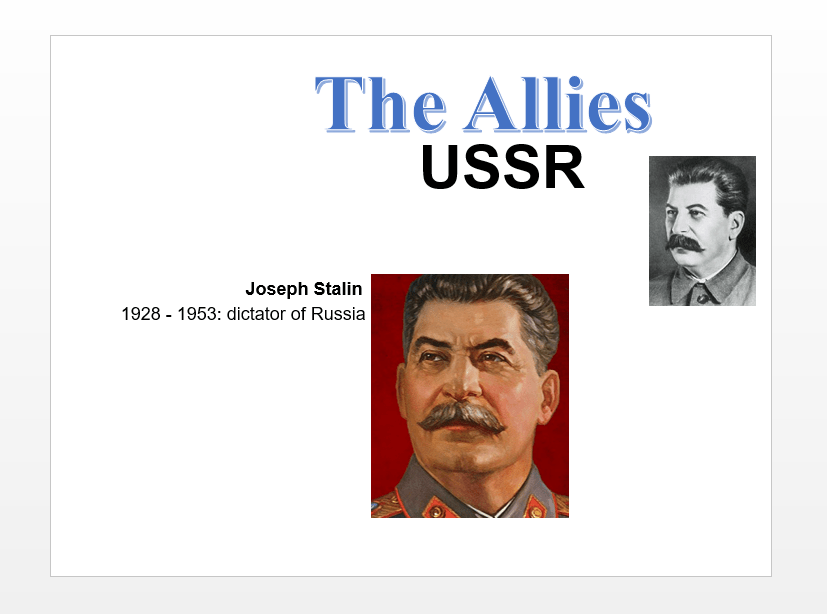
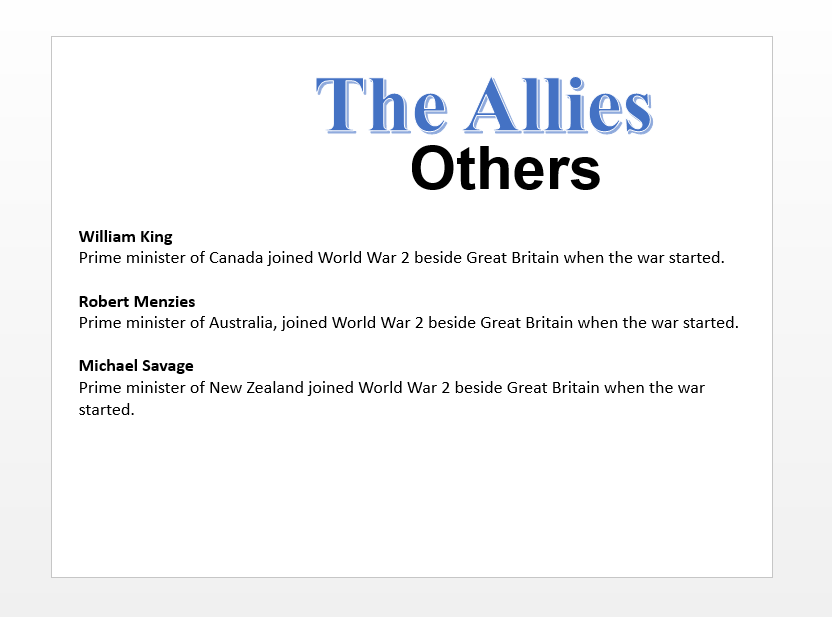
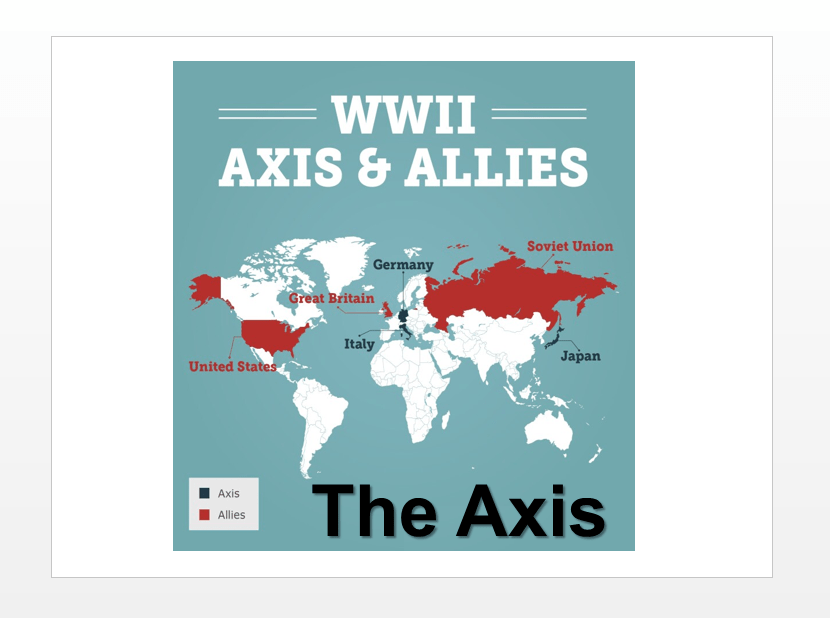
Can you remember who were Britain’s main allies?
France
the USSR
the USA
6.
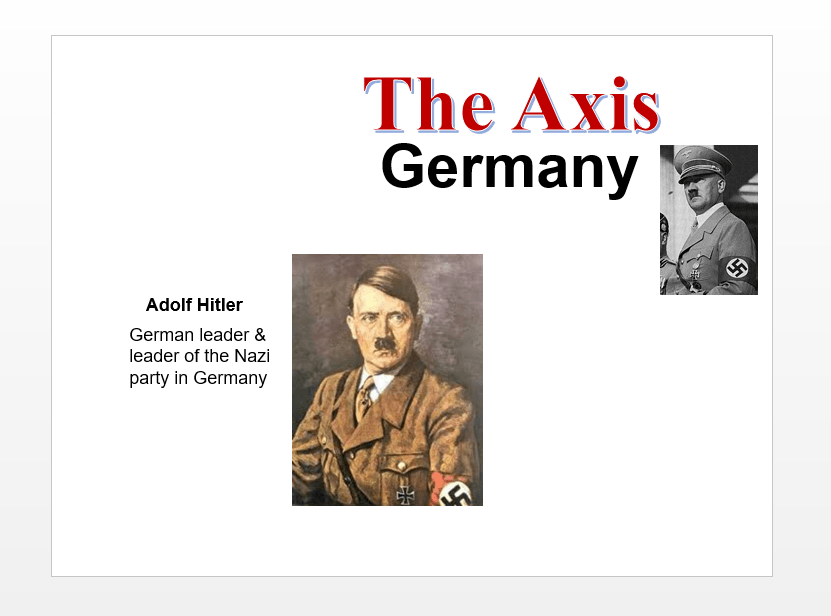
Can you remember who were Germany’s main allies?
Italy
Japan
7.
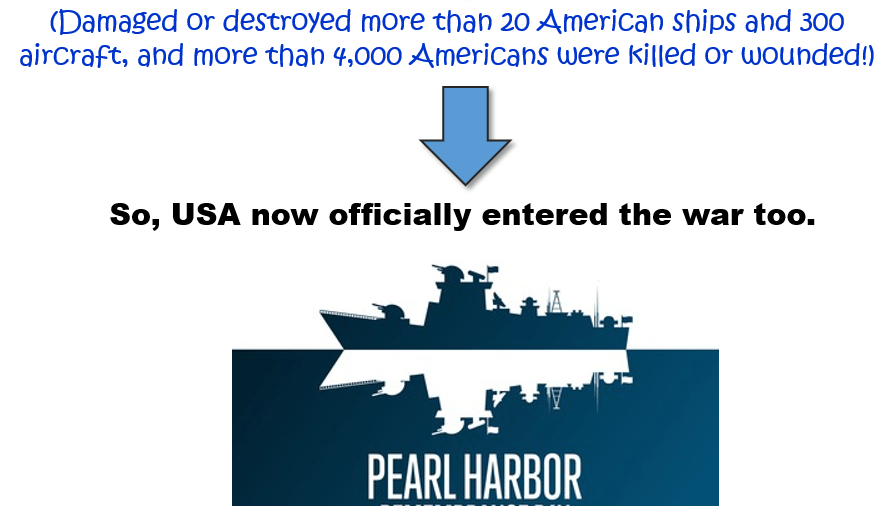
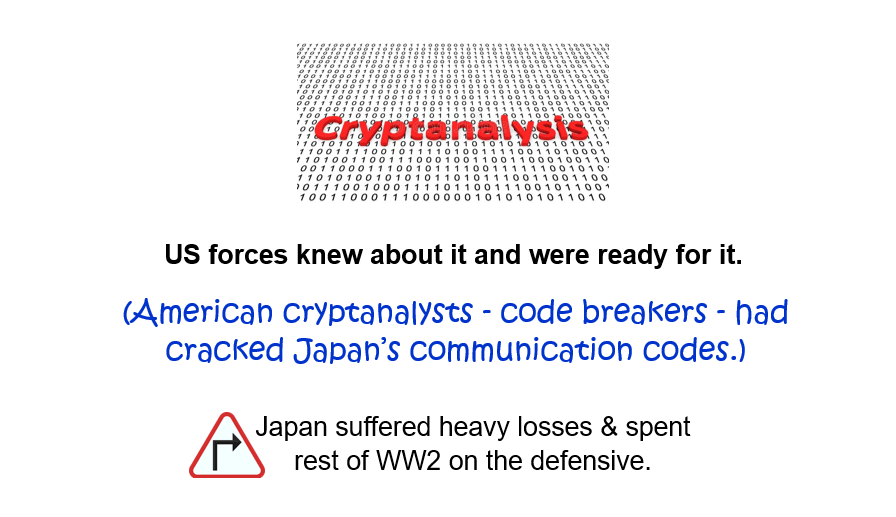
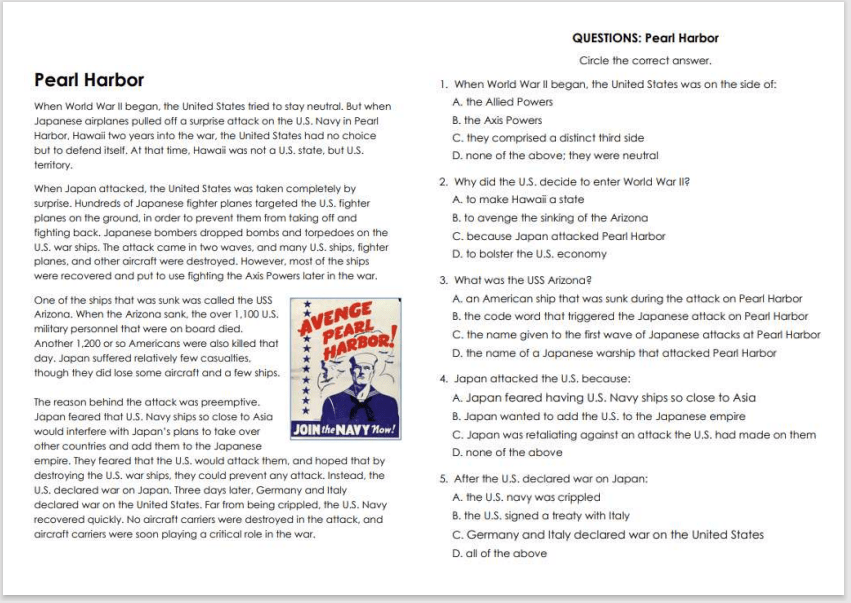
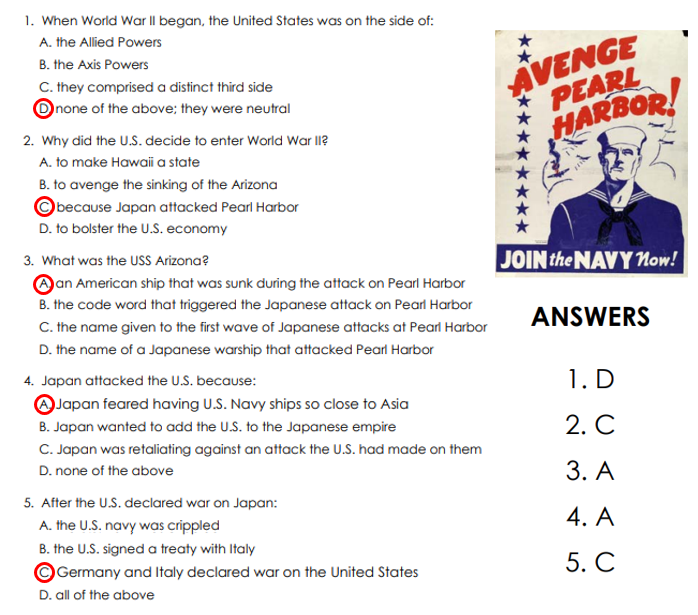
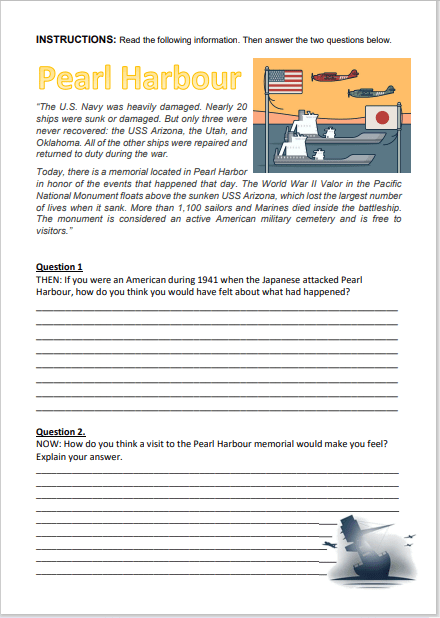
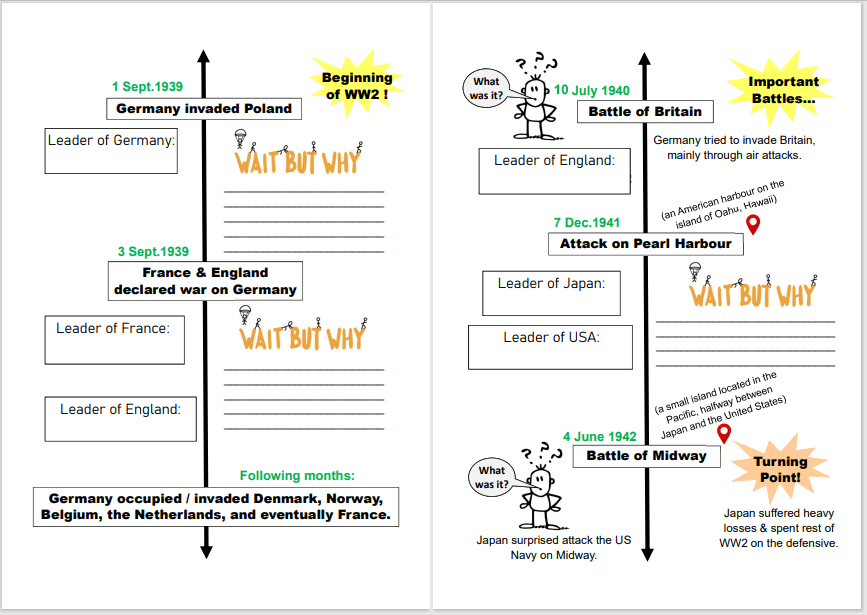
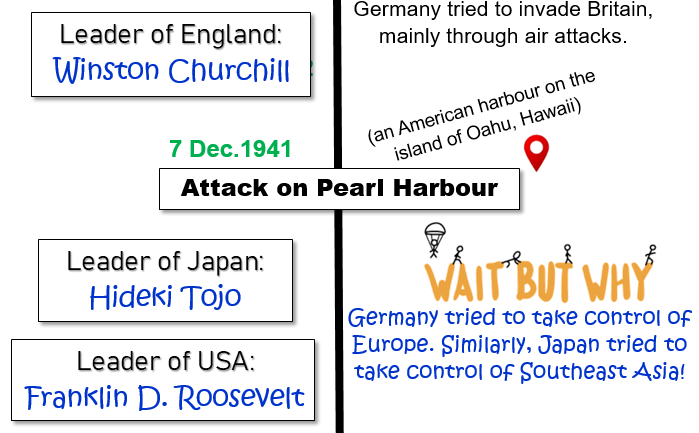
Right from the start the USA did not want to get involved with European conflict, but by the end of 1941 the USA was fighting on the Allies’ side, because Japan attacked the US Navy.
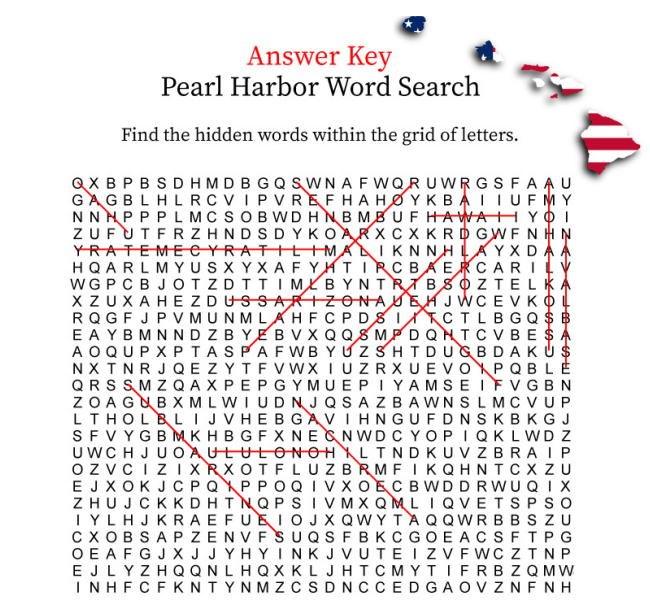
Examine the image below for more details about how the USA became involved:
8.
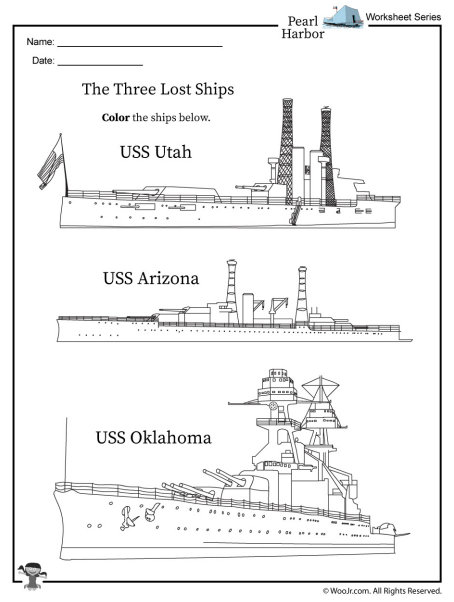
Look again at the information above and fill in the missing information on the worksheet on the attack on Pearl Harbour:
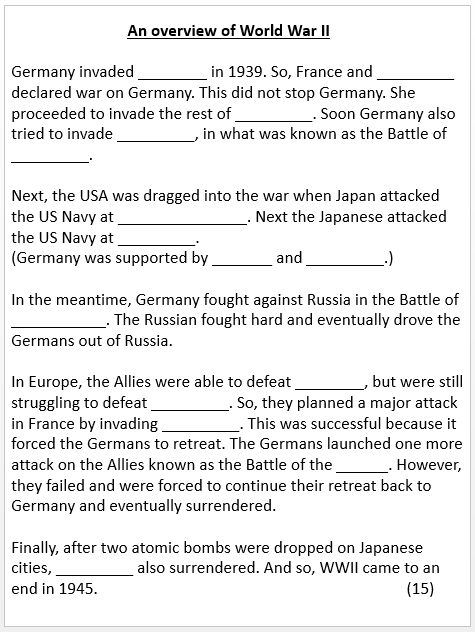
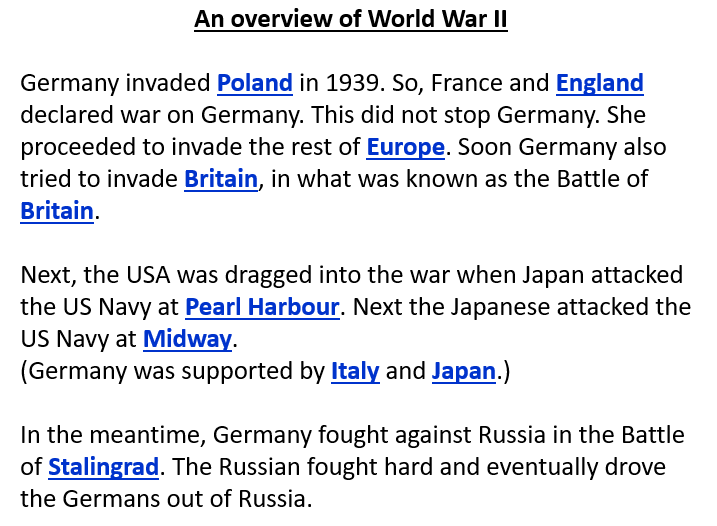
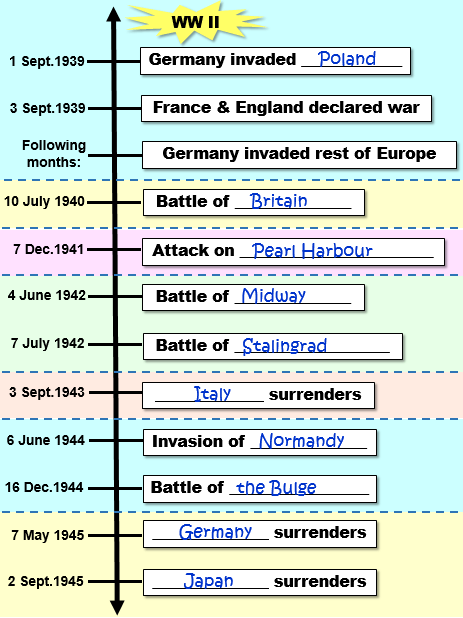
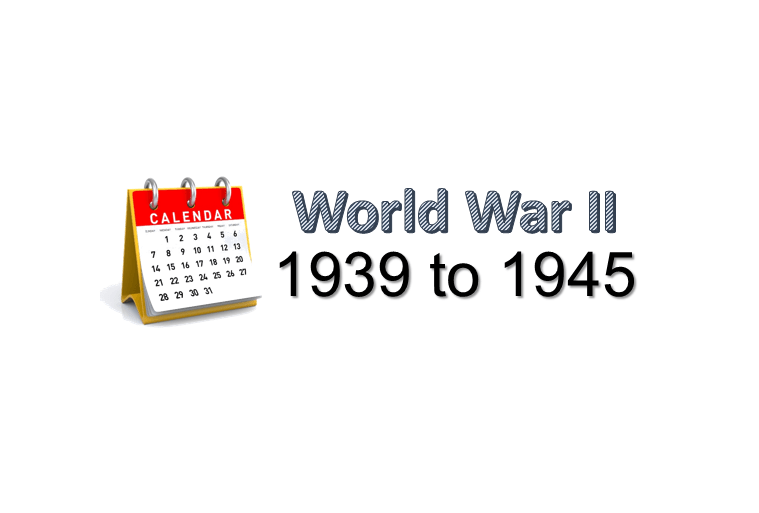
A lot happened during WW2! The video below takes you through the entire war, from 1939 to 1945.
Overview of WW2 on maps. (3:20 minutes long)
3.
By means of a timeline we will go through the entire war, from 1939 to 1945. The timeline will give you a brief overview of some of the main events of WW2. It will fast-forward you through WW2…!
Read the following timeline about the main events of WW2:
Today we are going to see why and how WW2 started.
to see how and why WW2 started
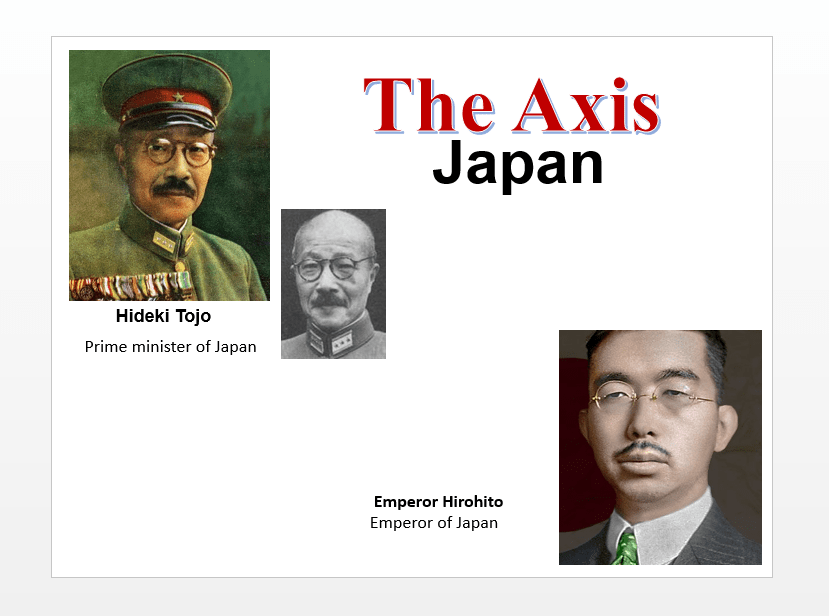
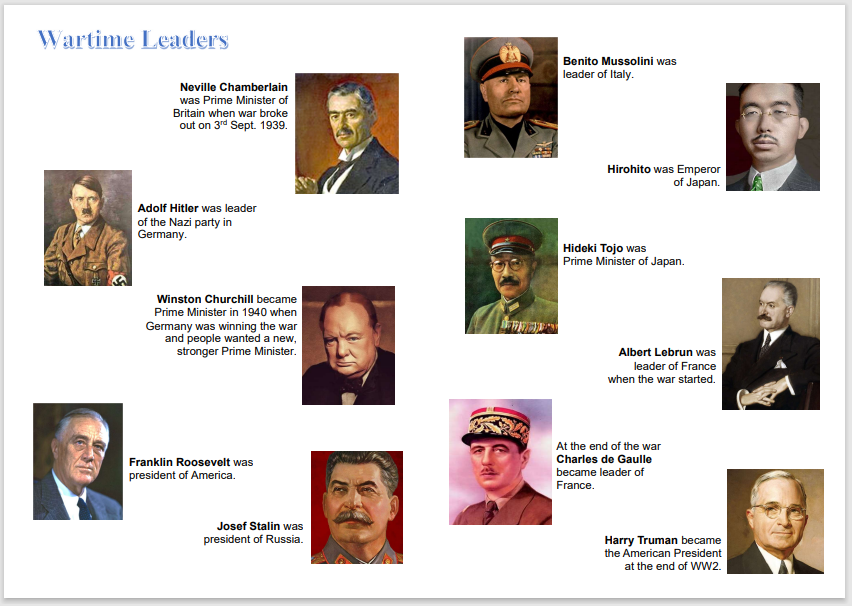
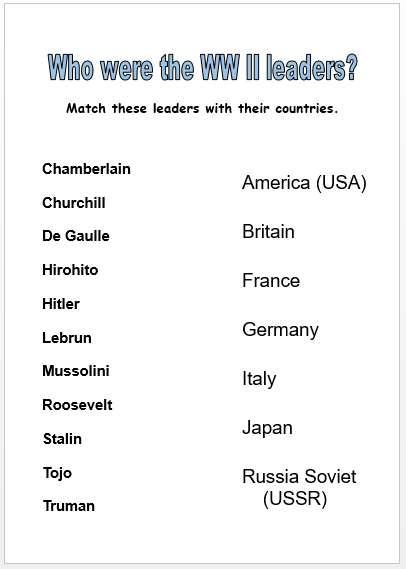
to learn who the WW2 wartime leaders were
to determine why WW2 broke out
to learn how to make point-form notes
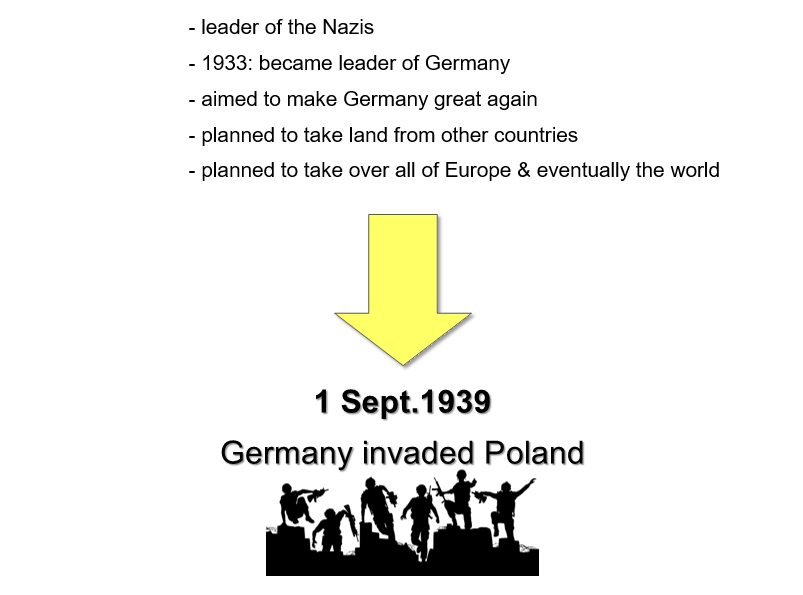
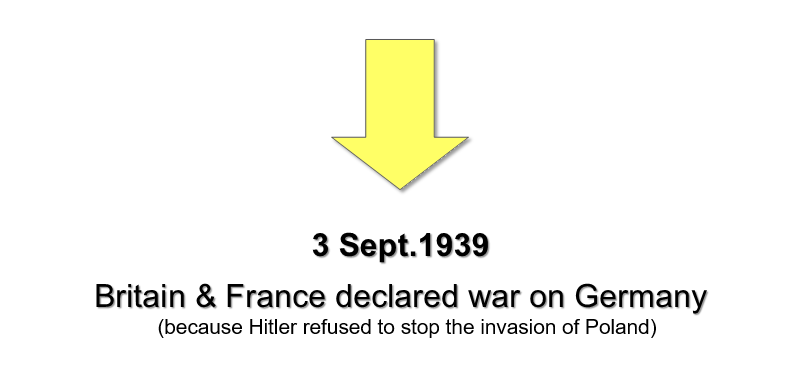
1.
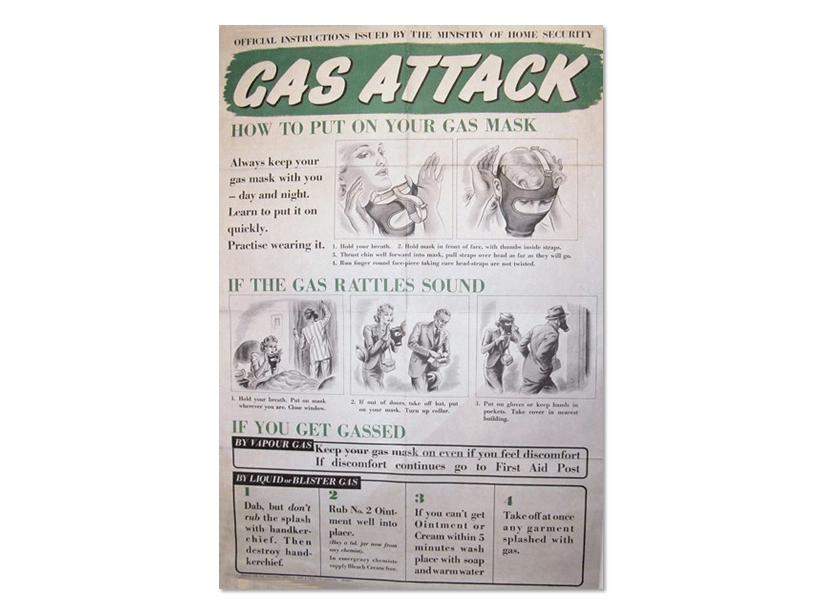
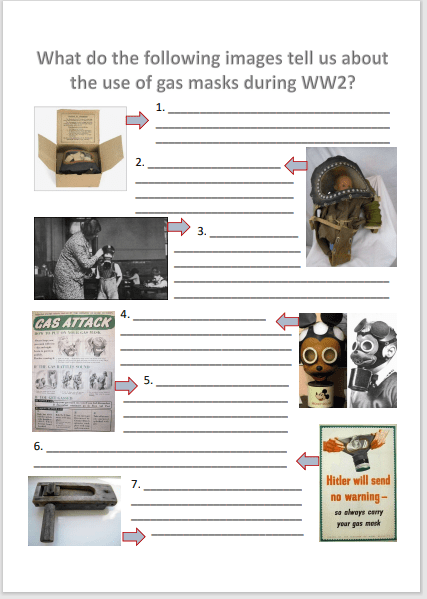
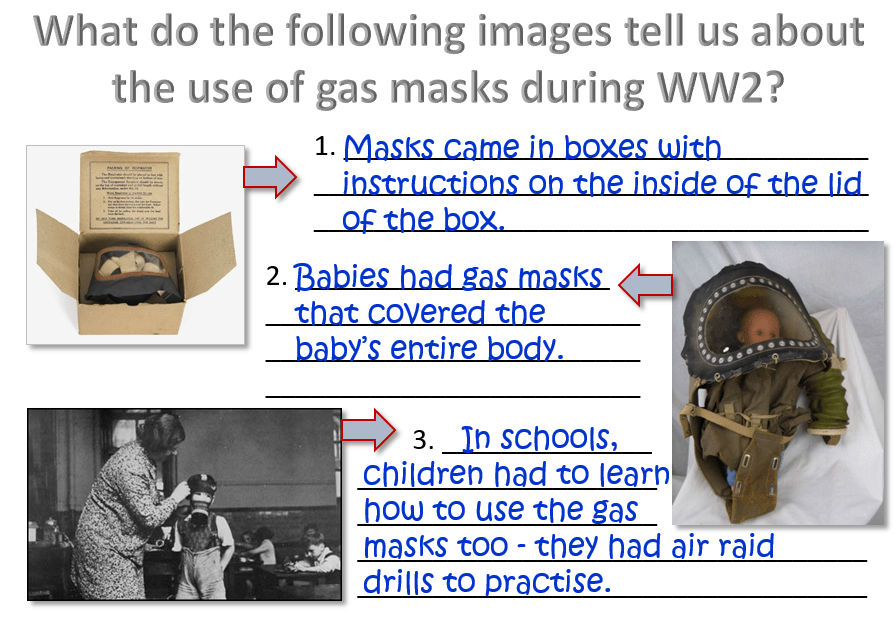
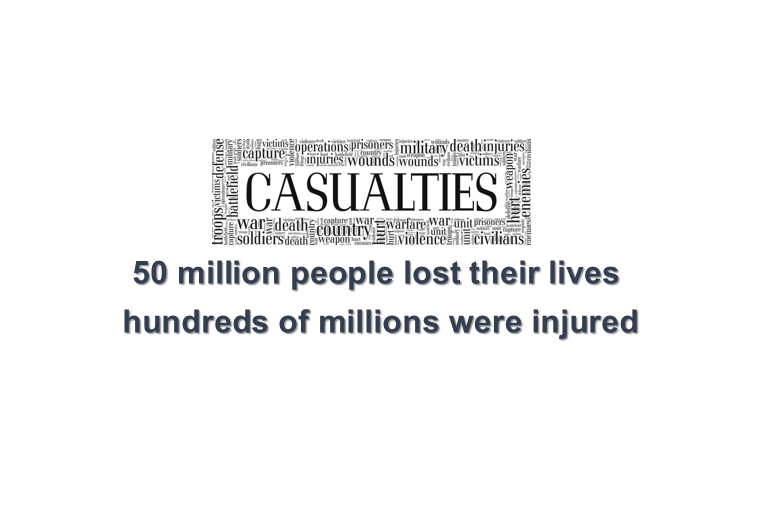
What do the following images tell us about WW2?
2.
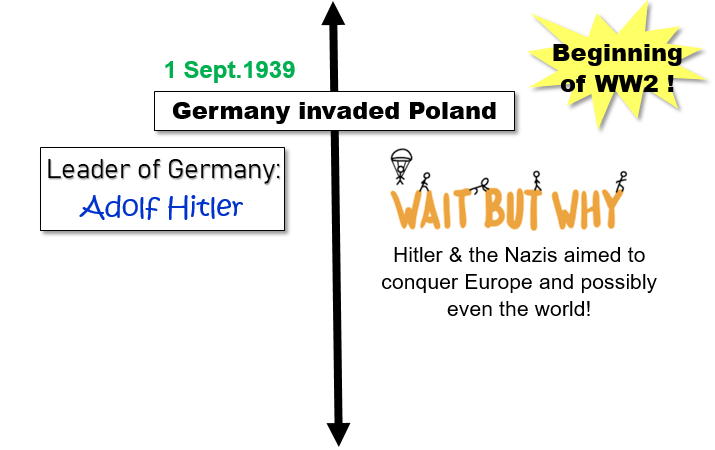
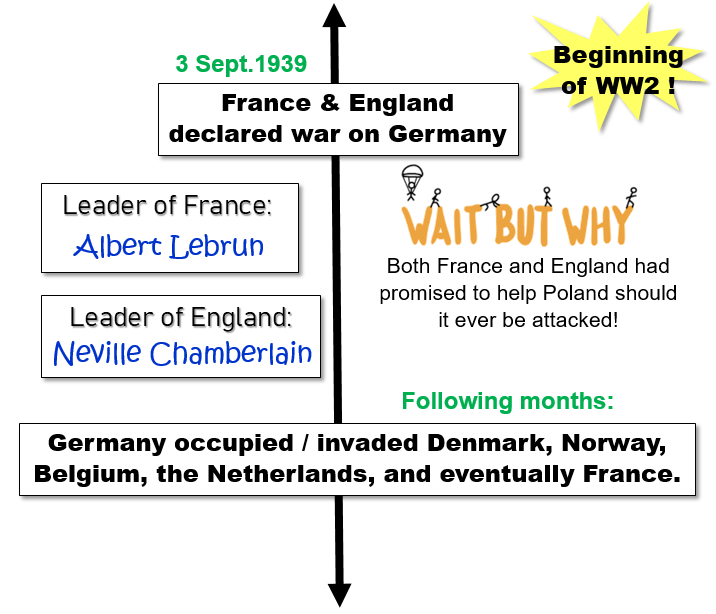
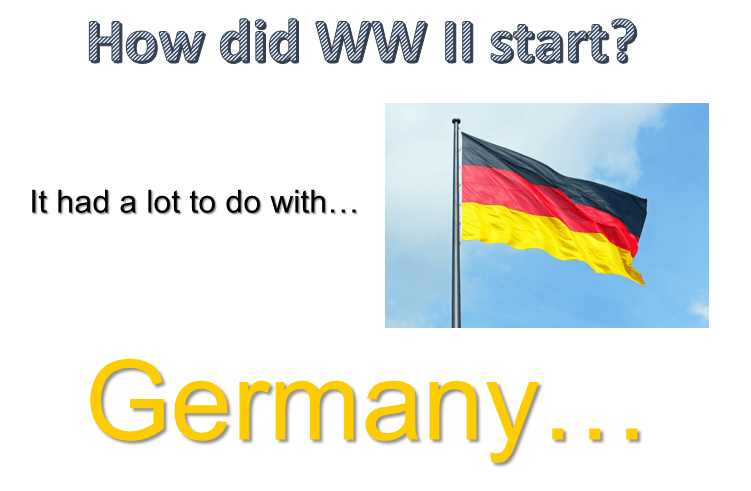
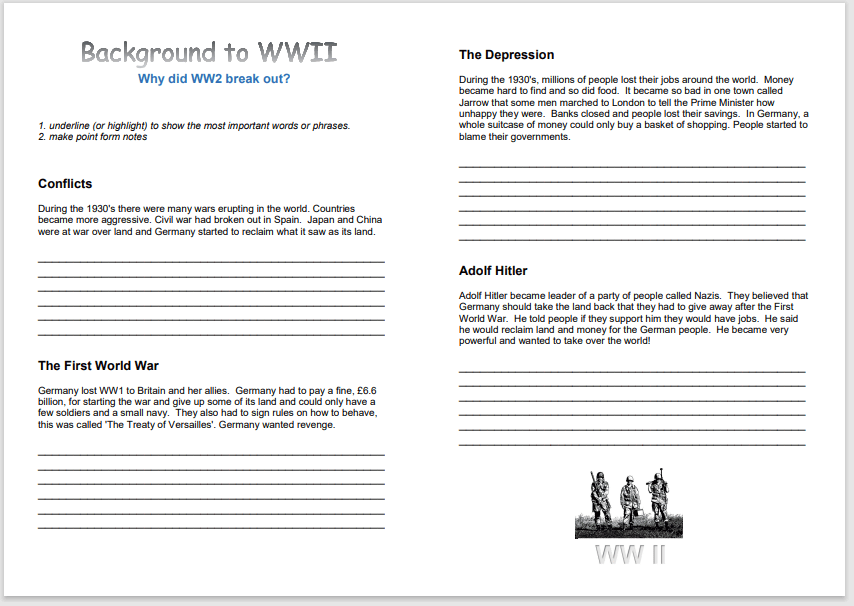
So, how did WW2 start?
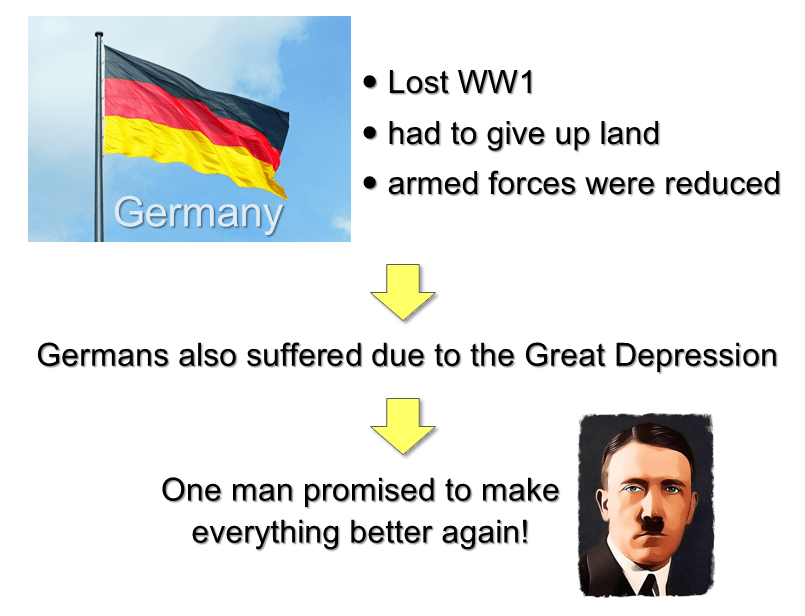
The flowchart below shows how Germany had some grievances after WW-1, which eventually led to WW-2.
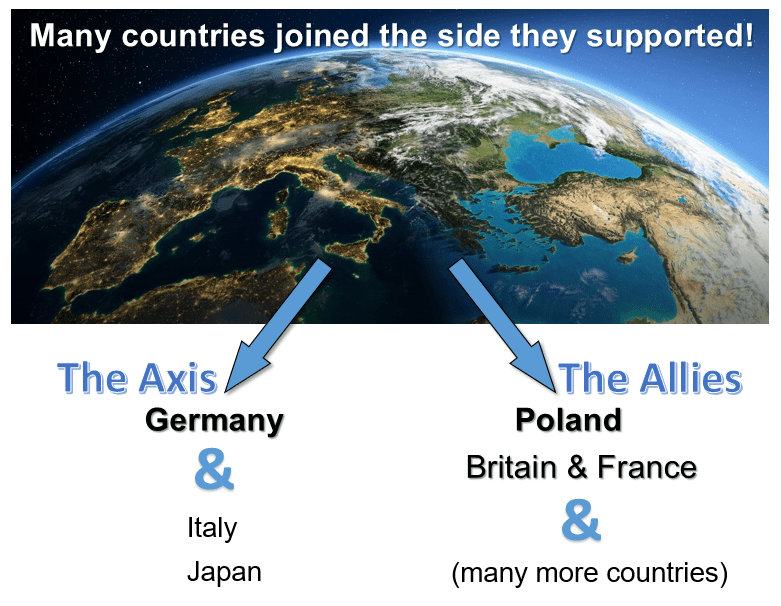
3.
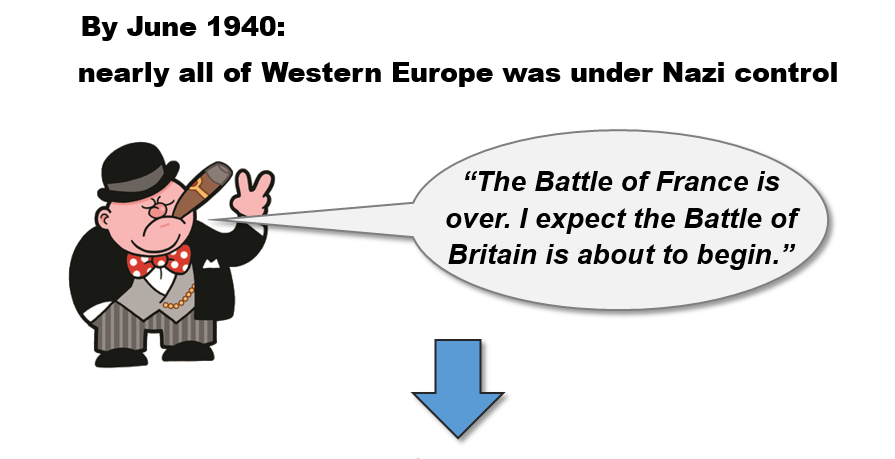
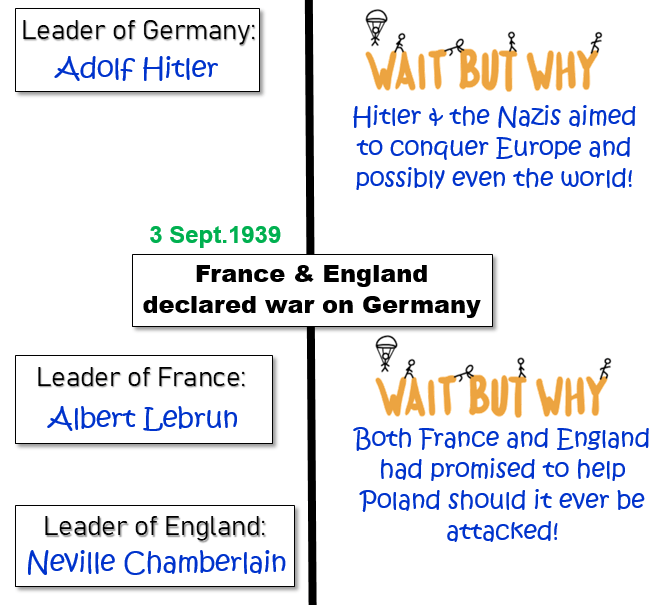
When Britain and France declared war on Germany, many more countries joined to help one of the two sides in the war. Here are the two sides that fought against each other:
4.
So, who were the leaders of these wartime countries? The videos below will give you an idea…
-1-
WW2 & WW1 Leaders singing. (0:30 minutes long)
-2-
Numa Numa WW2. (0:36 minutes long)
5.
To learn a little more about the wartime leaders, swipe through the slides below.
Let’s examine the reasons for WW2 in a bit more detail. Read the reasons given on the worksheet. Then highlight the most important points and make point-form notes.
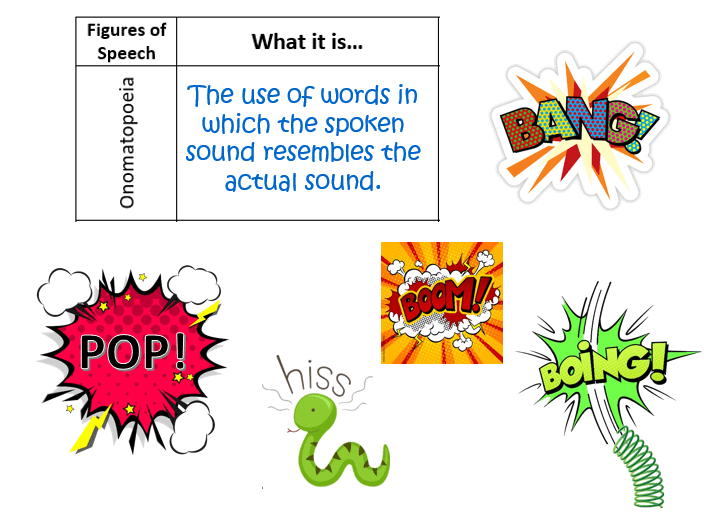
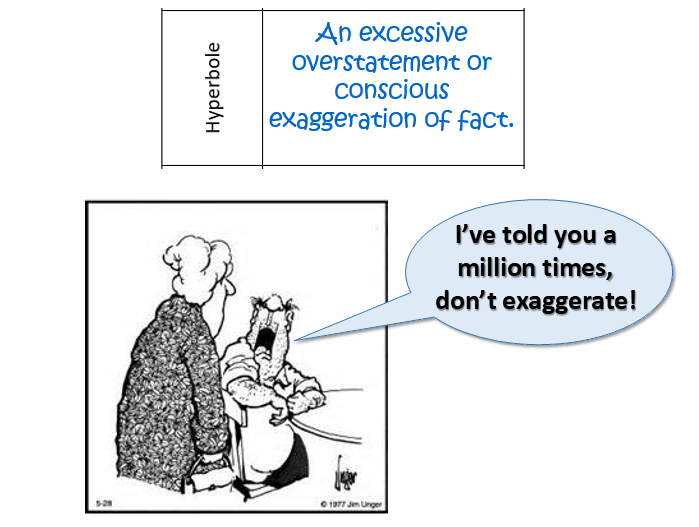
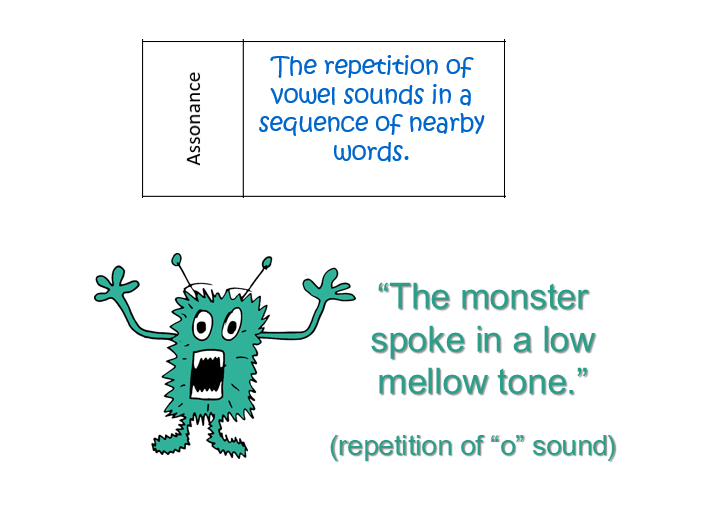
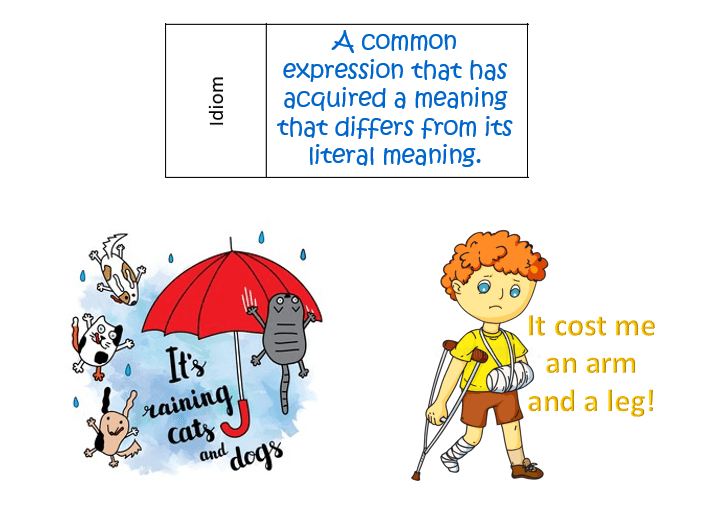
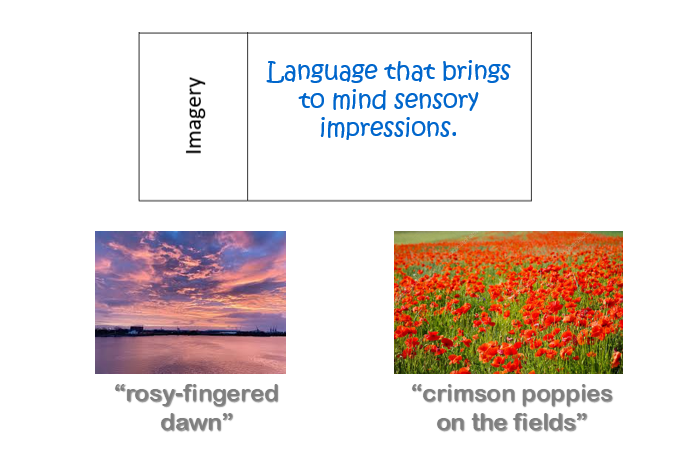
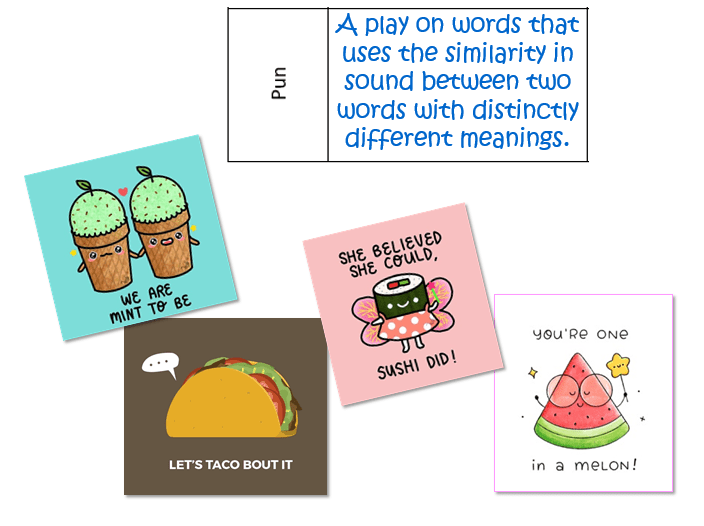
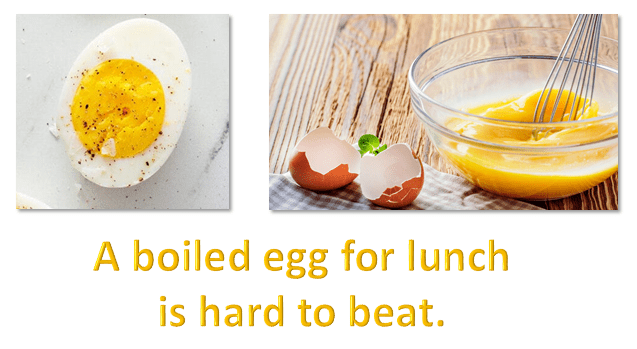
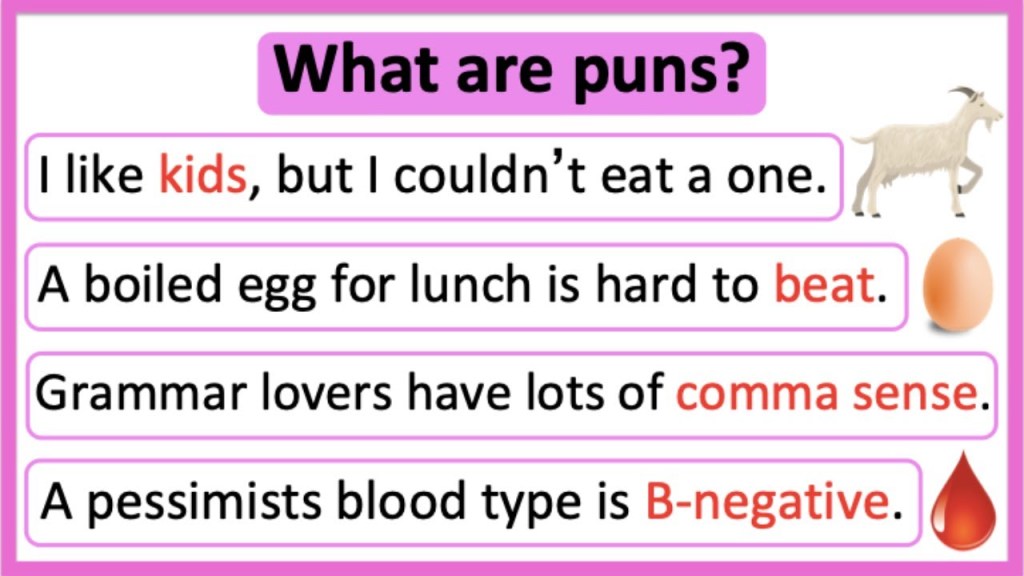
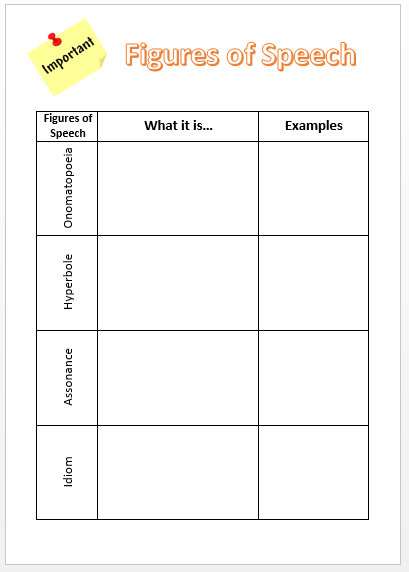
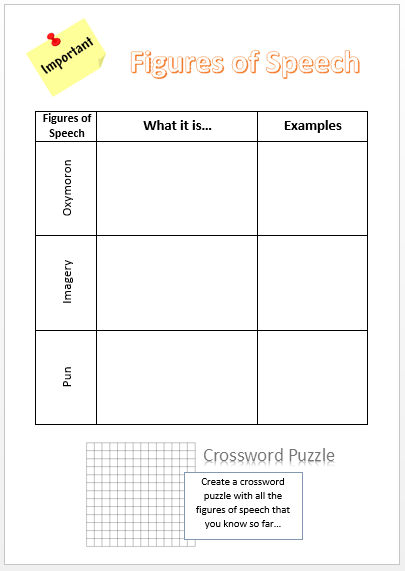
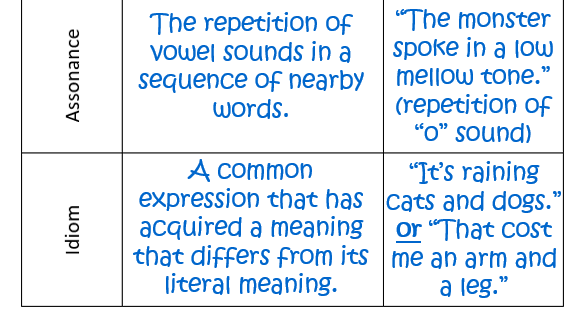
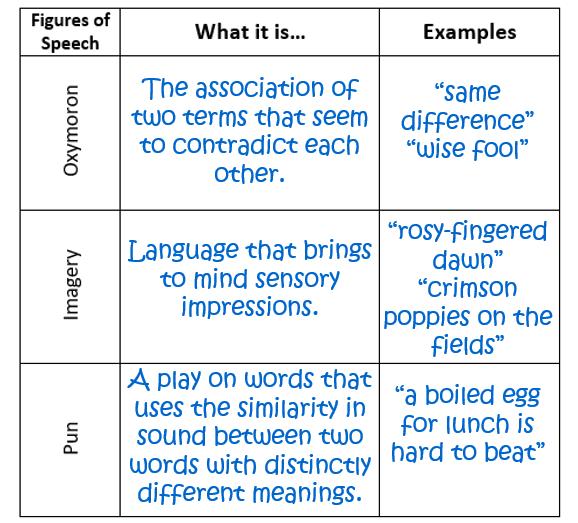
Now, let’s recap by watching a video or two on figures of speech!
Literary Devices. (12:11 minutes long)
Using Literary Devices to Enhance Storytelling. (2:41 minutes)
10.
Finally, make a crossword puzzle, as instructed on the worksheet…. You can make this manually, or use the button below to access an online crossword puzzle maker.
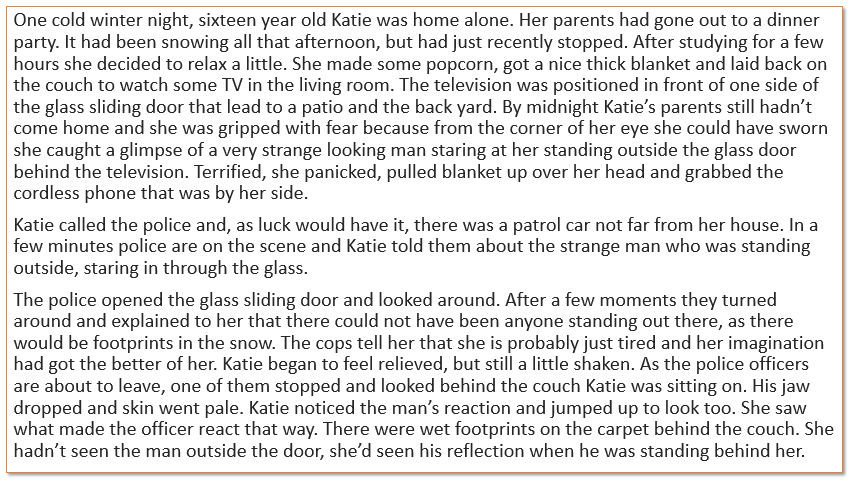
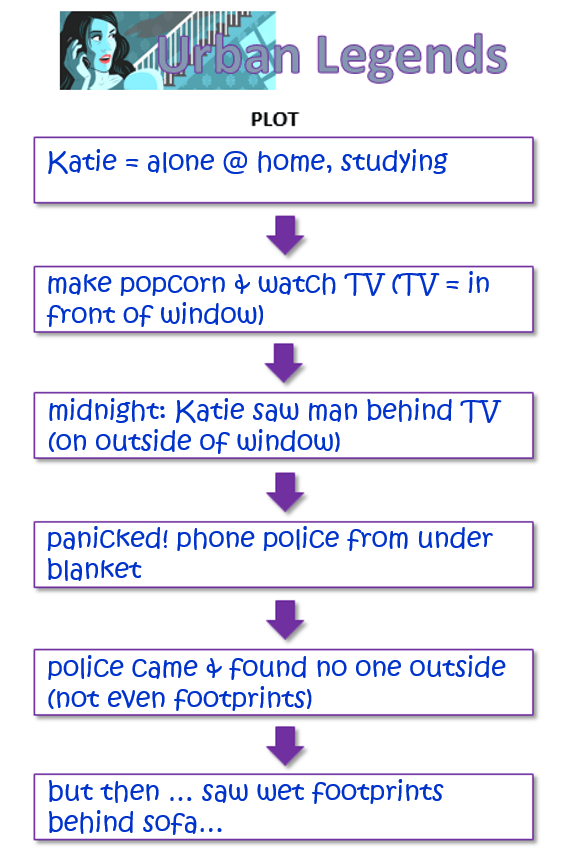
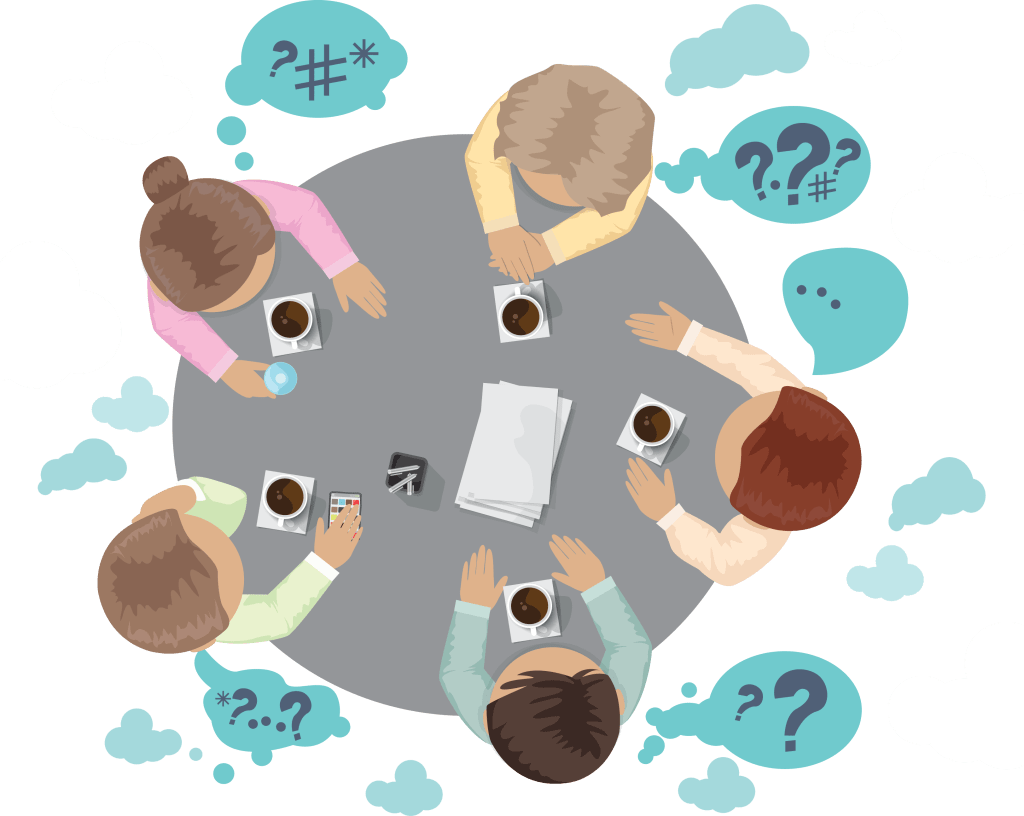
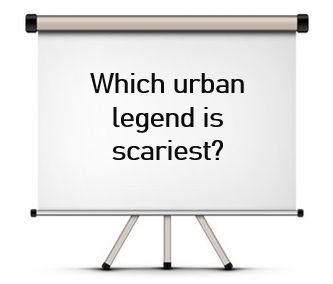
Today we are going to have some group discussions about Urban Legends…
to select relevant evidence in order to make informed judgements about the urban legends
to get useful tips for group discussions
to use discussion skills to show an understanding of urban legends
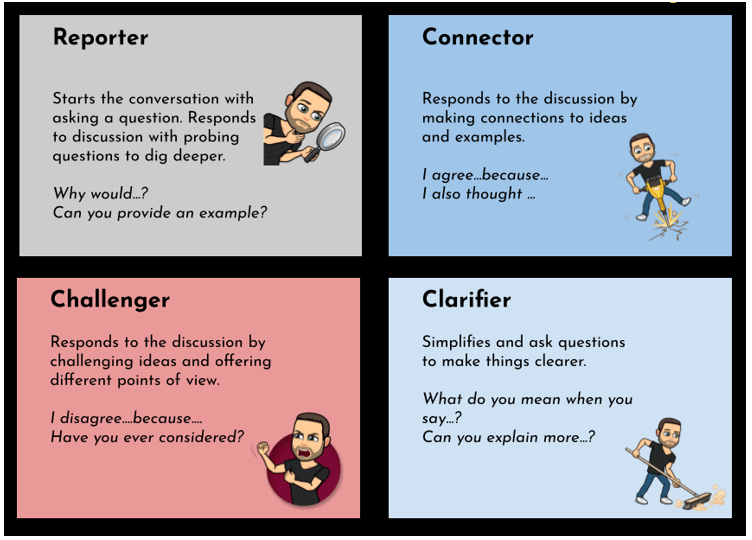
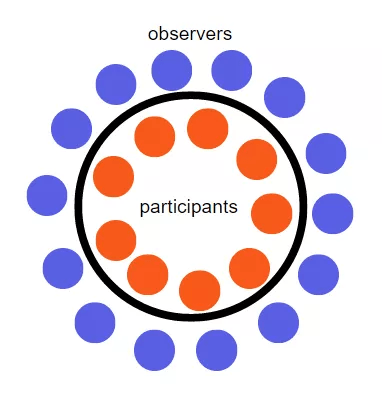
1.
What different roles can we have during a discussion?
In discussions there are people with different roles – naturally. The video below shows the type of roles people may have in a discussion.
(You may find this clip to be a little complicated but it should, nevertheless, give you an idea.)
Discussion Techniques. (3:16 minutes long)
Below is a more simplified version of the different roles we can have during a discussion.
Or, we can put it this way: (Even more simplified…)
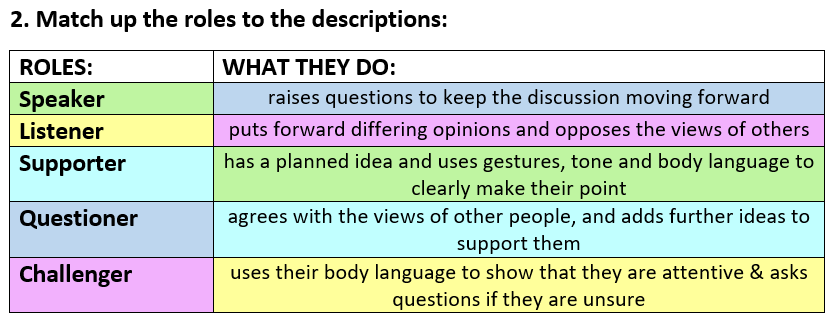
You need to match up the roles to the descriptions.
SOLUTION
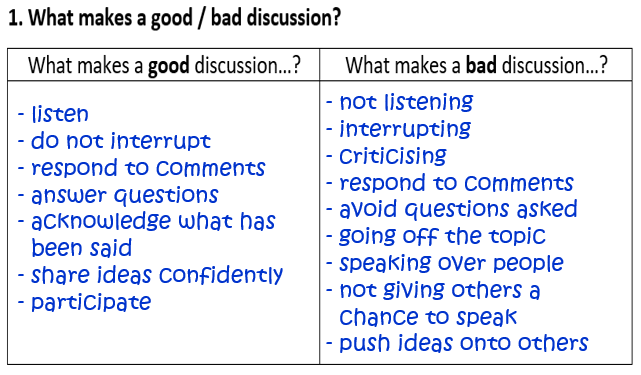
2.
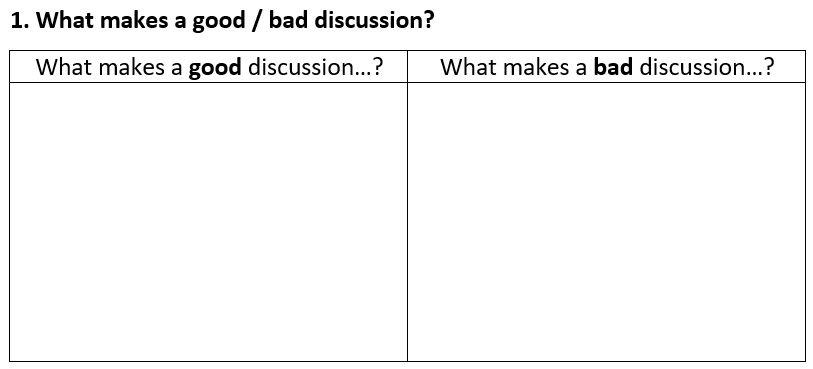
Now watch the video below and decide what makes a good / bad discussion. (On the sheet provided, write down what is good and what is bad. Think about this as you watch the video and write down ideas…)
Today we are going to continue looking at Urban Legends.
to find out what an urban legend is
to evaluate urban legend texts
to prepare for an assessment task by selecting relevant evidence (in order to make informed judgements about the urban legends)
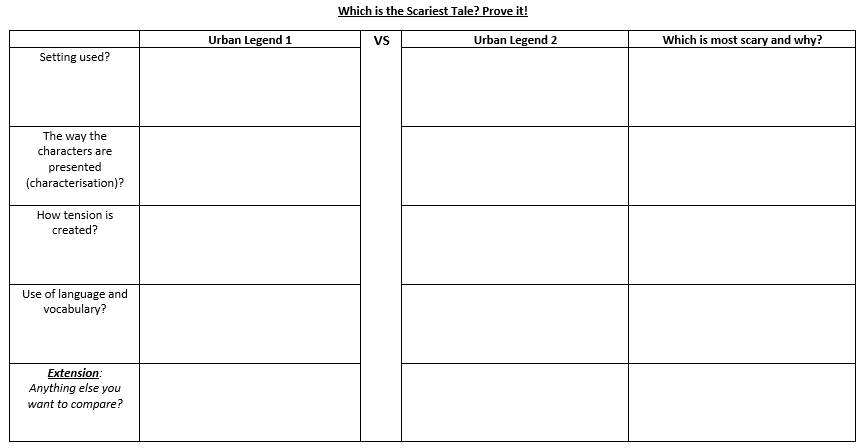
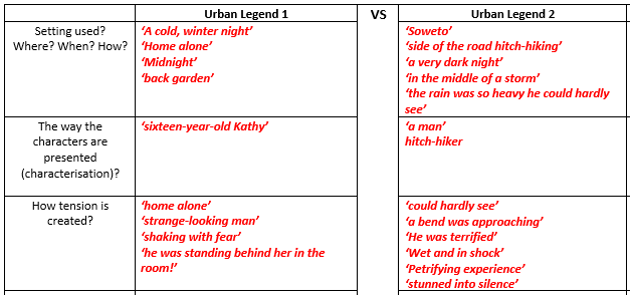
1.
If not finished yet, complete the table by writing down your ideas about the two Urban Legends that we looked at in the previous lesson. Make sure that you support what you say with quotes from the text!
You will need this information for a discussion task in the next lesson…
Do you want to hear a few more Urban Legends? The video below tells more stories. Distinguish between which stories are true Urban Legends and which are simply ghost stories.
Unique Urban Legends. (9:26 minutes long)
(Start watching at 2:00 minutes)
3.
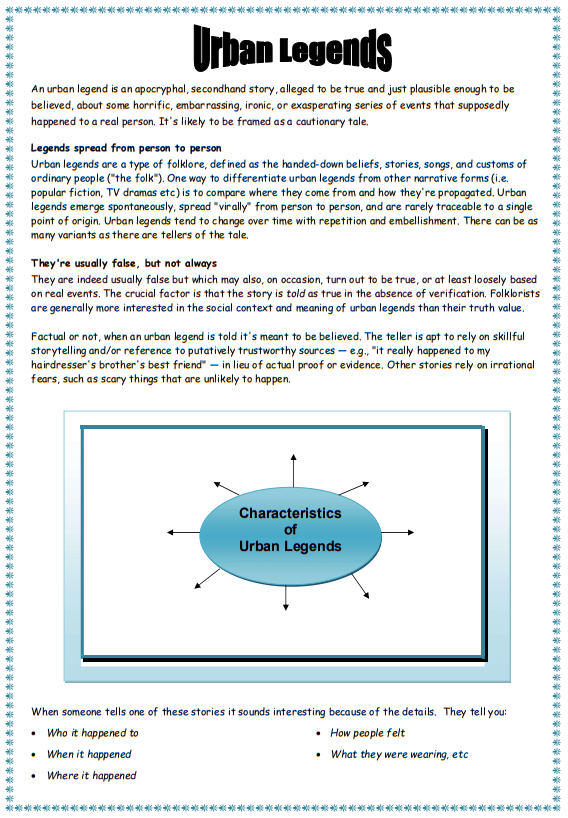
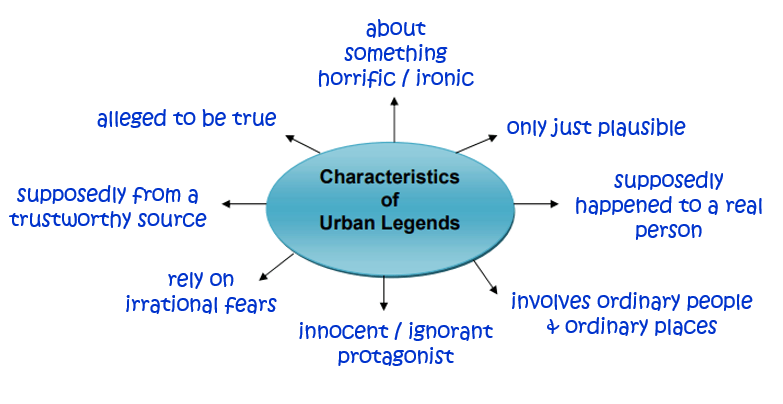
Read the information explaining characteristics of Urban Legends.
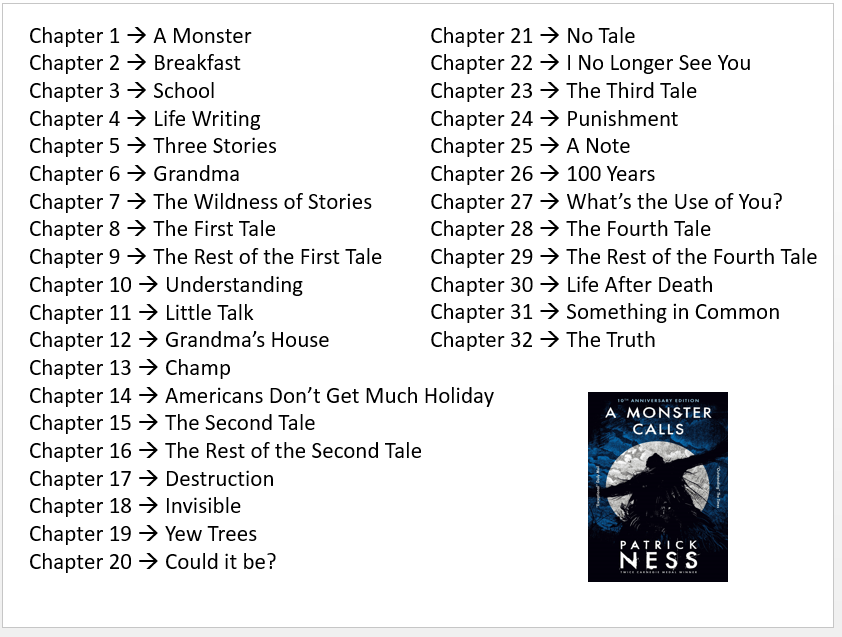
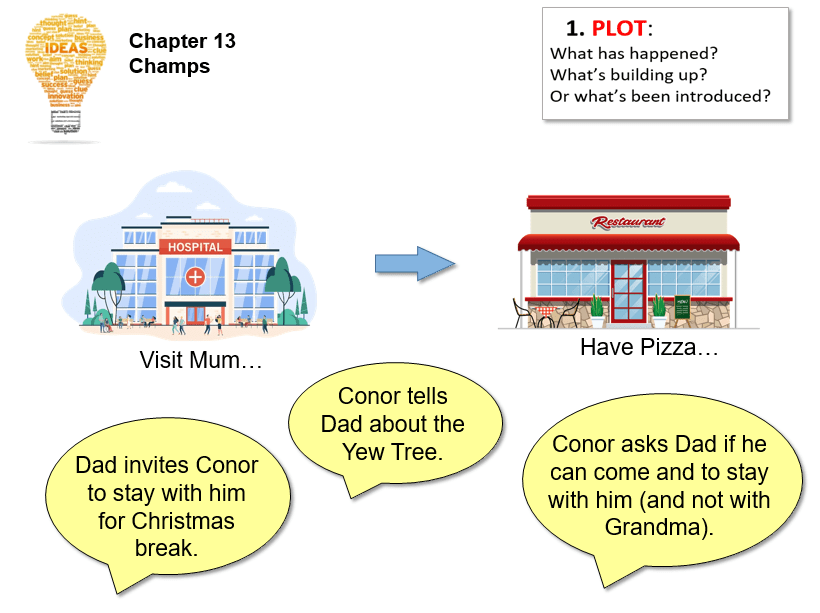
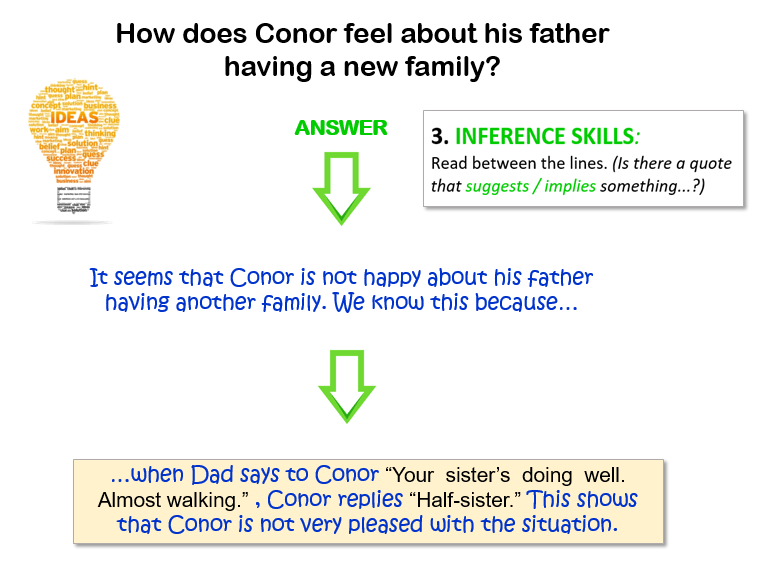
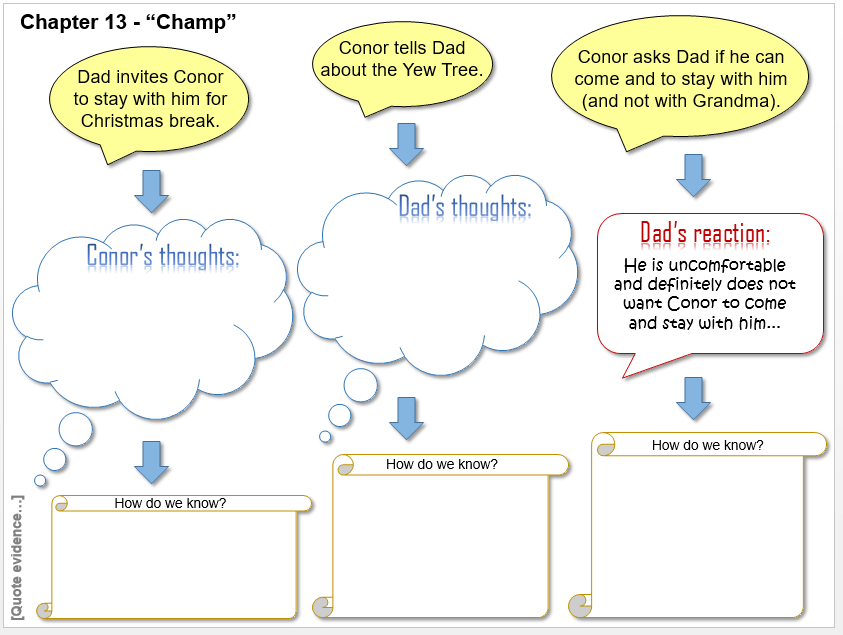
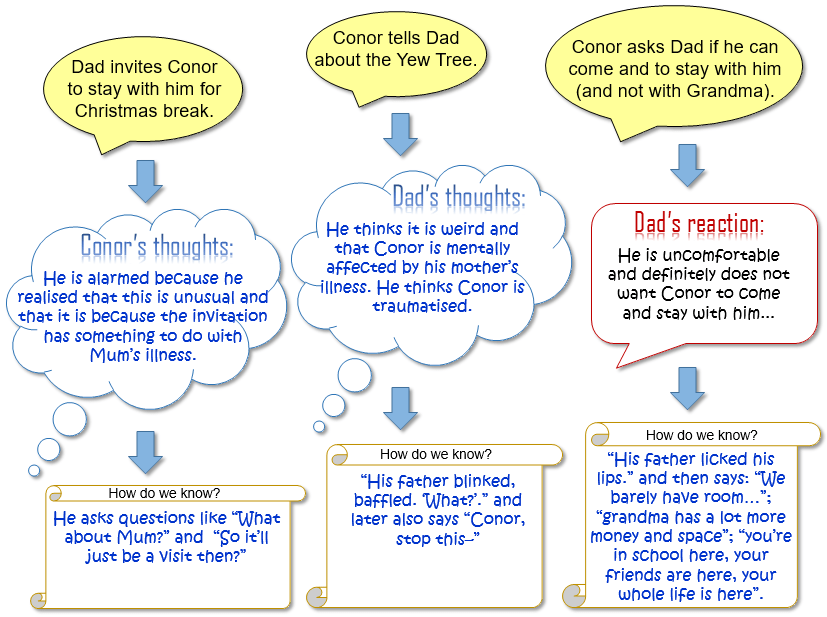
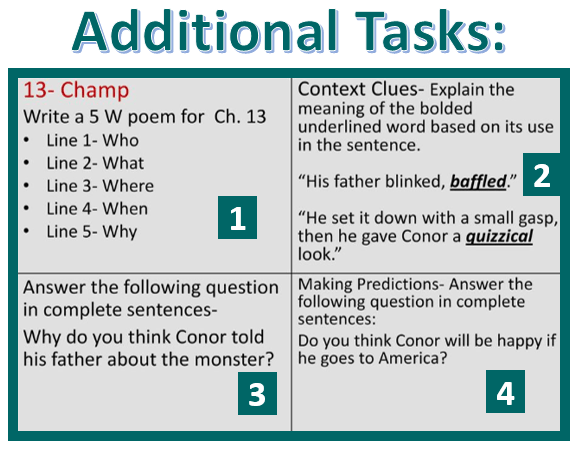
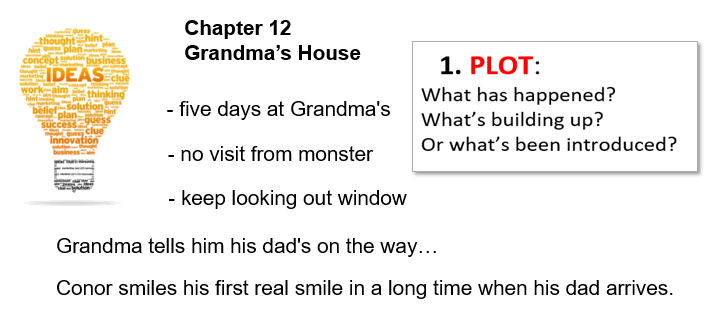
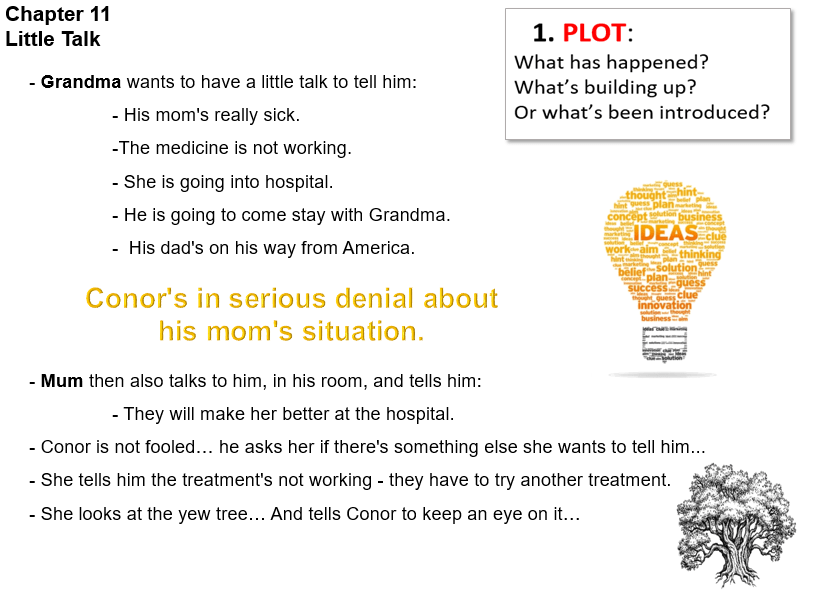
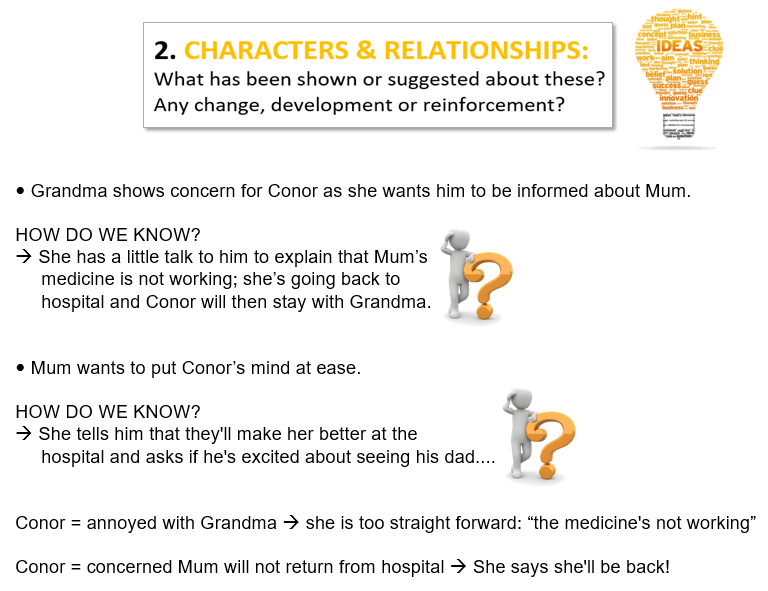
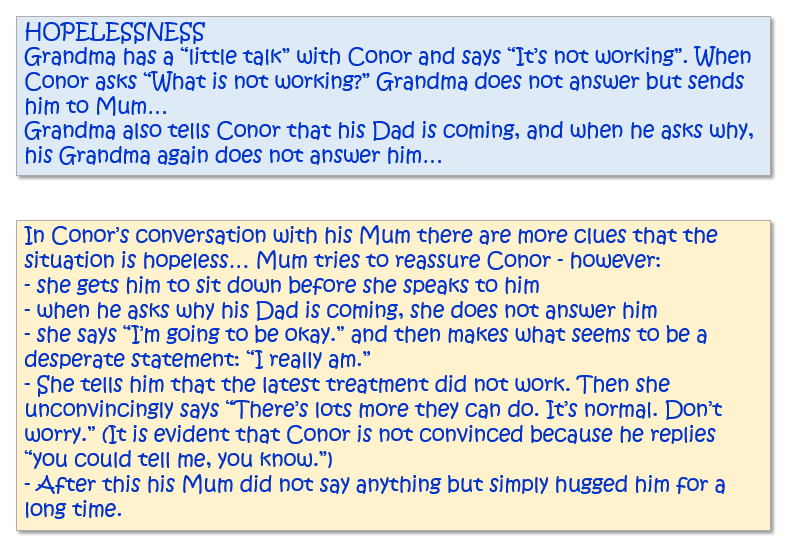
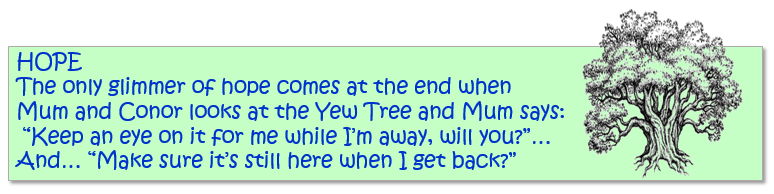
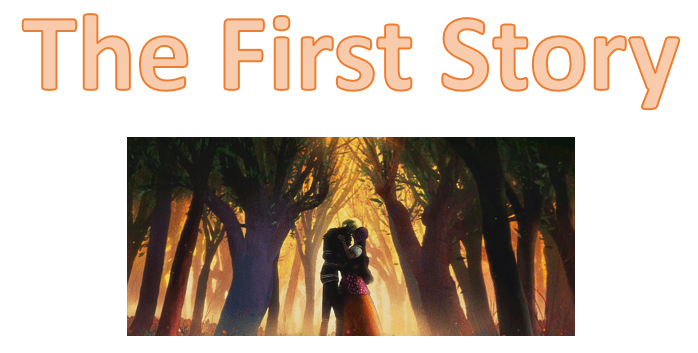
Today we are going to read Chapter 13 of “A Monster Calls”.
to consider the plot of Chapter 13
to consider Conor’s relationship with his father
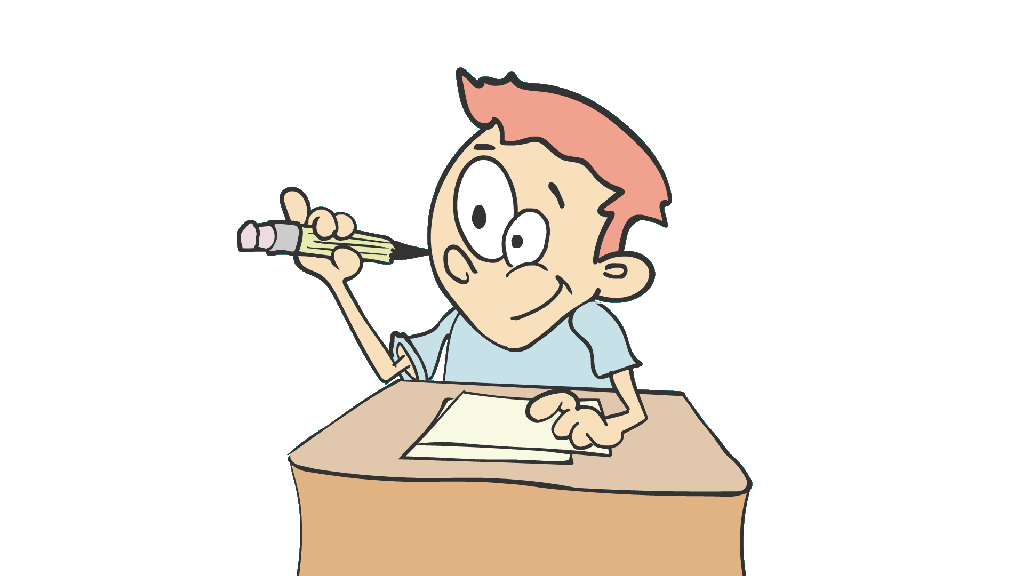
to practise motivating statements
1.
“Champ.”
Read Chapter 13.
2.
This is what we’ve read in Chapter 13…
3.
In Literature, it is VERY important to ALWAYS motivate your statements. You should always answer the following question in your responses to questions in Literature:
You do so in the form of an explanation. However, your answer will be even better if you can also give a quote from the text, as evidence!
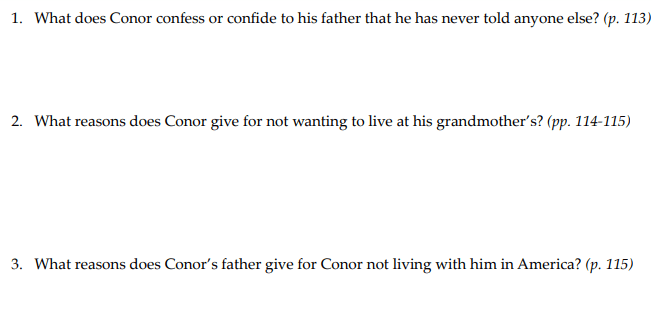
4.
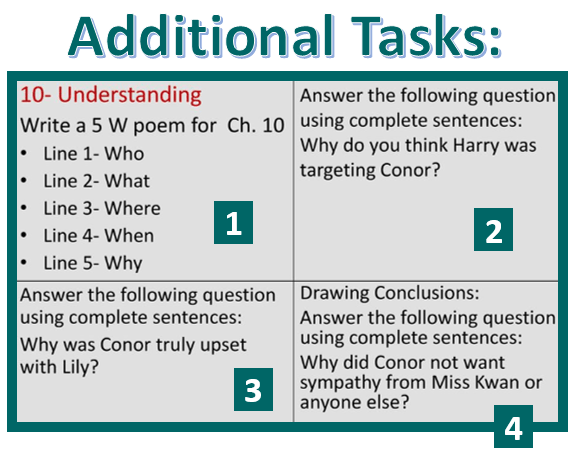
So, let’s do a task to practise motivating statements. Complete the following worksheet about the events in Chapter 13:
Authors use certain devices or techniques to communicate with their audiences. For example, in order to share a character’s feelings, an author may use a monologue.
What is a monologue?
“A monologue is a speech given by a single character in a story. In drama, it is the vocalization of a character’s thoughts; in literature, the verbalization. It is traditionally a device used in theater—a speech to be given on stage—but nowadays, its use extends to film and television.”
In the video below a director explains what a monologue is.
What is a monologue? (0:34 minutes long)
5.
Let’s look at a few examples of monologues:
-EXAMPLE 1-
This is a speech made by a frustrated teacher… It comes from a scene in a film called “School of Rock”.
The Man. (2:26 minutes long)
-EXAMPLE 2-
This is a speech made by a victim of racial discrimination… It comes from a scene in a film called “Hidden Figures”. It tells the story of a team of female African-American mathematicians who served a vital role in NASA during the early years of the U.S. space program.
Bathroom Speech Scene. (1:55 minutes long)
-EXAMPLE 3-
This is a speech made by Dory… It comes from a scene in the film “Finding Nemo”.
Dory Monologue. (0:48 minutes long)
6.
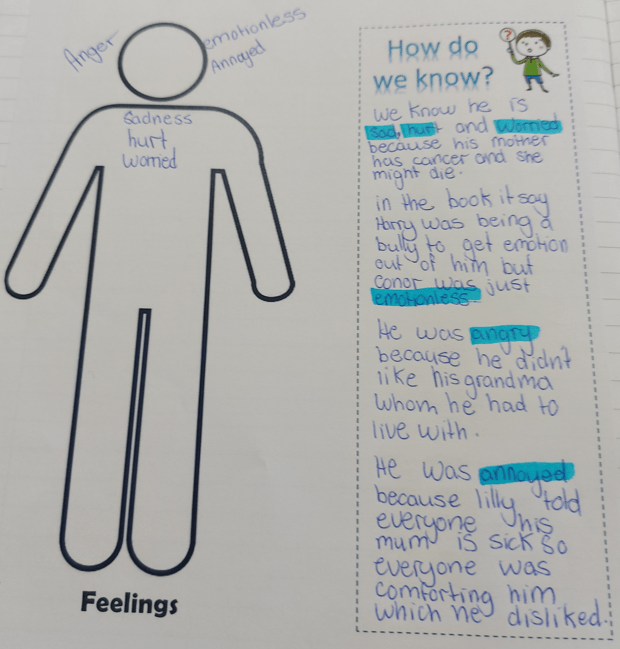
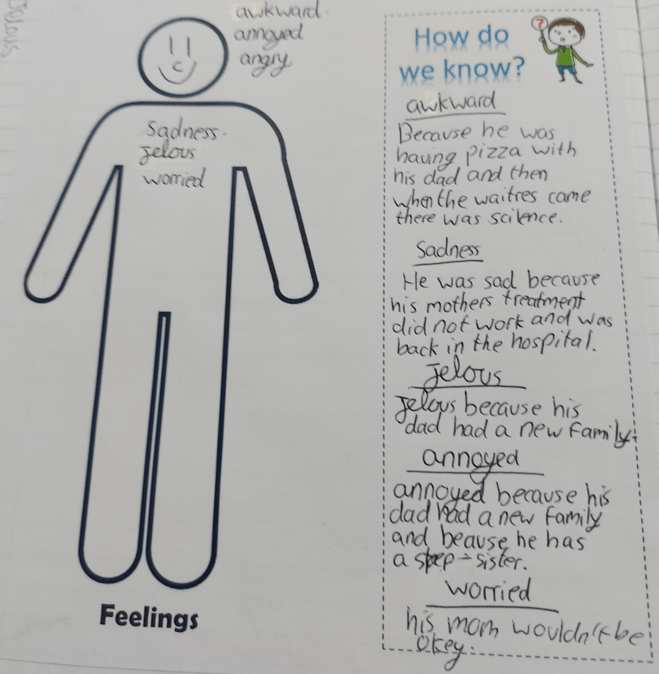
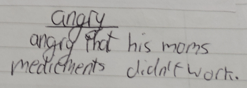
Write a short monologue to show the innermost thoughts and feelings of Conor..
(The previous task on Conor’s feelings can be very useful in writing this monolgue!)
Here is a little bit of advice…
Writing Tips. (1:52 minutes long)
7.
Will you be able to perform your monologue?
Here is a performance of Dory’s monologue.
Performance – Dory Monologue. (1:31 minutes long)
8.
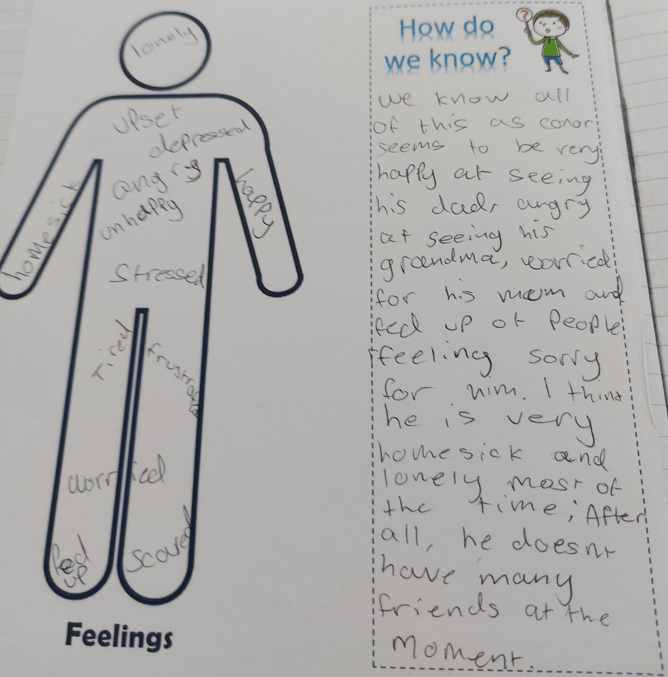
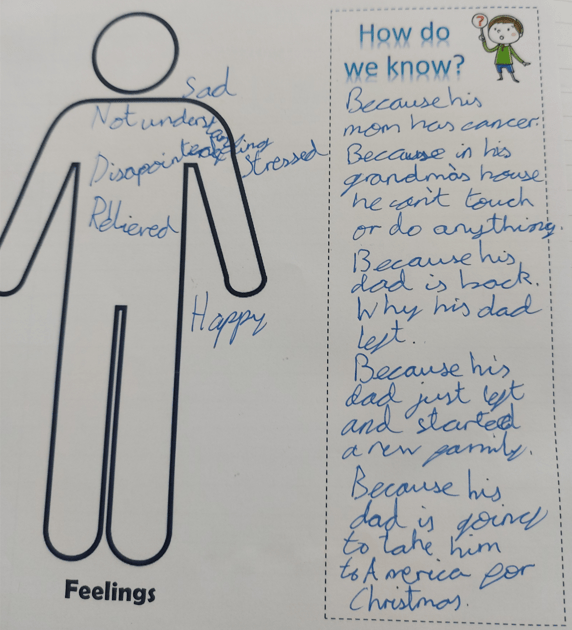
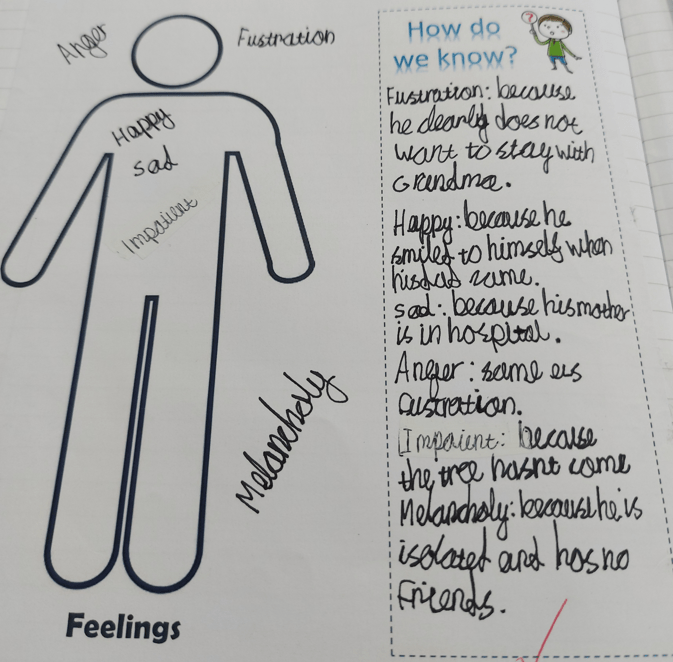
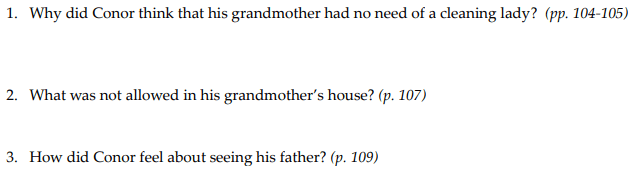
And now for a few questions…
Answer the following questions:
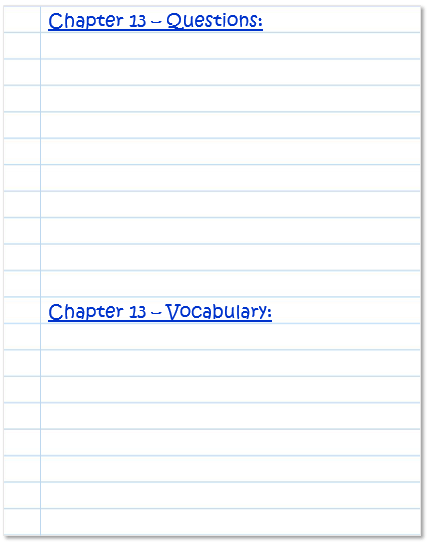
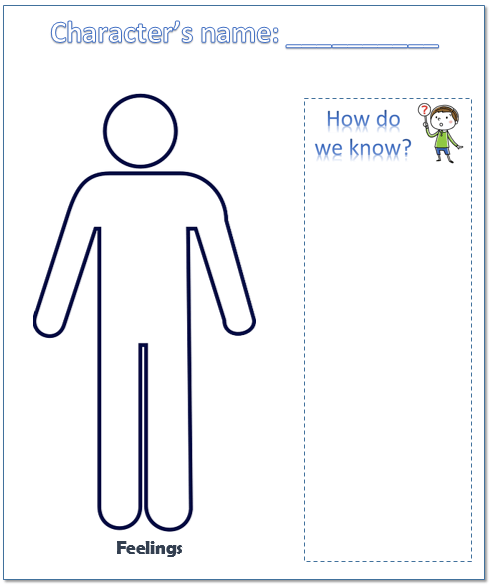
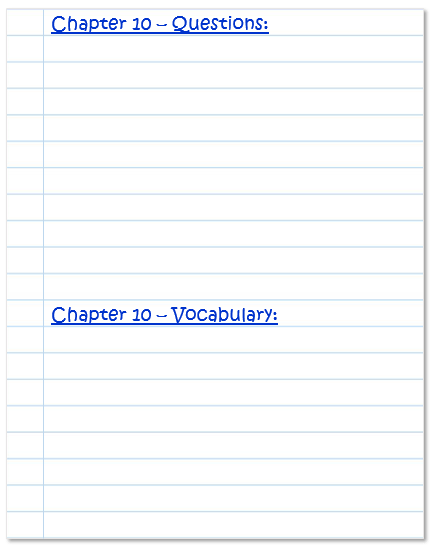
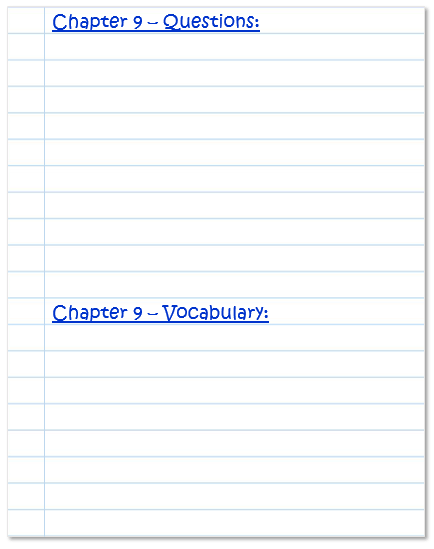
You need to use a new page in your book.
Write the headings as shown below.
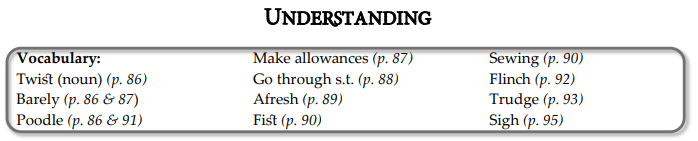
(After this task you will also look at vocabulary.)
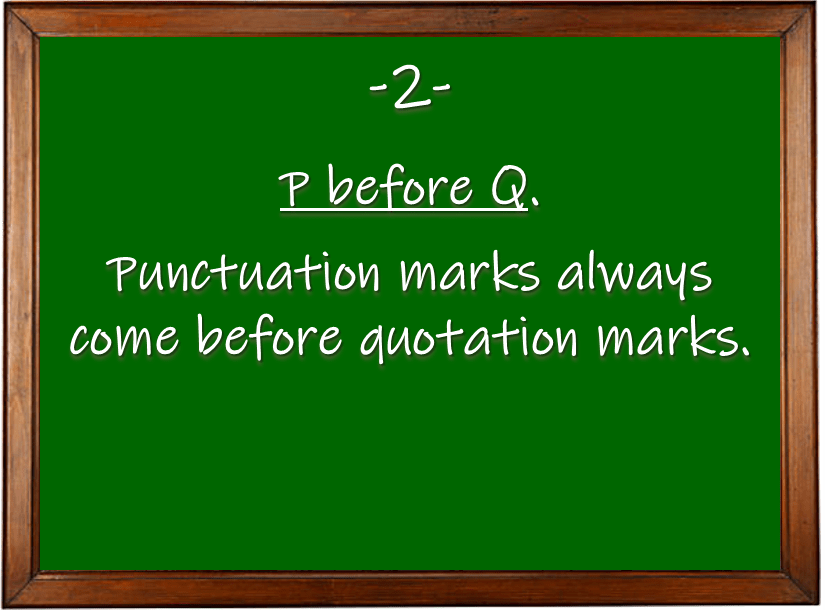
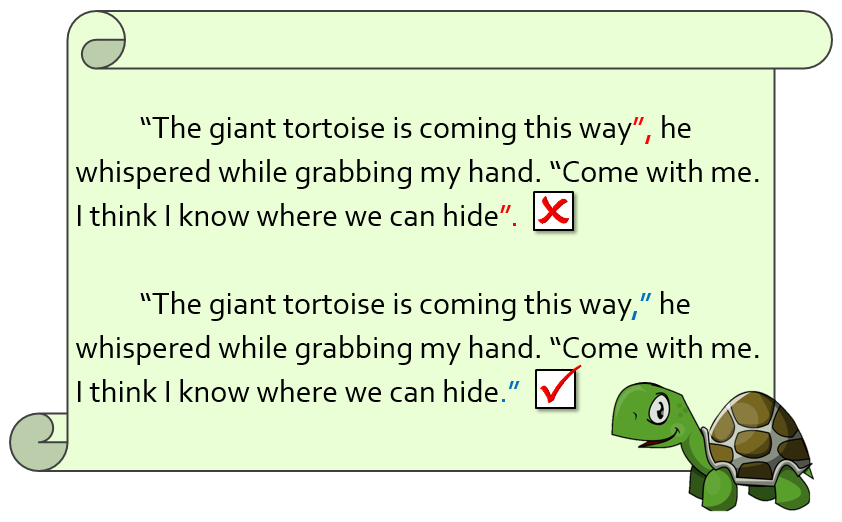
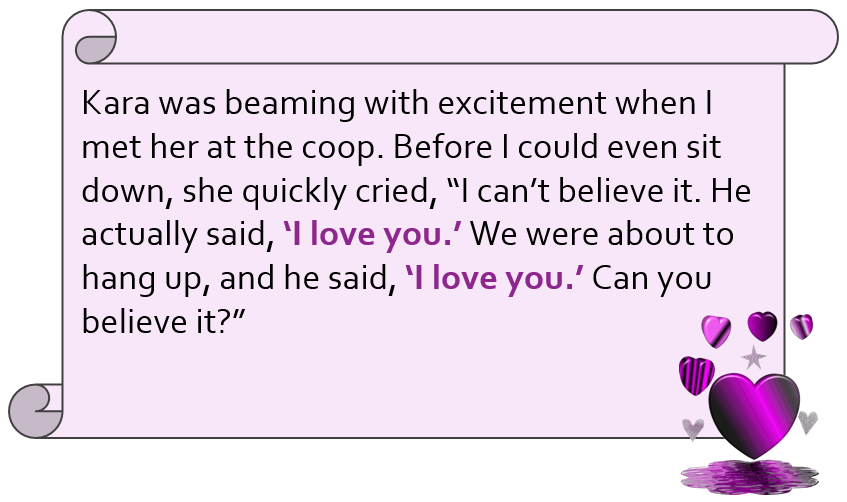
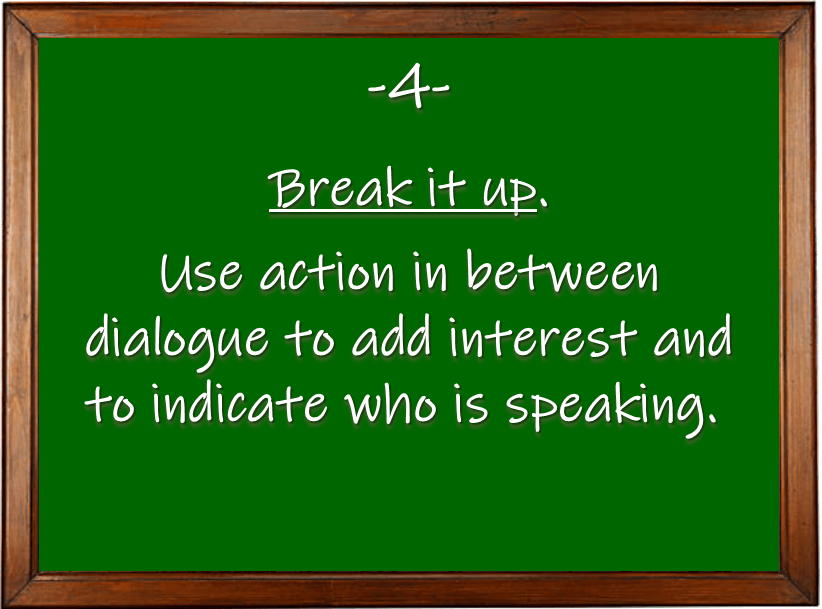
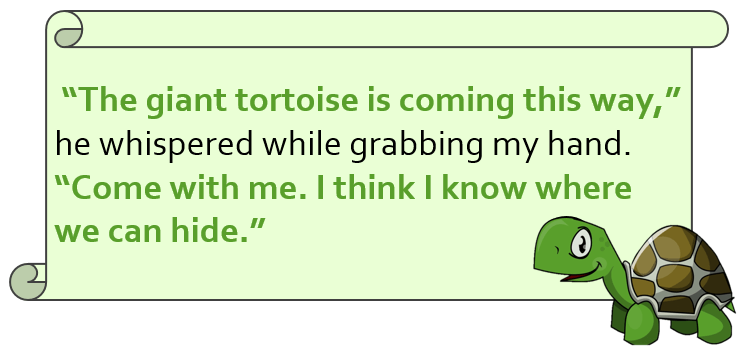
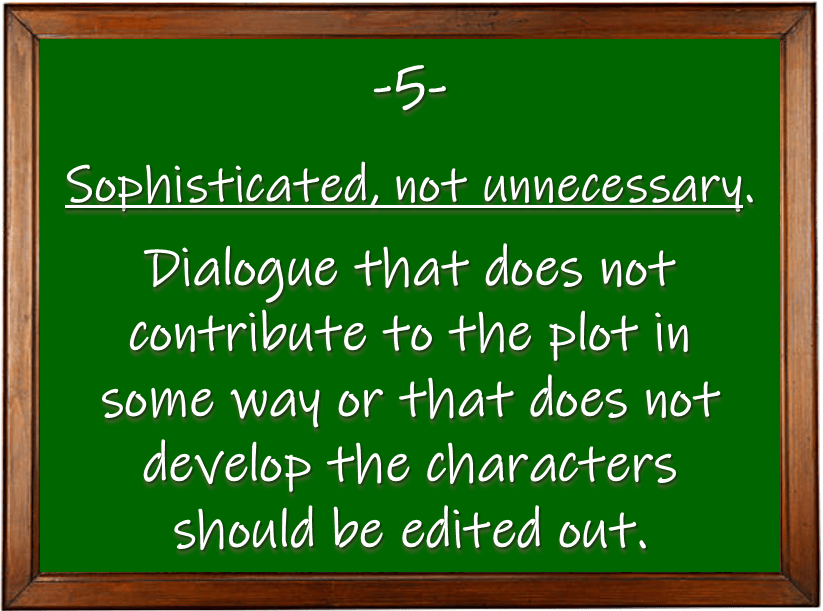
Below are five rules for using dialogue effectively:
3.
Let’s look at an example of how to apply each of these rules!
Rule 1
-EXAMPLE-
Rule 2
-EXAMPLE-
Rule 3
-EXAMPLE-
Rule 4
-EXAMPLE-
Rule 5
-EXPLANATION-
4.
It is important that you know how to write dialogue. Copy the rules into your books for study purposes.
5.
Previously we read Chapter 10 (Understanding) and Chapter 11 (Little Talk). You were asked to focus on how dialogue is set out in the book. Now you are going to practise writing your own dialogue…
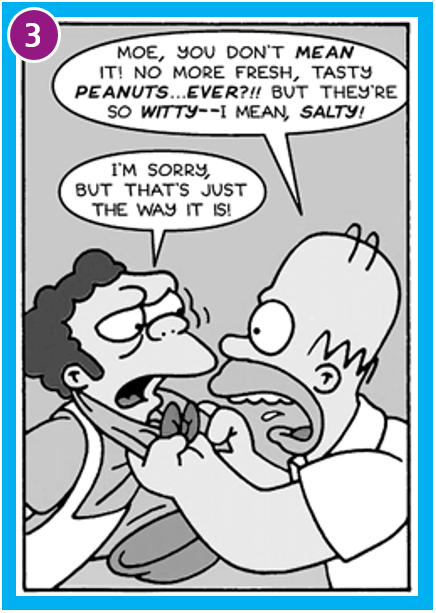
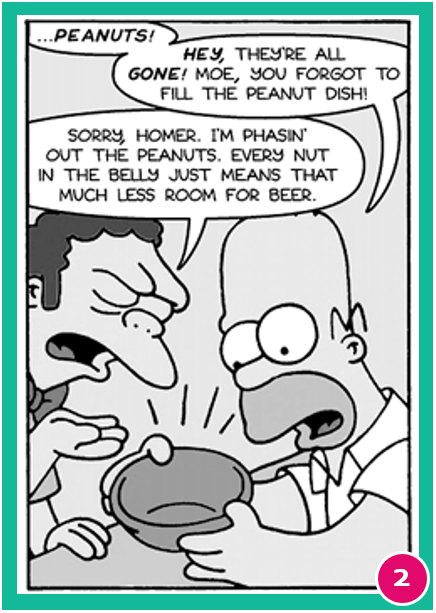
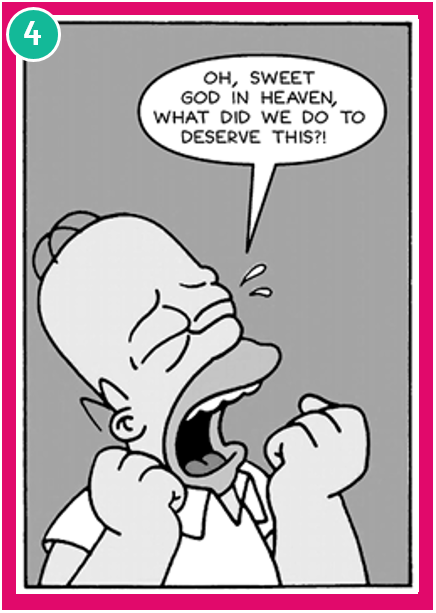
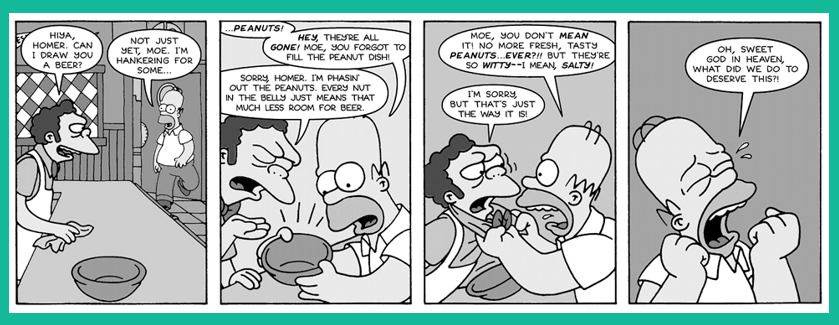
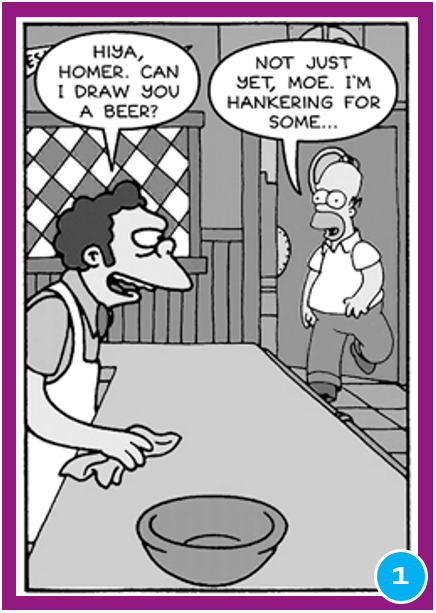
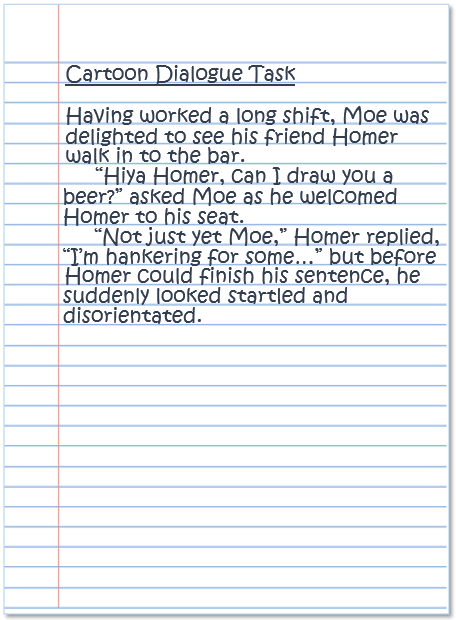
Look at the comic strip below:
This is a comic strip featuring a conversation between Homer and Moe from the Simpsons. The only information we have is what the characters say. We know their emotions because of the pictures, but in a novel, there are very rarely pictures, which means that it is down to your description to let the reader know that information.
6.
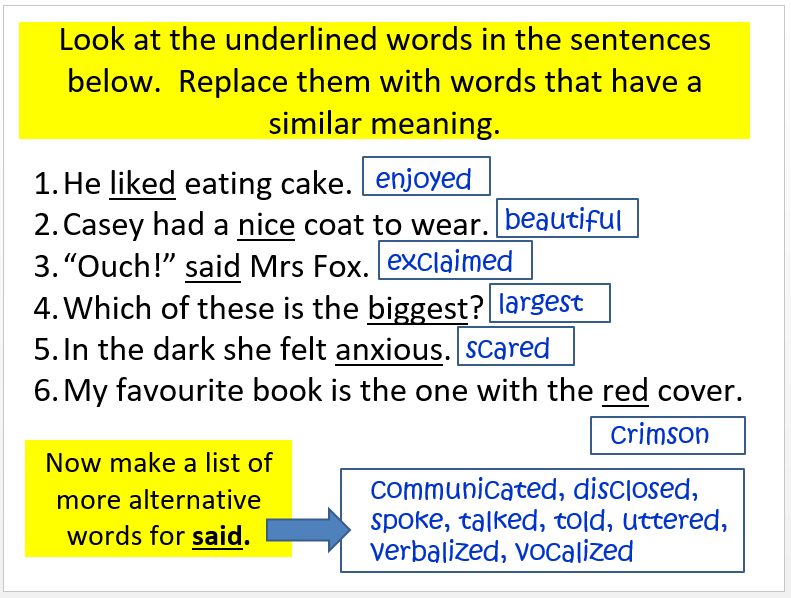
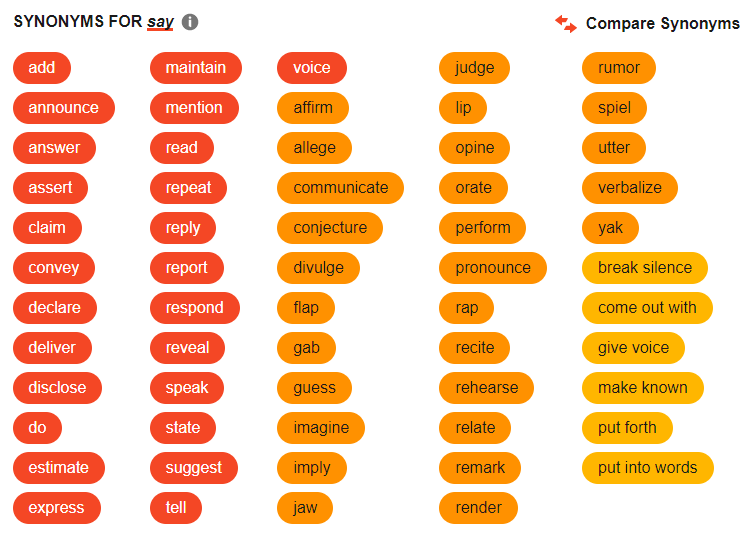
Look back in your books to when we found alternatives to the word ‘said’.
Turn this comic strip into a written narrative, by writing the speech out into dialogue. Remember to use the five rules that we have looked at today.
In this task the word ‘said’ is banned from your dialogue! Try to use a better range of vocabulary in your work.
ADVICE
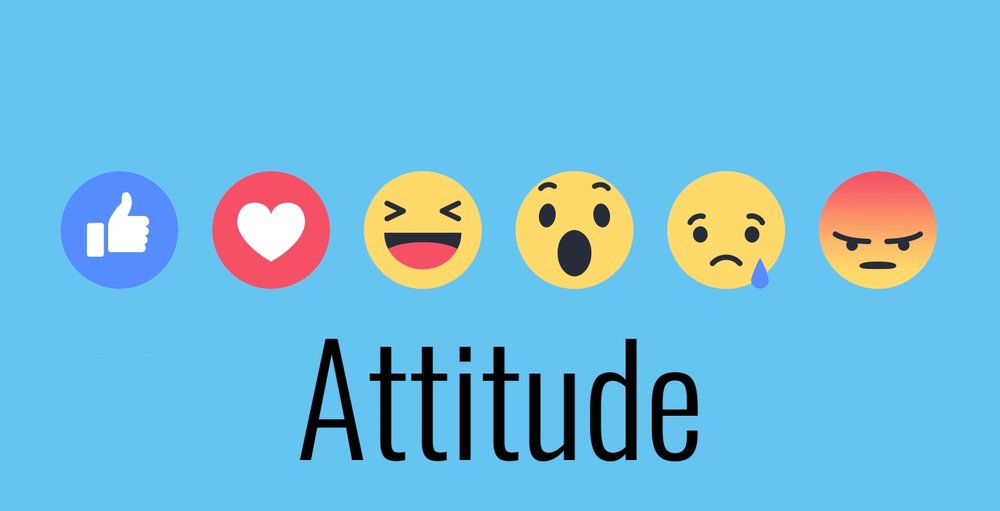
So you need to write the dialogue as shown in the cartoon, but with actions and attitudes.
Use the example below as a start (if you need to) and do the same for the rest of the comic strip. Use as much detail as you can to make it entertaining. Remember to NOT use the word ‘said’!
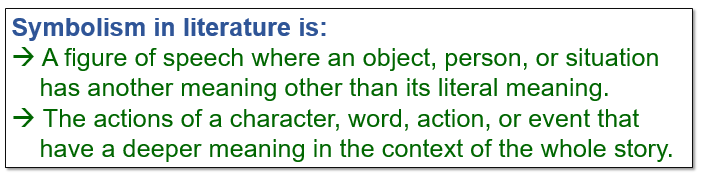
Writers use symbolism to explain an idea or concept to their readers in a poetic manner without saying it outright. The use of symbolism allows writers to make their stories more complex. People often also use symbolism in everyday life.
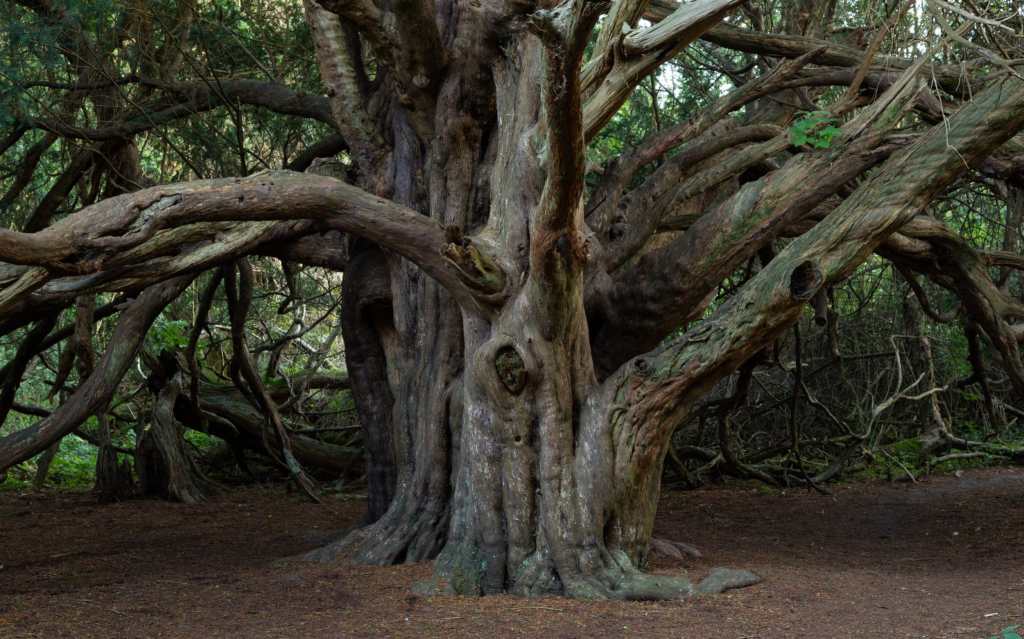
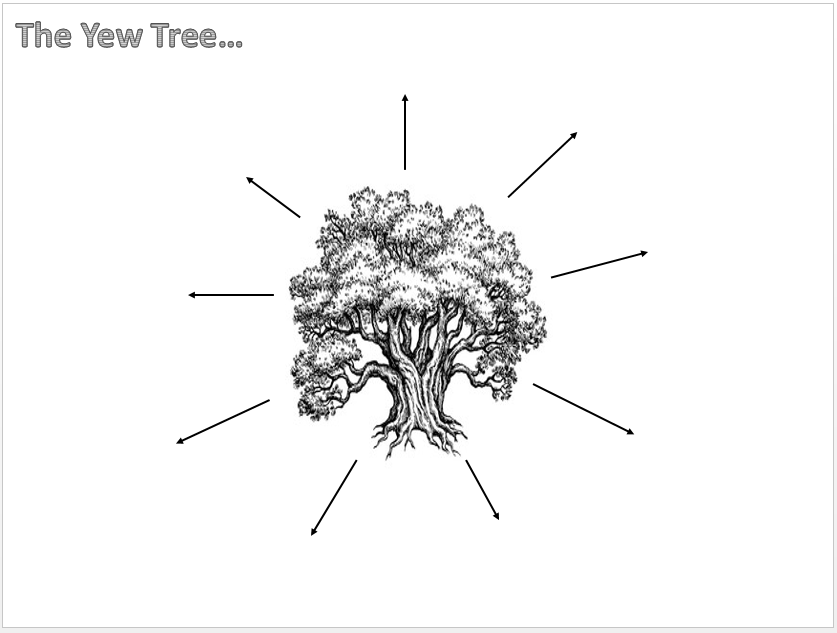
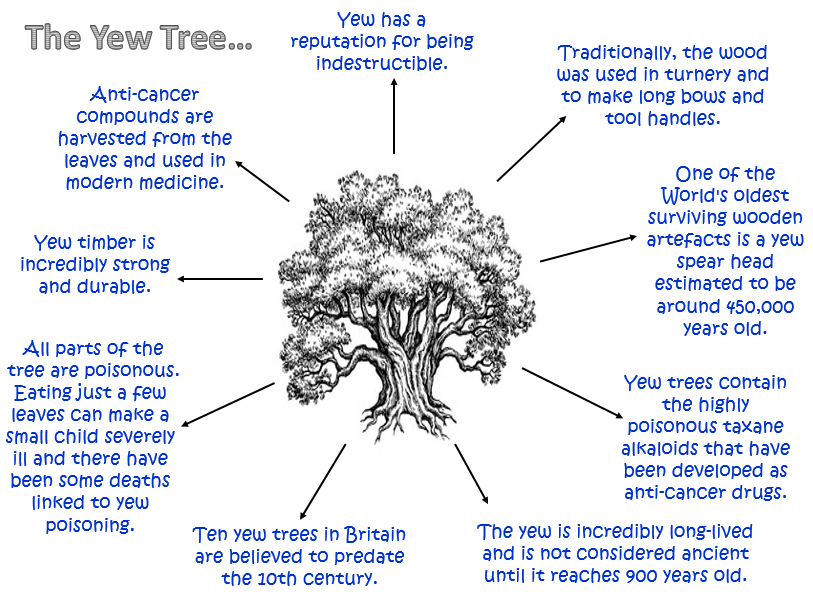
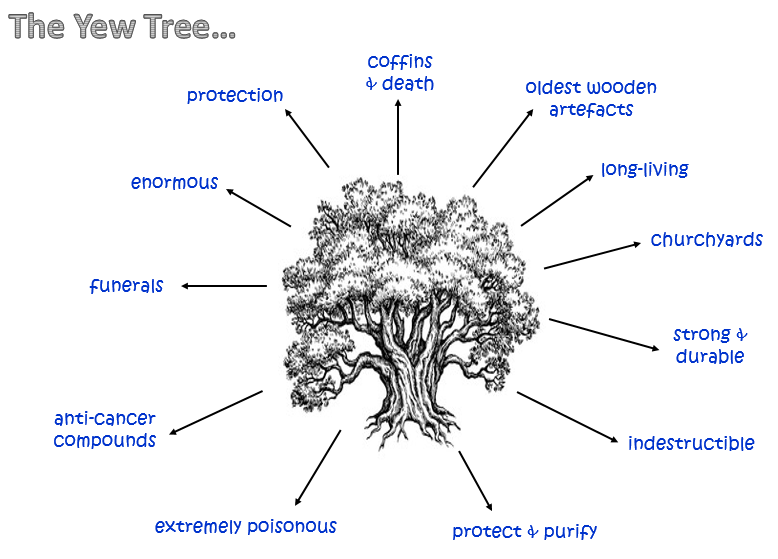
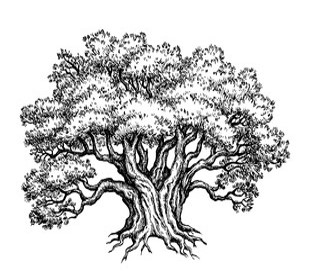
The image of the yew tree is repeated throughout the novel, but what is significant about a yew tree and why is it being associated with the monster.
Complete the following task to determine why the author has chosen to use a yew tree to be associated with the monster. Use the diagram to write down interesting facts or ideas about yew trees. (You need to do research on this and complete the task at home!)
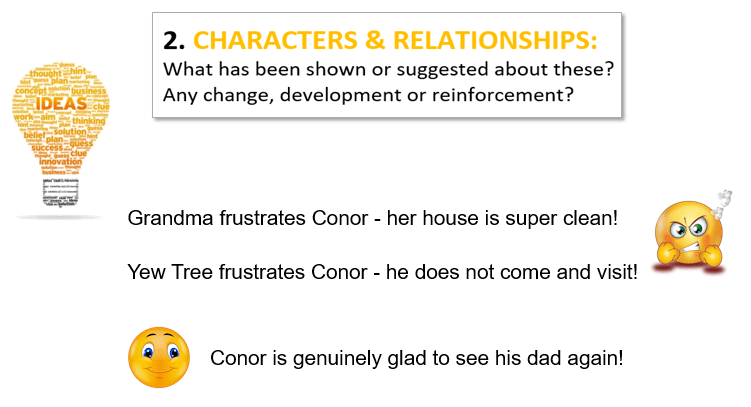
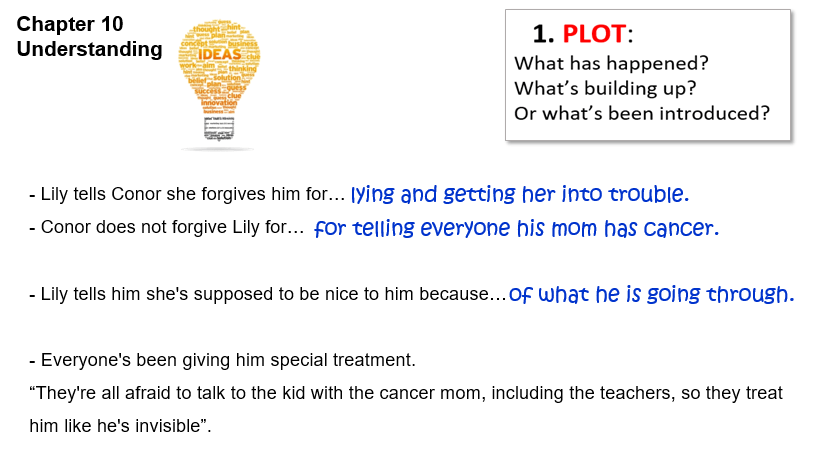
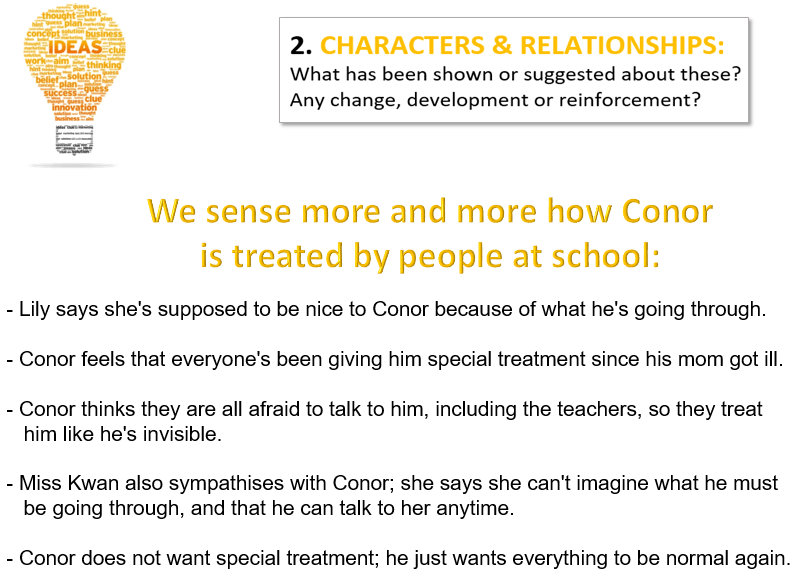
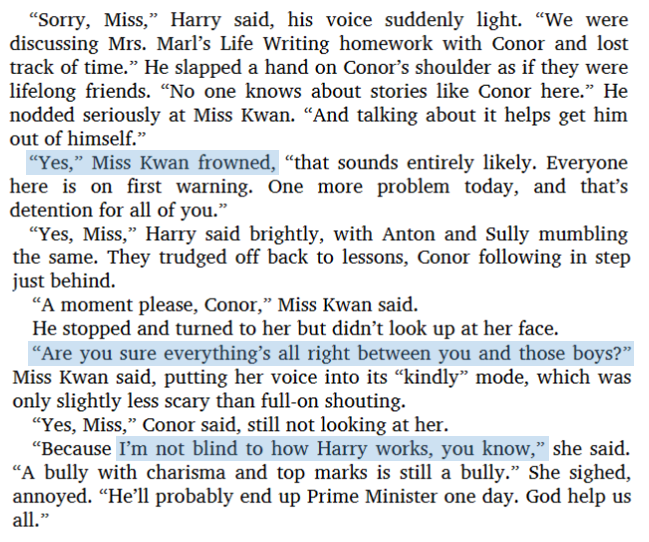
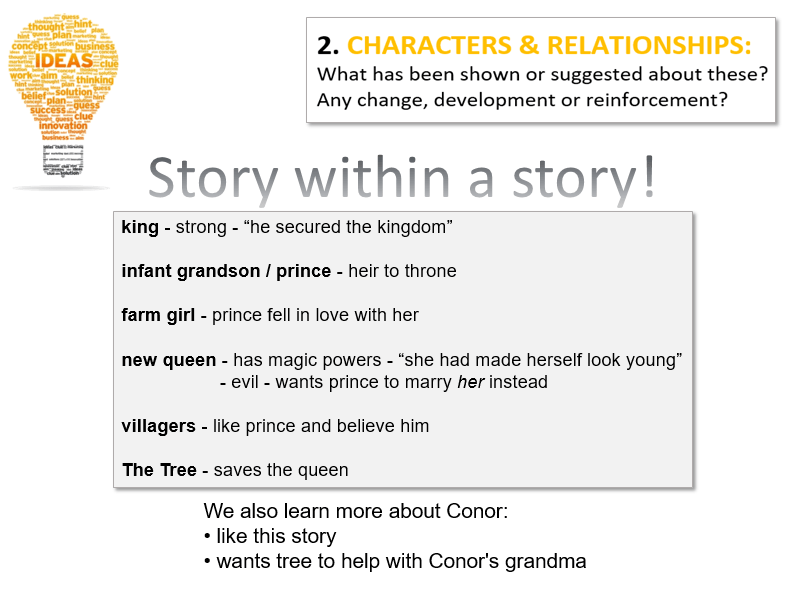
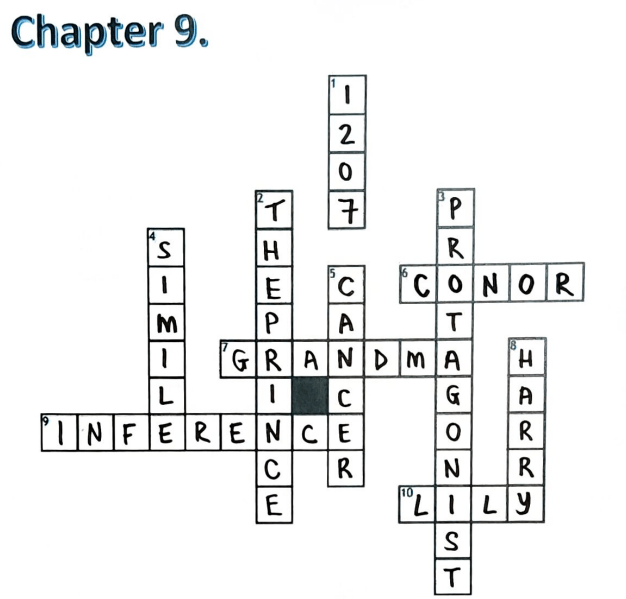
Chapter 9: We learn more about the Conor through the following:
AND…
4.
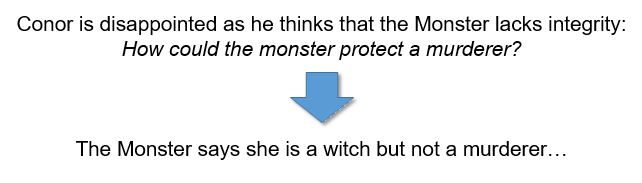
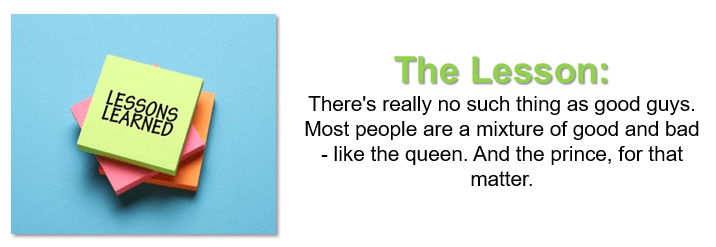
Is the Monster trying to teach Conor a lesson?
Consider the following Inference Questions:
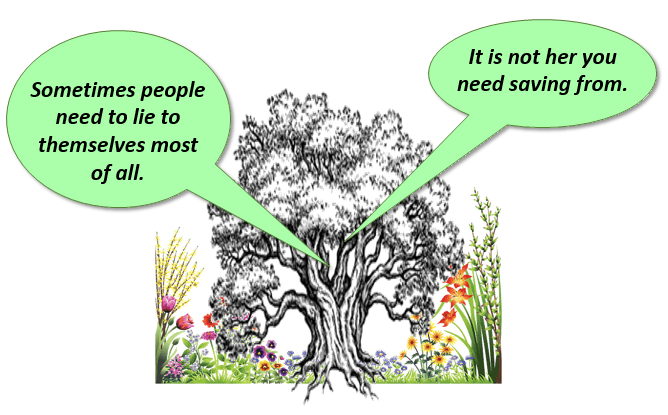
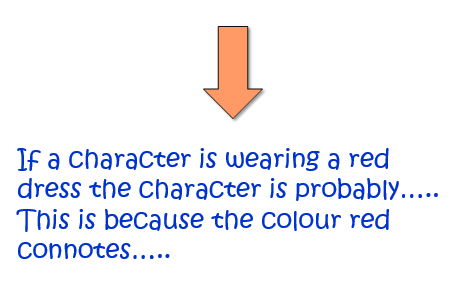
1) ‘Sometimes people need to lie to themselves most of all.’ Do you think the monster is just referring to the First Tale when he makes this statement?
2) ‘It is not her you need saving from.’ Speculate about what the monster believes Conor actually needs saving from.
5.
You learnt the following about symbolism …
Writers use symbolism to explain an idea or concept to their readers in a poetic manner without saying it outright. The use of symbolism allows writers to make their stories more complex. People often also use symbolism in everyday life.
What is symbolism in writing, and how does it work?
Symbolism is the use of words or images to symbolize specific concepts, people, objects, or events. Symbolism is a figure of speech that is used when an author wants to create a certain mood or emotion in a work of literature.
You already know that the yew tree is a symbol of …
Writers also make use of Allegories to make their work more interesting…
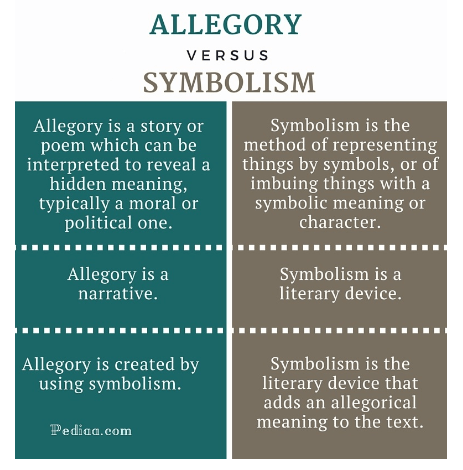
An allegory is a story, poem, or picture which can be interpreted to reveal a hidden meaning, typically a moral one.
Allegory is a narrative, a poem or story, that can be interpreted to reveal a hidden meaning. A moral lesson is often presented in the form of an allegorical story.
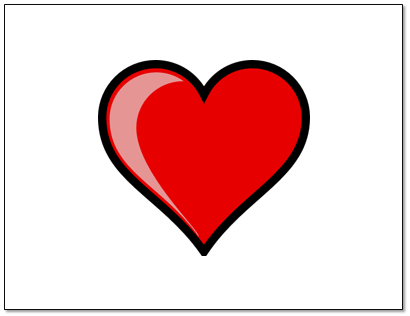
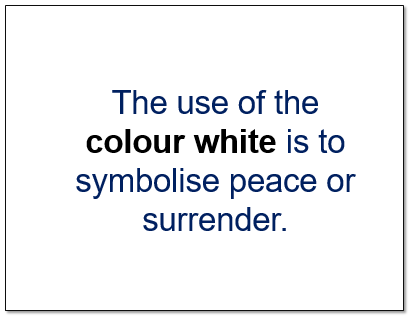
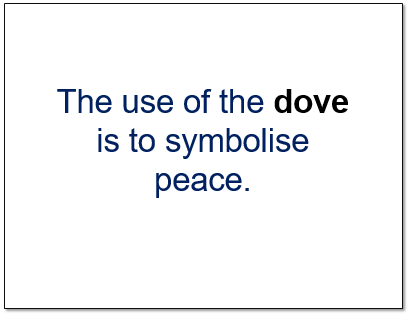
Symbolism is a literary device that presents one particular item, like a dove, to represent something else (peace).
In other words, an allegory is a whole story, poem, or book. Symbolism can be just a part of the story, poem, or book.
7.
Here is an example of an allegory:
The Lion and the Mouse. (2:51 minutes long)
A kindness that is given is a future kindness returned.
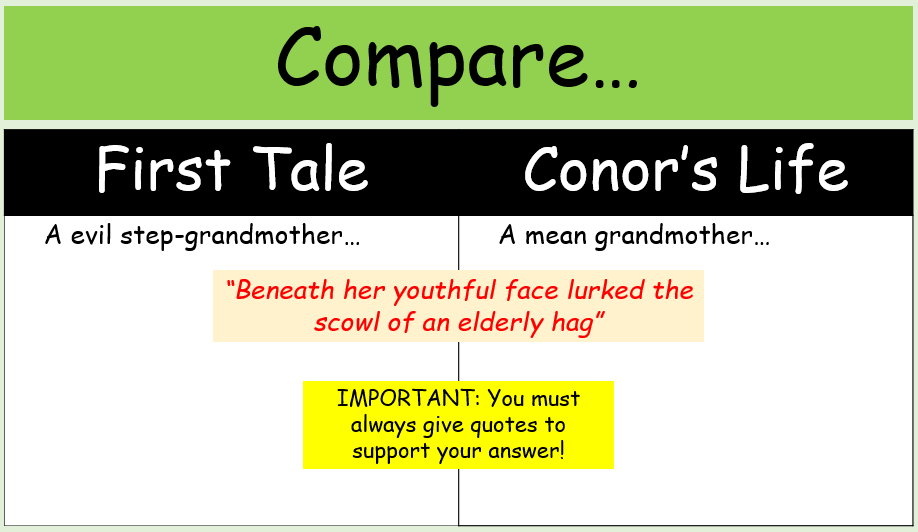
How was ‘the first tale’ allegorical? (Consider this quote: “There was nowhere for the prince to run. His horse had been chased away while he slept. The yew tree was his only shelter.”)
What similarities can you make between the tale and Conor’s life?
So, what hidden meaning did the first tale have for Conor’s life?
Answer the following question in detail:
How is ‘The First Tale’ an allegory for Conor’s life?
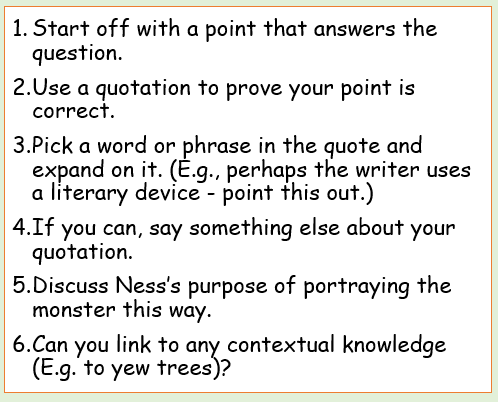
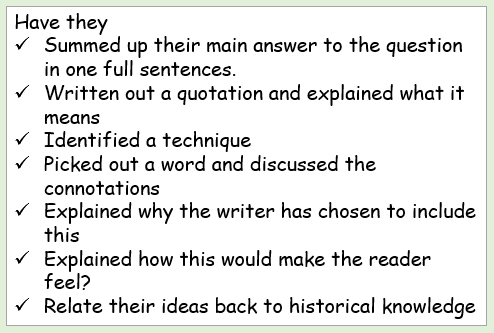
Here is how one should tackle a question like this one!
This is how you teacher would mark this type of question:
8.
Let’s look a little deeper into symbolism in literature:
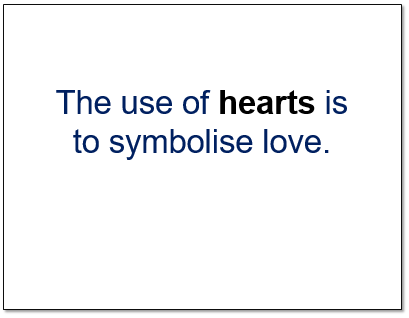
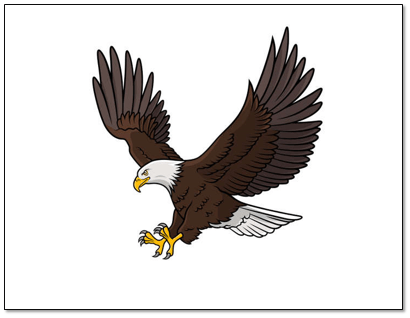
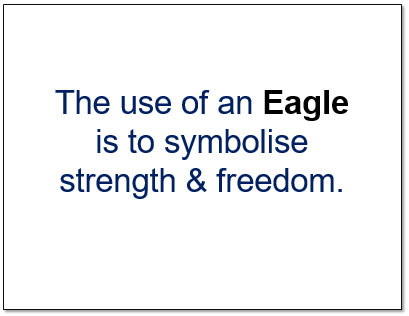
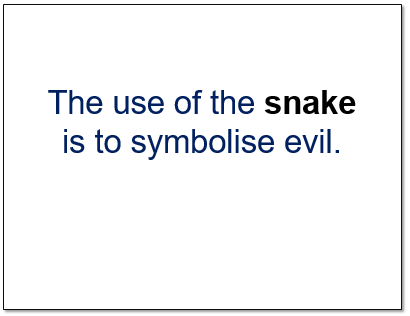
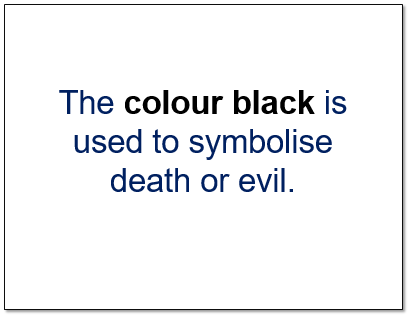
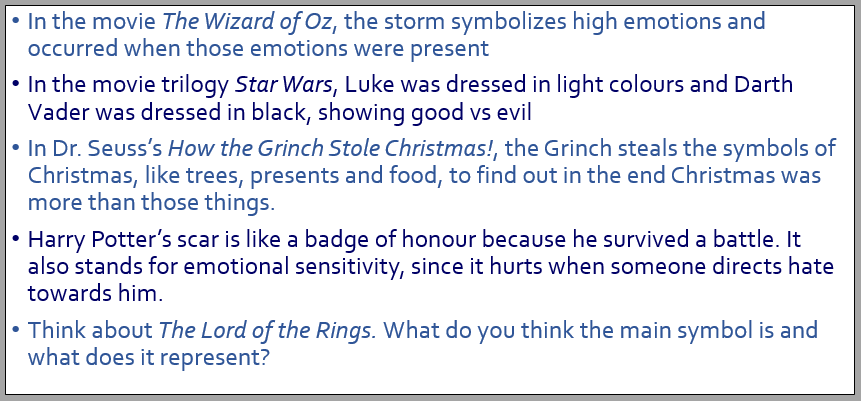
Here are more examples of symbolism, from well-known texts:
9.
Copy the information below into your book for study purposes:
Allegory is a narrative, a poem or story, that can be interpreted to reveal a hidden meaning. A moral lesson is often presented in the form of an allegorical story.
Symbolism is a literary device that presents one particular item, like a dove, to represent something else (peace).
In other words, an allegory is a whole story, poem, or book. Symbolism can be just a part of the story, poem, or book.
10.
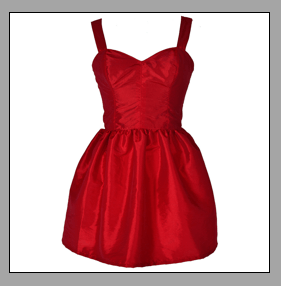
Answer the following question:
If a character was wearing a red dress, what could that symbolise?
11.
And now for a few more questions…
Answer the following questions:
“Search and Locate” Questions:
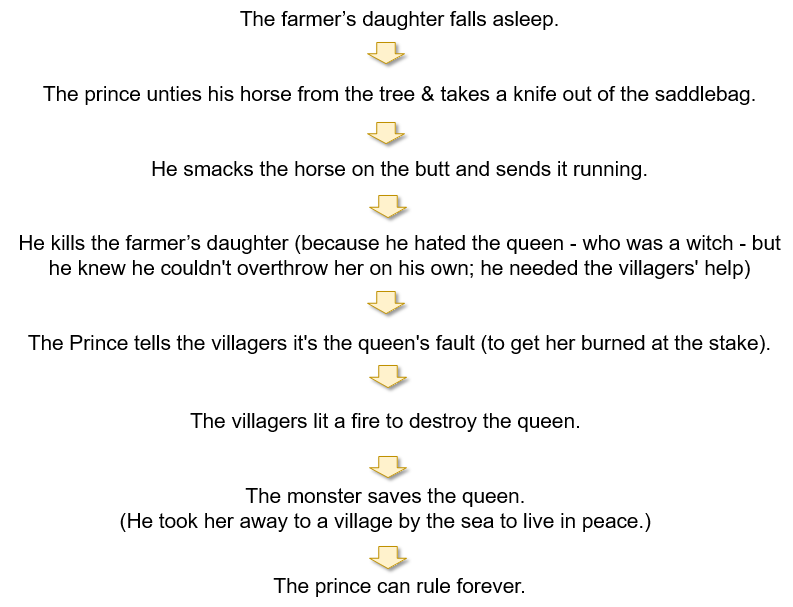
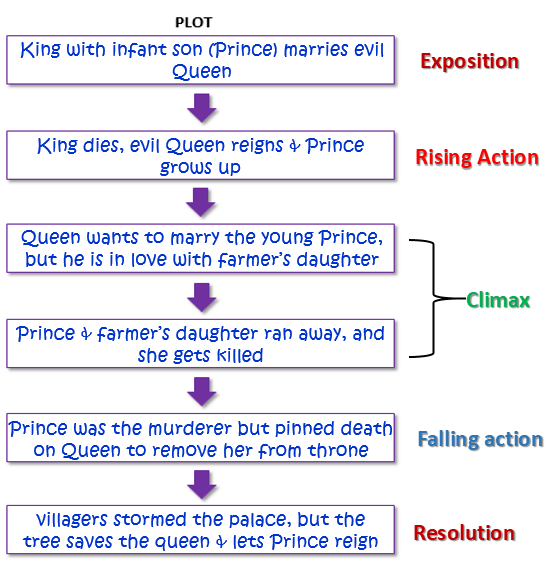
a) What rumours surrounded the King’s illness? (P.72)
b) What was the Queen’s plan for retaining power? (P.74)
c) Who saved the Queen from the flames? (P.79)
d) Where did the monster take the Queen? (P.79)
e) Who murdered the farmer’s daughter? (P.81)
Summary Task:
Retell the First Tale in 3 chapters.
The first must contain exactly 75 words, the second exactly 50 words and the final chapter must contain exactly 25 words. (Be as specific as you can, and stay within the word count.)
Additional Questions on Symbolism:
b) Which character in the book could The King be a symbol for? Explain your answer.
a) Which character in the book could the Queen Regent be a symbol for? Explain your answer.
12.
And now for even more questions!
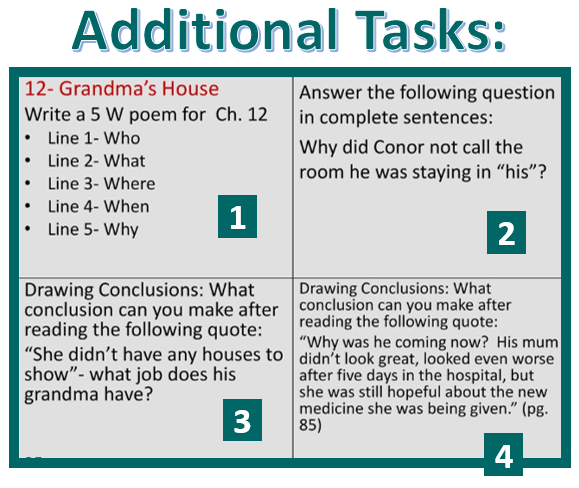
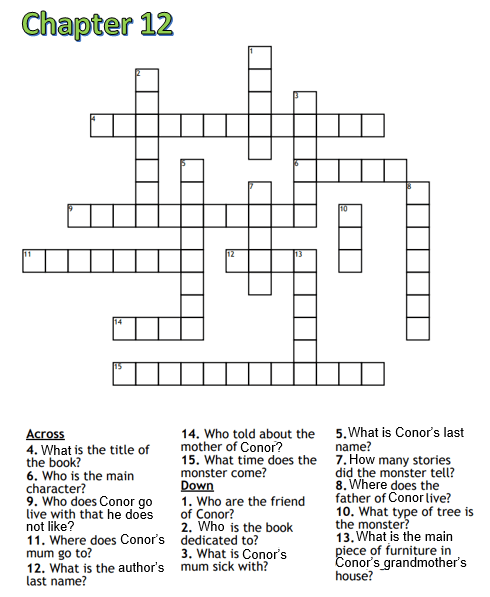
Answer the following questions:
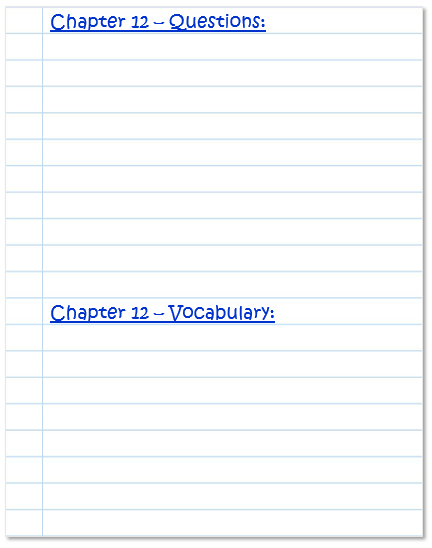
You need to use a new page in your book.
Write the headings as shown below.
(After this task you will also look at vocabulary.)
What is symbolic about a tree or a plant? Does it symbolise life, maybe? Or growth? Perhaps, but there is something more to a Yew tree in particular… We know that the leaves off a Yew Tree are used to create a medicine called Taxol, a medicine that is used in the treatment of Cancer!
Answer these questions in your book:
1. Is the Yew Tree Monster here to help or harm Conor?
2. Why has Patrick Ness chosen a Yew Tree specifically?