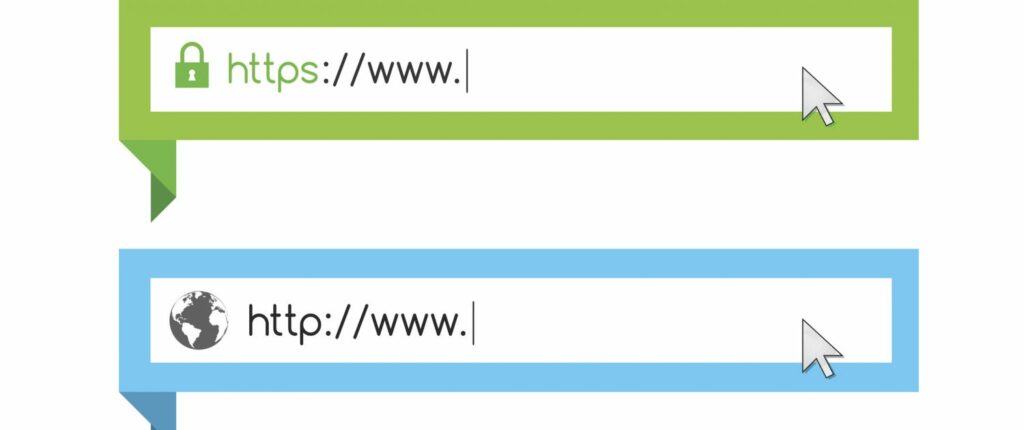
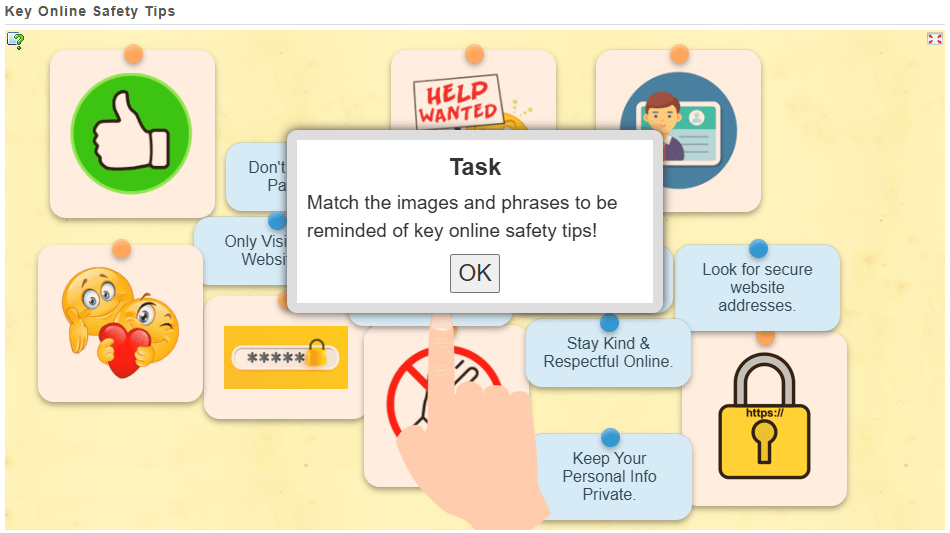
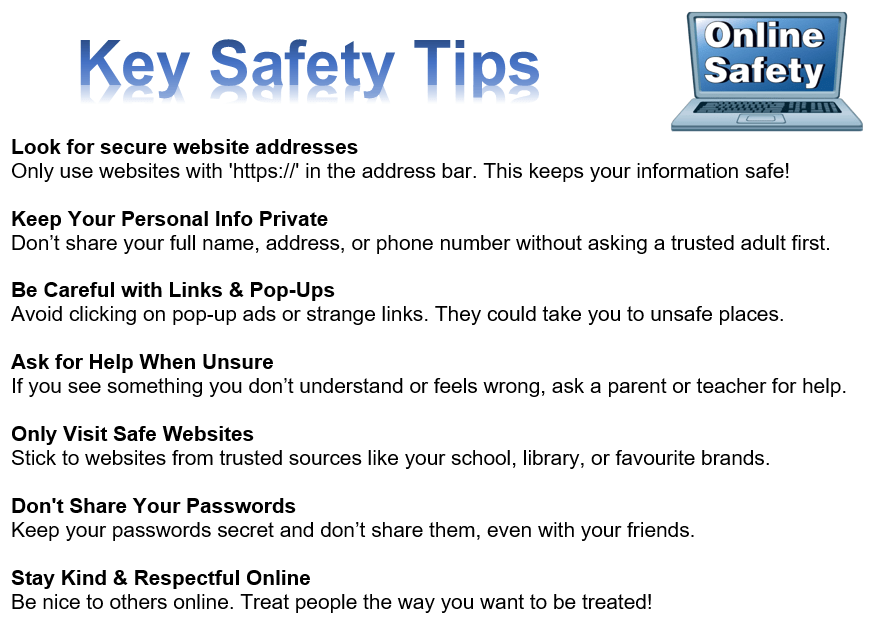
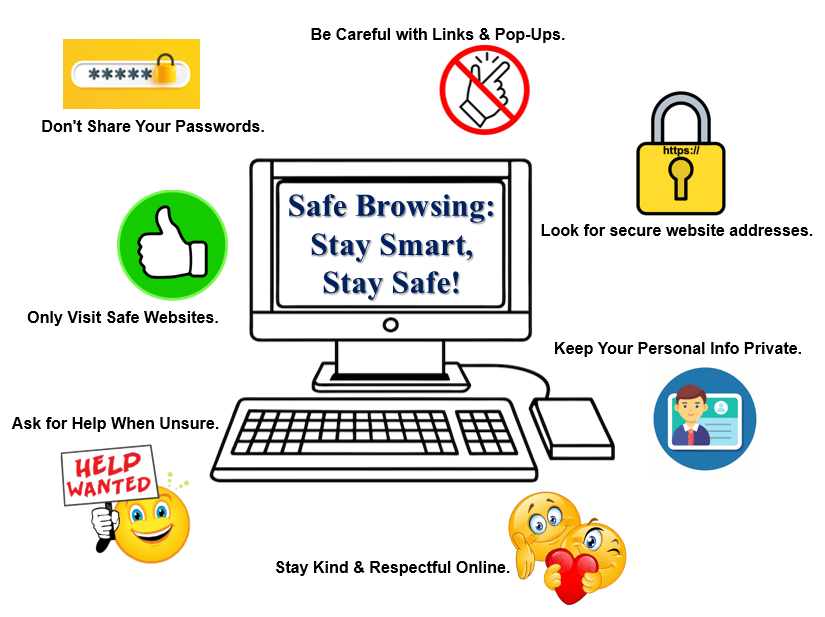
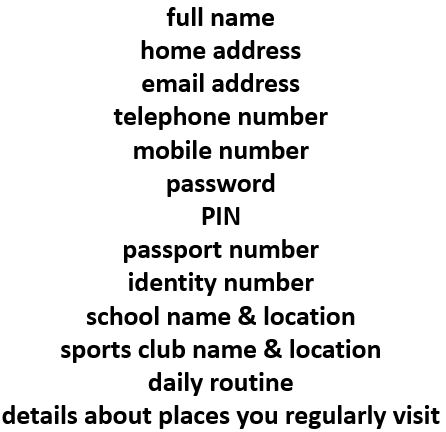
Look for “https://” at the beginning of the website address. It means the website is safe and keeps your information protected.
It Has a Privacy Policy
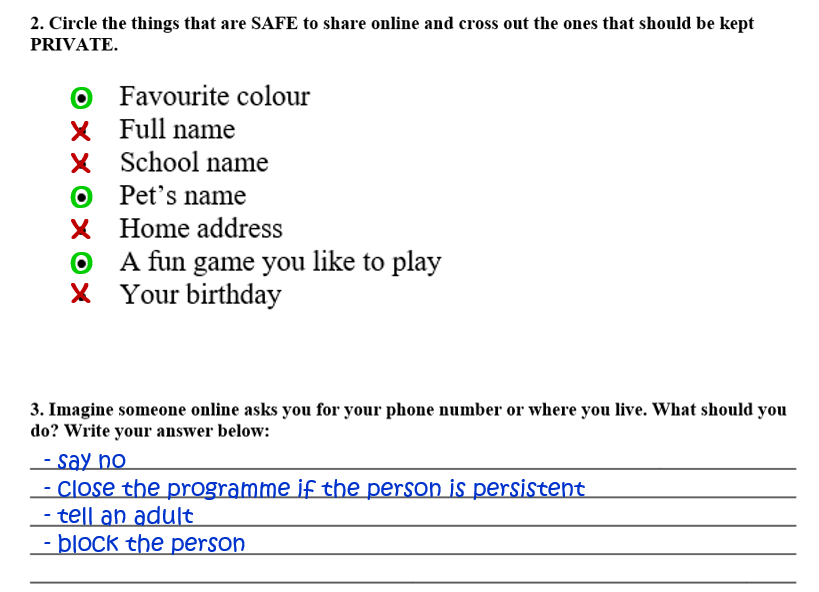
Safe websites tell you how they keep your information private and safe. They explain what they do with your information.
Parental Controls
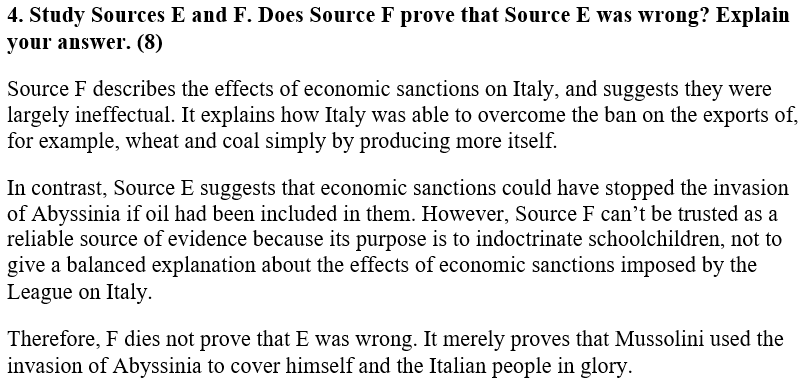
Safe websites let parents check and control what kids can see and do on the website.
It’s from a Trusted Source
The website comes from a company, school, or group you know and trust, like your school website or a well-known store.
No Annoying Pop-Up Ads
Safe websites don’t have annoying pop-up ads that could take you to a bad website.
Clear Contact Information
The website shows where you can contact the people who run the website if you have questions or problems.
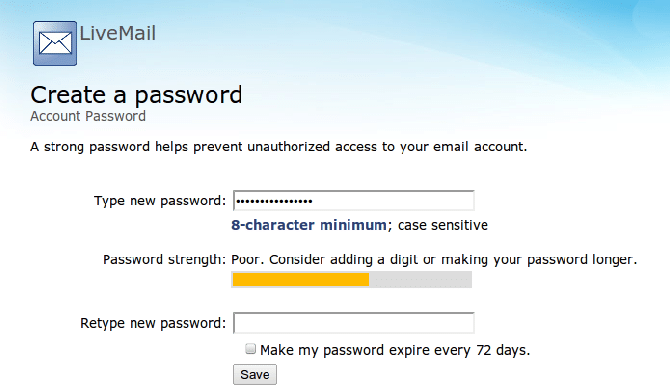
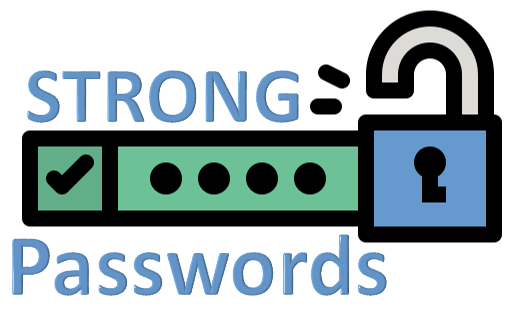
Strong Passwords
If you need to make an account, the website asks you to make a strong password with letters, numbers, and symbols to keep your account safe.
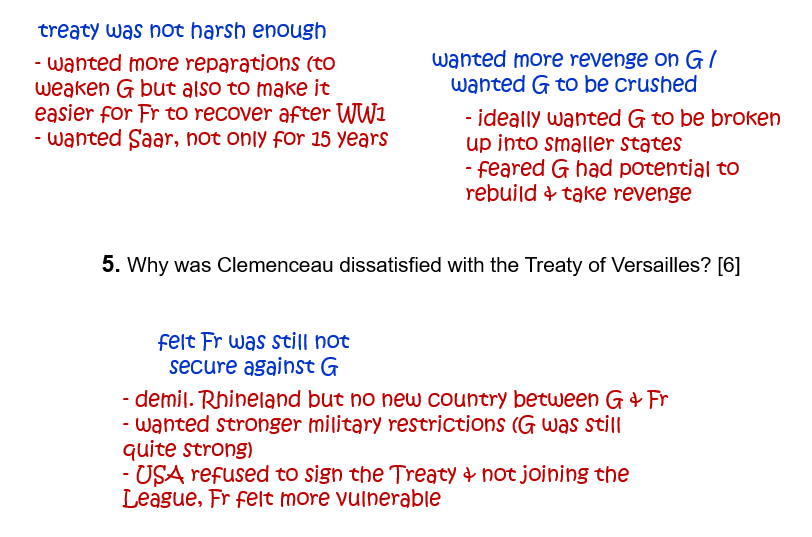
5.
We will now consider what makes a website unsafe:
Things That Make a Website Unsafe:
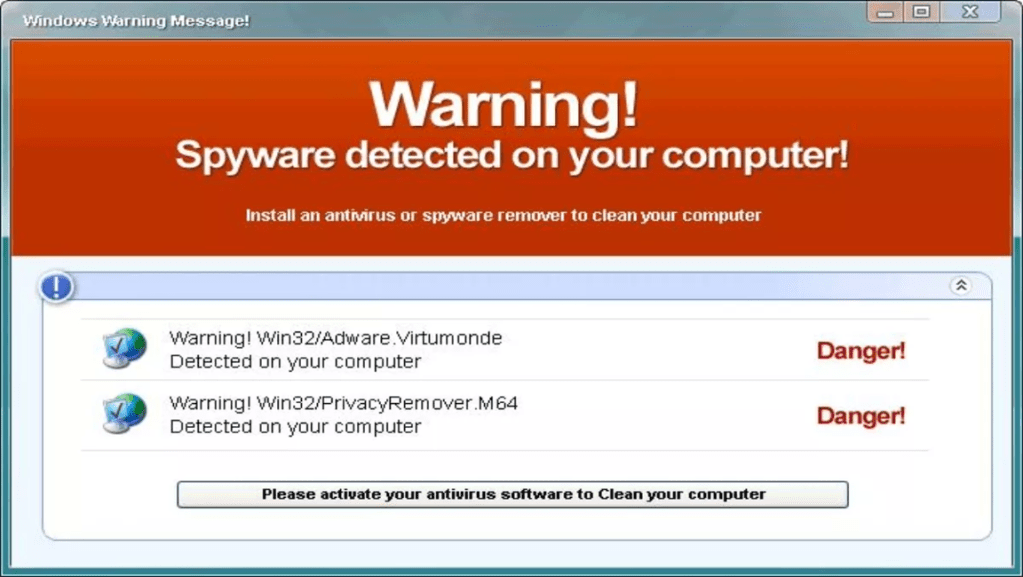
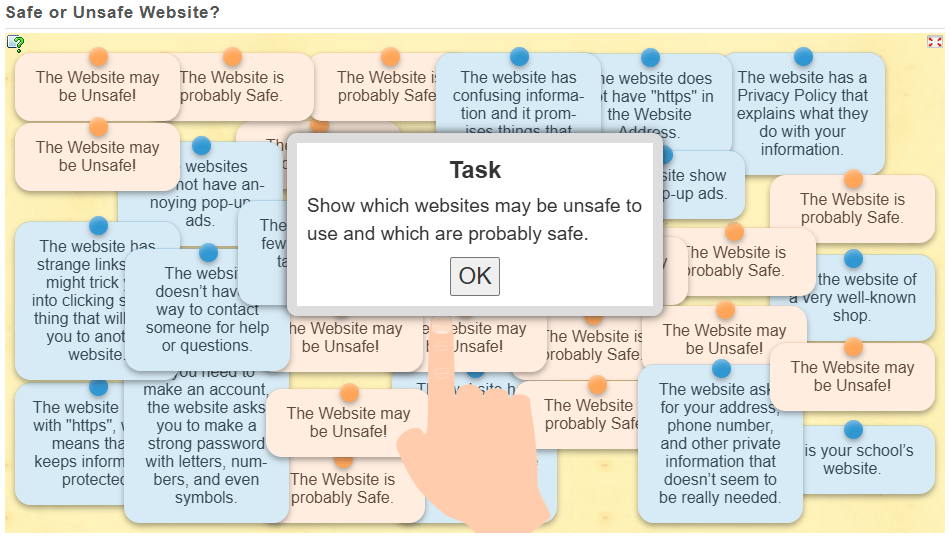
No “https” in the Website Address If the website doesn’t start with “https://,” it might not be safe to use.
No Privacy Policy Unsafe websites don’t tell you how they protect your personal information.
Pop-Up Ads or Weird Links Unsafe websites show pop-up ads or strange links that might trick you into clicking something bad.
Asking for Too Much Personal Info If the website asks for your address, phone number, or other private information that doesn’t seem needed, it might not be safe.
No Way to Contact Them If the website doesn’t have a way to contact someone for help or questions, it might be unsafe.
Spelled Wrong or Strange Name If the website has a funny name or weird spelling, it could be a trick to get you to a fake website.
Confusing or Fake Information If the website has confusing information or promises things that seem too good to be true, it’s best to stay away.
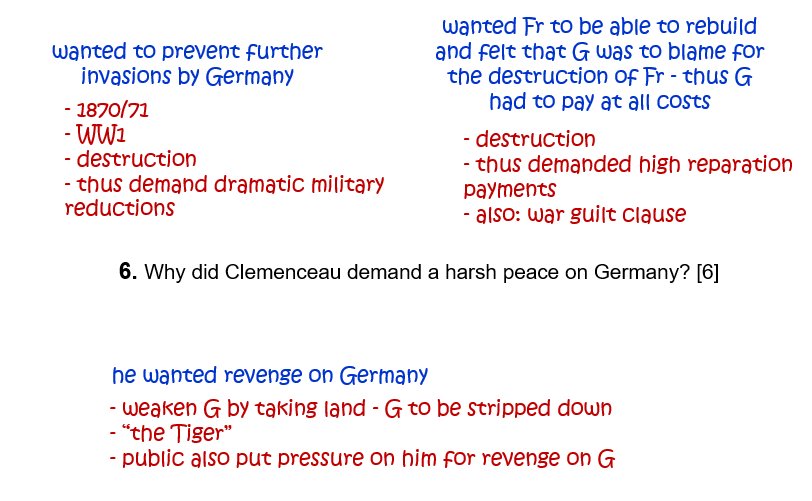
6.
Let’s look at ways in which websites are unsafe…
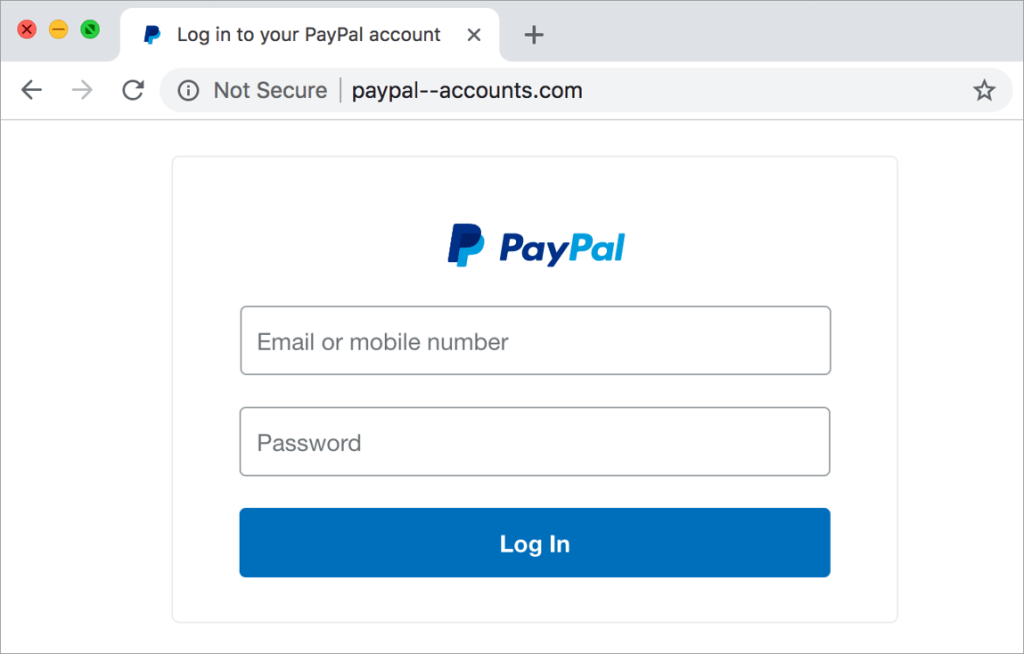
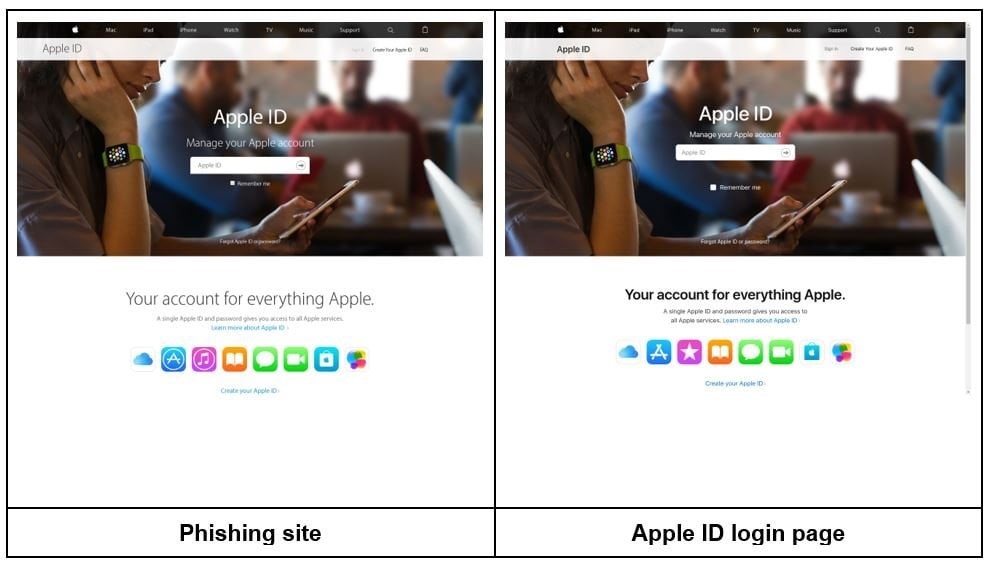
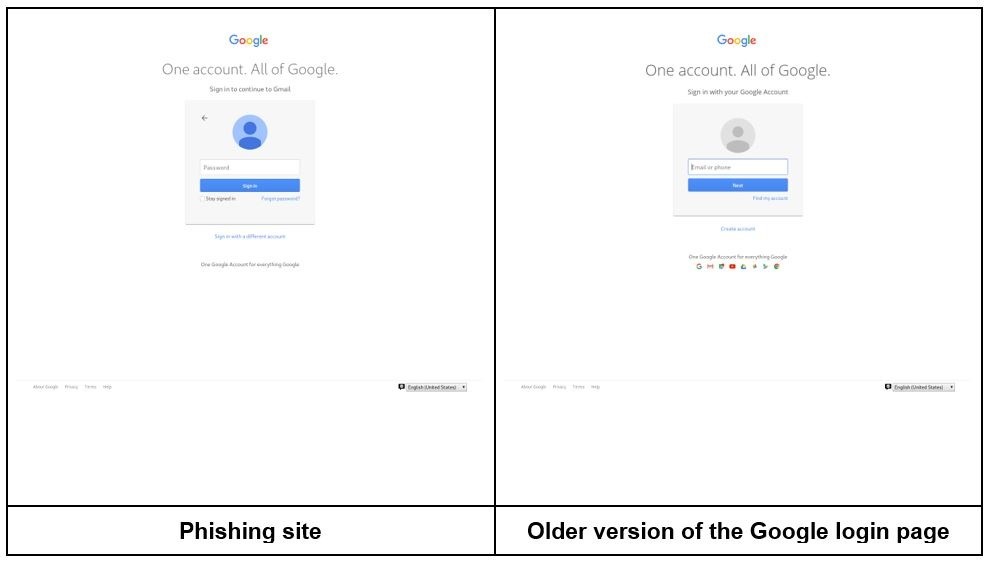
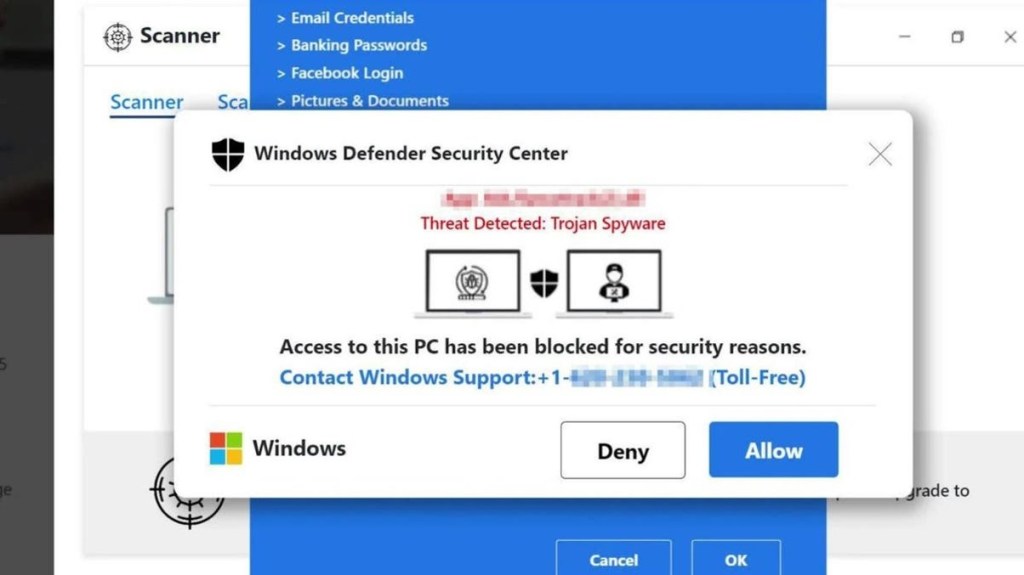
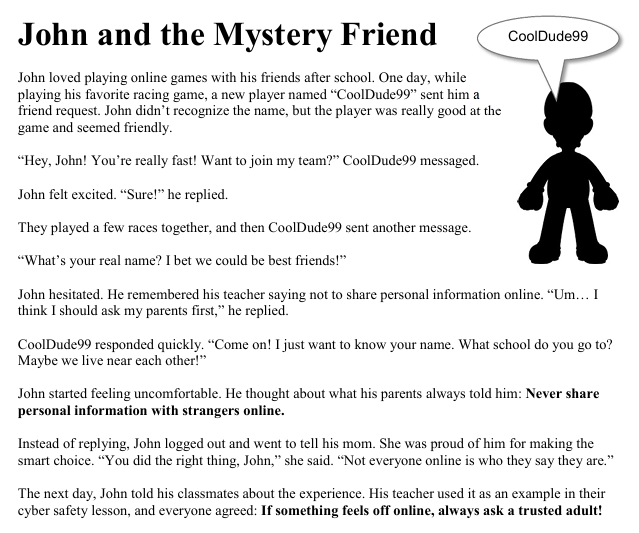
This is a fake login page that mimics a real service like Google or PayPal.
How does phishing work?
Phishing is a technique used by cybercriminals to trick people into giving up personal information such as credit card details and login details. It can come in many forms, including telephone phishing, smishing (SMS phishing), phishing emails, and phishing websites.
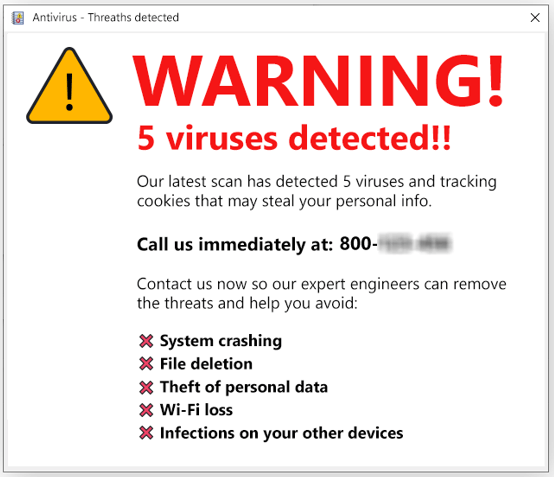
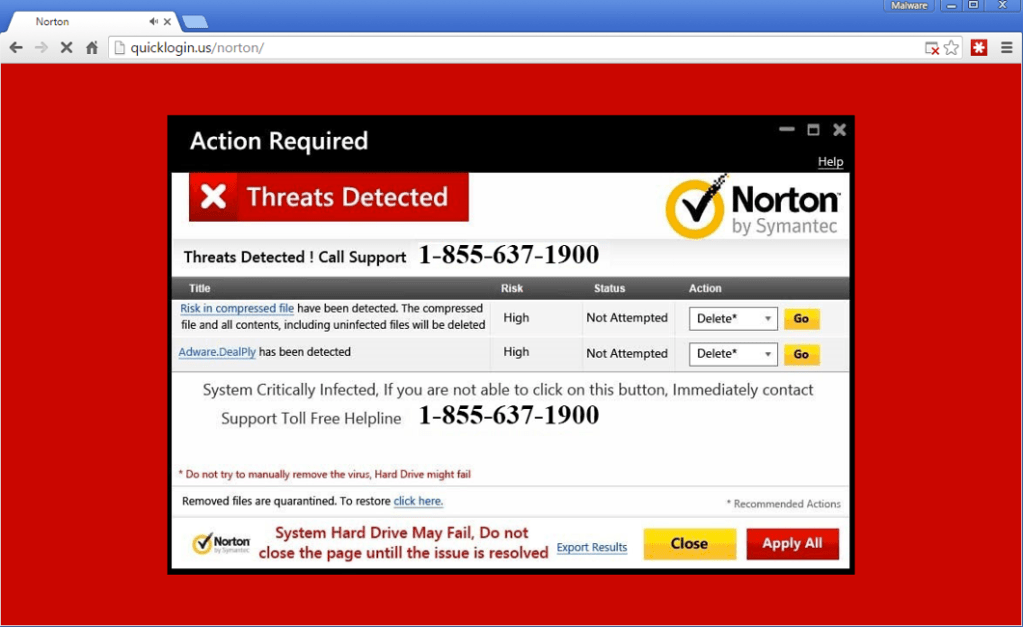
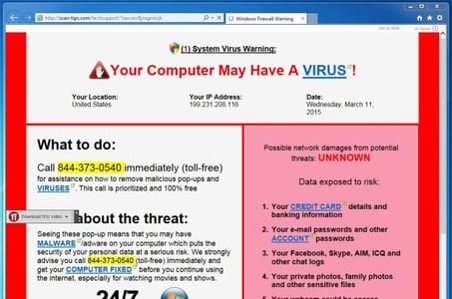
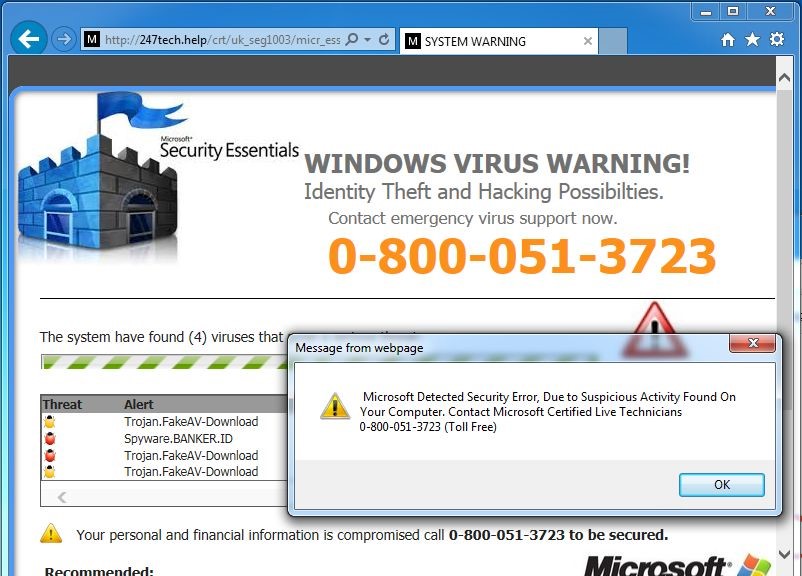
This is a flashing pop-up claiming “Your computer is infected! Click here to scan now!”
Some scare-war sites ask you to “contact a Helpline”. When you call the number, you would be asked to allow the technician to take remote control of your computer.
Does Your Computer Have A VIRUS? (5:46 minutes long)
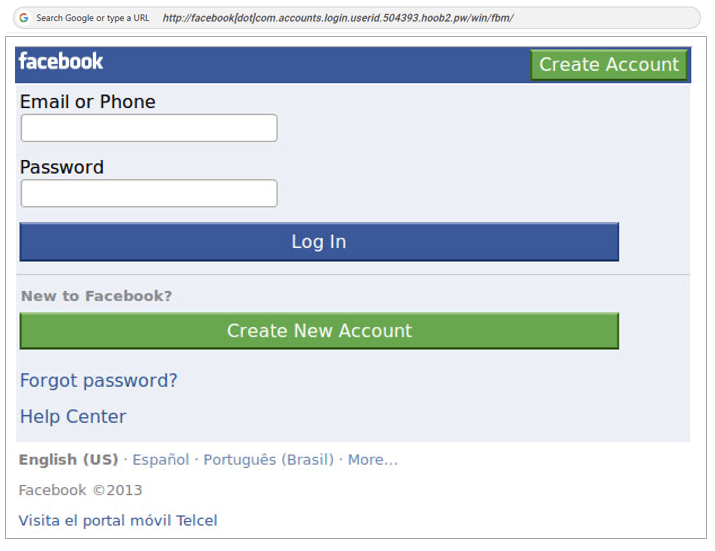
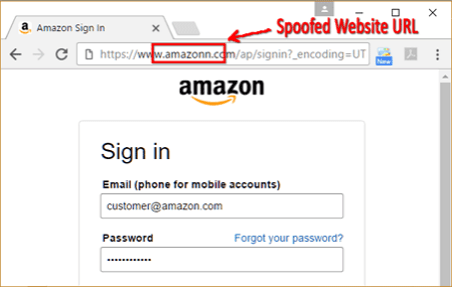
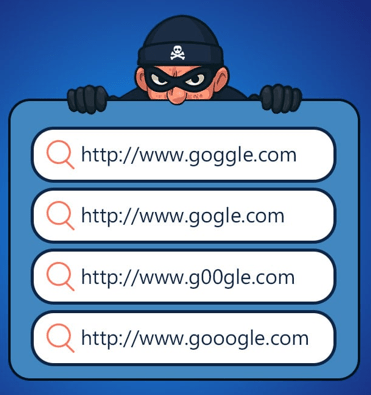
This is a website that looks like amaz0n.com instead of amazon.com, showing ads or malware downloads.
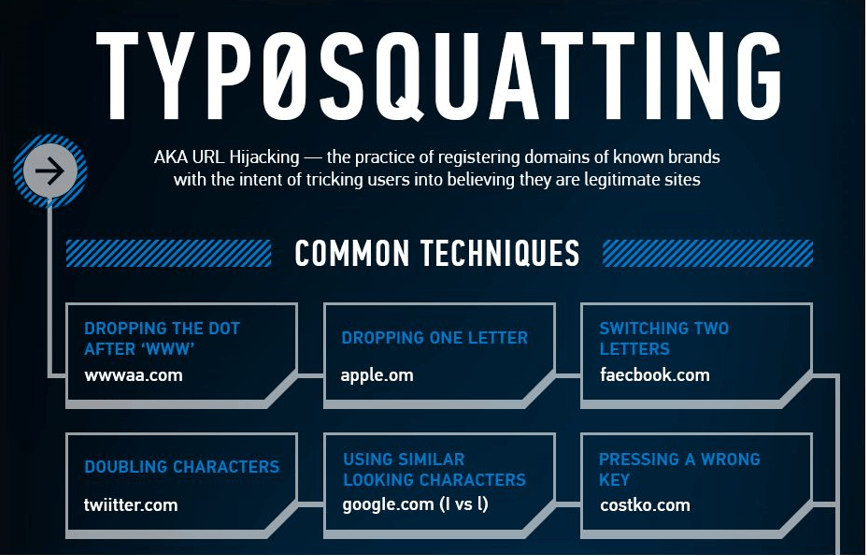
Typo-squatting, is a form of URL hijacking, where criminals register domain names that are slightly misspelled versions of legitimate websites. They do this to trick users into thinking that they use the real website.
This is a page that locks the browser and displays a fake Microsoft or Apple warning with a phone number to call.
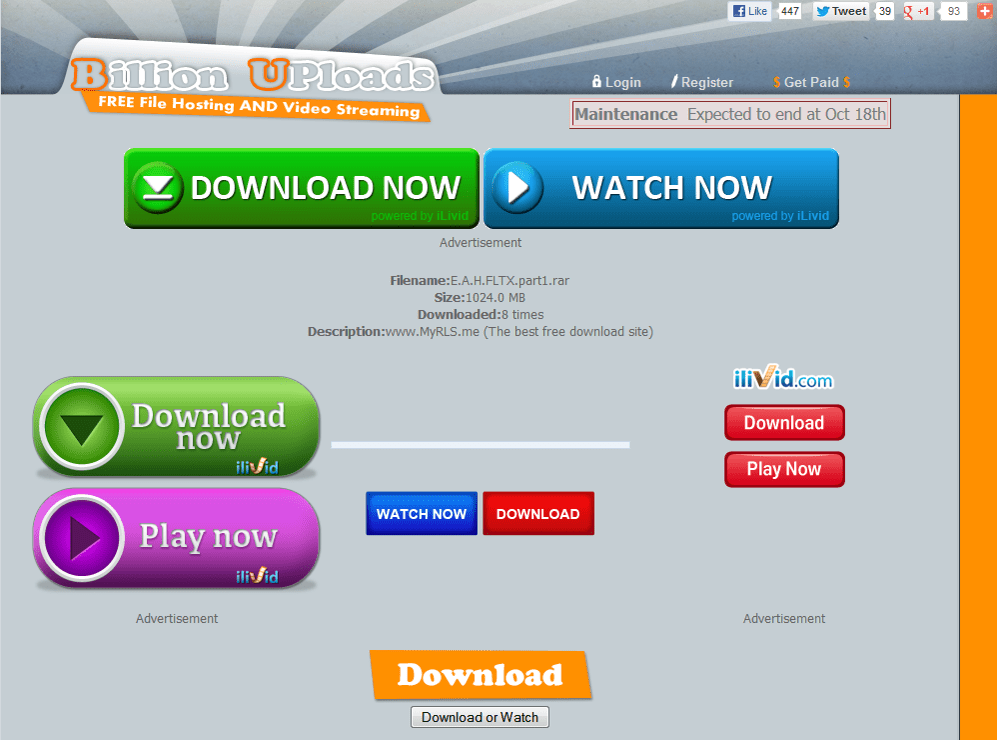
This is a a download page for popular software that includes multiple misleading “Download” buttons.
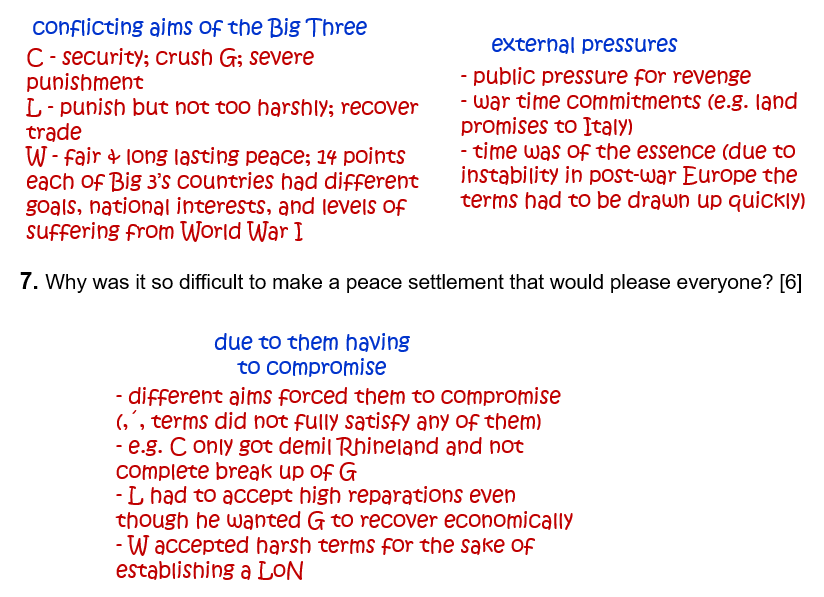
7.
Do you remember these online safety tips?
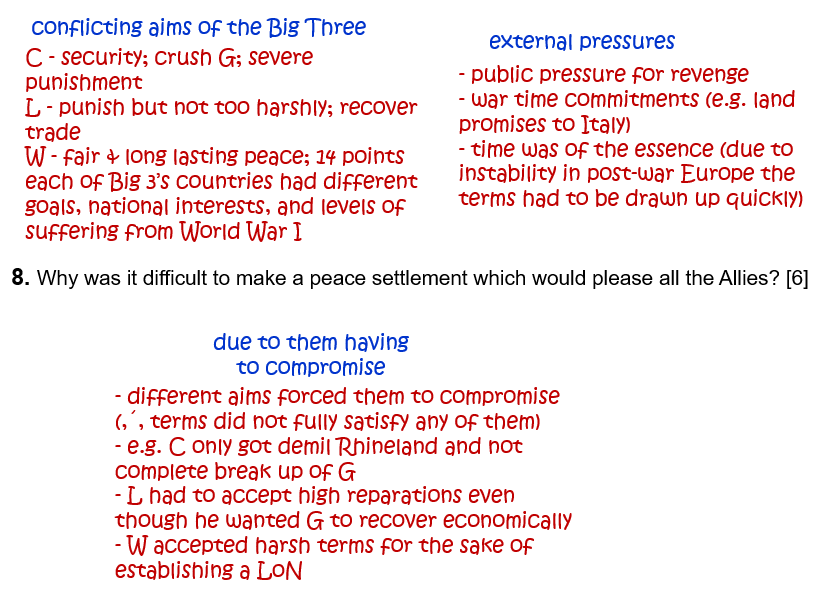
8.
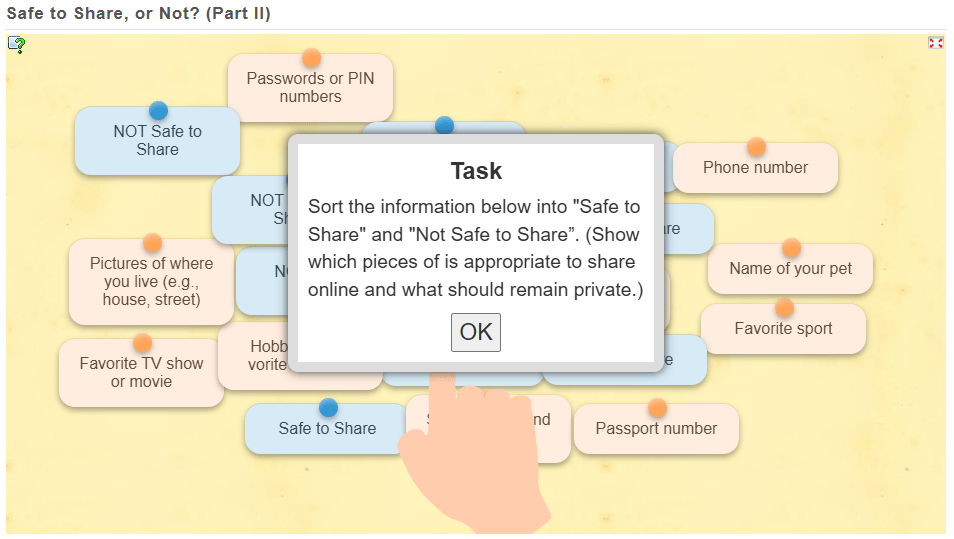
Can you identify which websites may be unsafe to use and which are probably safe?
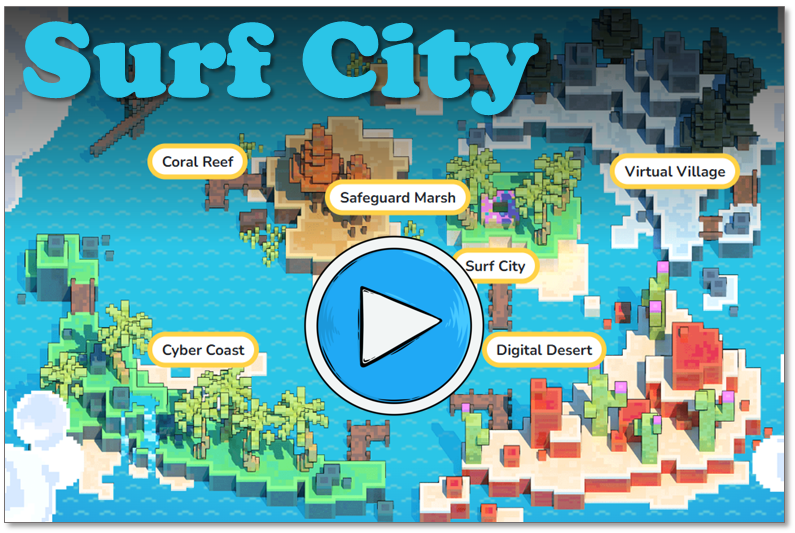
Here are some awesome internet safety games that not only entertain but will also teach you essential online skills.
As you navigate through a virtual city, you will get pop-up questions at different points. By answering these questions, you do in an interactive quiz that helps you to learn essential internet safety skills.
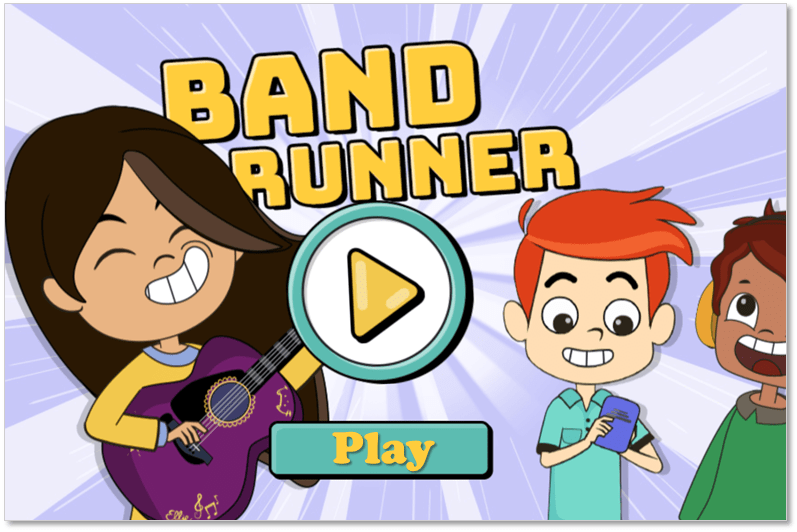
Band Runner blends fast-paced action with important safety lessons. You play as characters Alfie and Ellie. They run from potential dangers. You will help them recognize online predators and make quick, safe decisions.
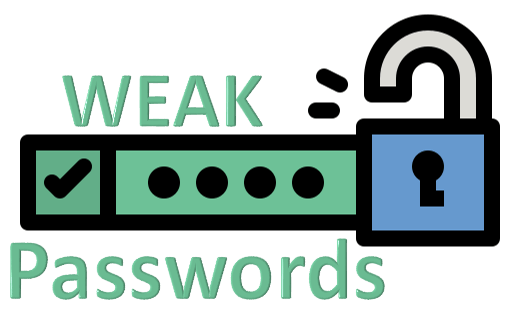
Now, let’s talk about the importance of strong passwords…
Weak passwords are easy to guess and unsafe!
123456 (Common and predictable)
password (One of the most commonly used passwords)
qwerty (Straight from the keyboard layout)
john2008 (Includes a name and birth year, which is easy to guess)
letmein (A simple phrase that hackers often try)
Strong passwords are difficult to guess and more secure!
G8f$3mLp@Xz (Random mix of letters, numbers, and symbols)
R@!nB0w_C@t99 (Uses a mix of uppercase, lowercase, symbols, and numbers)
Zebra4!Pine#Tree (A combination of three unrelated words with symbols)
Yt@#79LpQv! (Completely random mix of characters)
S!llyB@nana_34 (Uses a mix of words and symbols but is still unique)
5.
So…
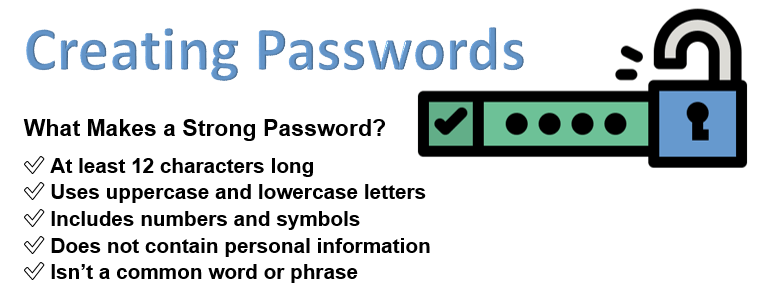
✅ Is at least 12 characters long ✅ Uses uppercase and lowercase letters ✅ Includes numbers and symbols ✅ Does not contain personal information ✅ Isn’t a common word or phrase
6.
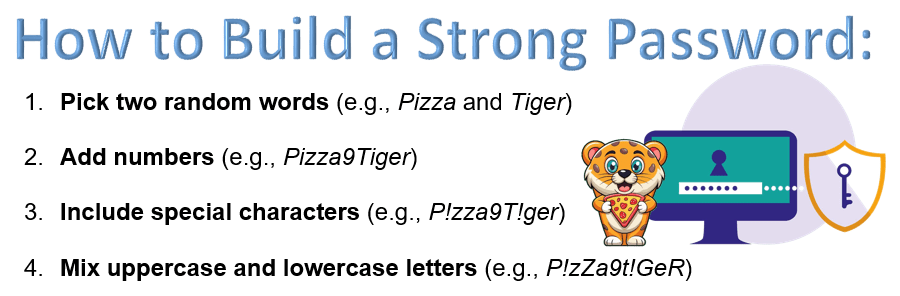
Before the next activity, look ate these tips for creating a strong password.
Use at least 12 characters
Mix uppercase, lowercase, numbers, and symbols
Avoid using your name, birthday, or common words
Use a passphrase (e.g., “Blue$ky!Jumps#Fast”)
Never share your password with others
7.
Now, let’s see if you can create a strong password, following this strategy!
(Write the password on the worksheet provided.)
Swap the worksheet with a partner and check if the password follows all the strong password rules.
(This is just an exercise – you will not actually use these passwords online).
Can you come up with a fun but strong password you could actually use in the future?
(Just think about it – do not share this with the class!!!)
8.
What was easy or difficult about making a strong password?
How will you remember your password without writing it down in a place where someone can see it?
Why is it important not to share your password with anyone except a trusted adult?
9.
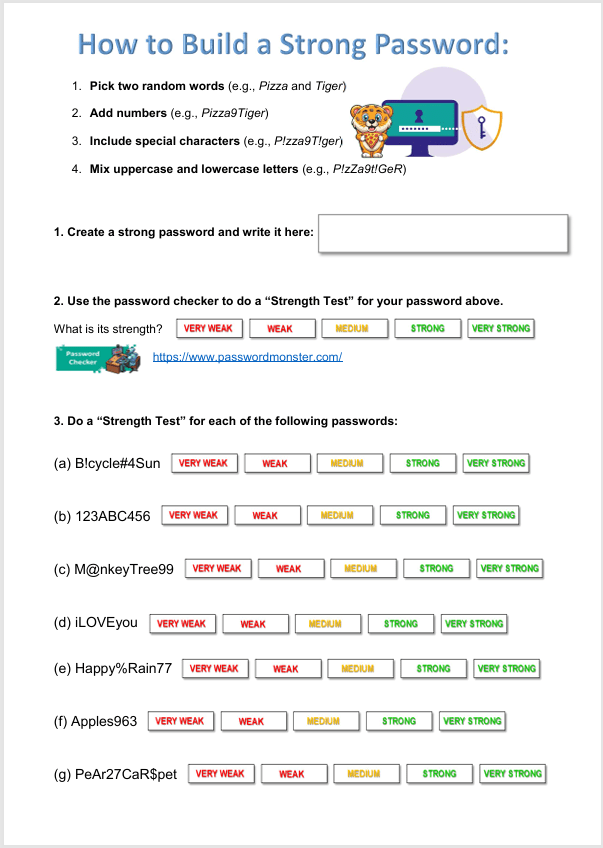
Complete the rest of the worksheet.
First, you need to test the strength of the password that you created, using the password checker below.
Then also test the strengths of the rest of the passwords on the worksheet.
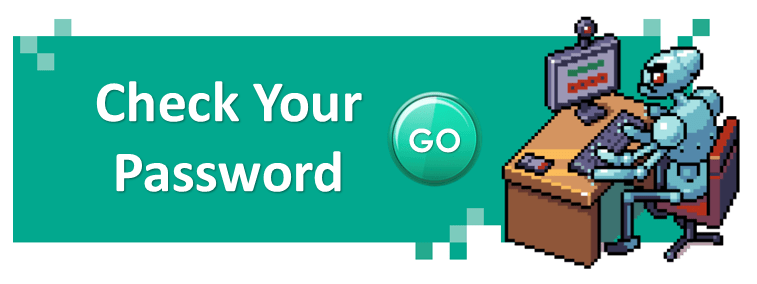
Use this password checker. Click on GO to check if the passwords are strong or not…
Here are some awesome internet safety games that not only entertain but will also teach you essential online skills.
As you navigate through a virtual city, you will get pop-up questions at different points. By answering these questions, you do in an interactive quiz that helps you to learn essential internet safety skills.
Band Runner blends fast-paced action with important safety lessons. You play as characters Alfie and Ellie. They run from potential dangers. You will help them recognize online predators and make quick, safe decisions.
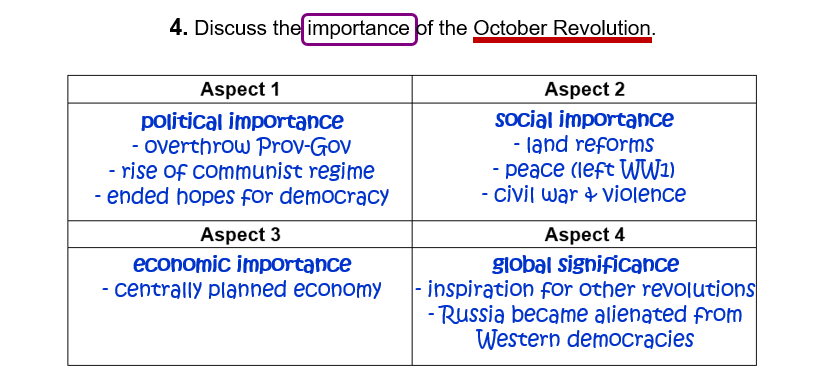
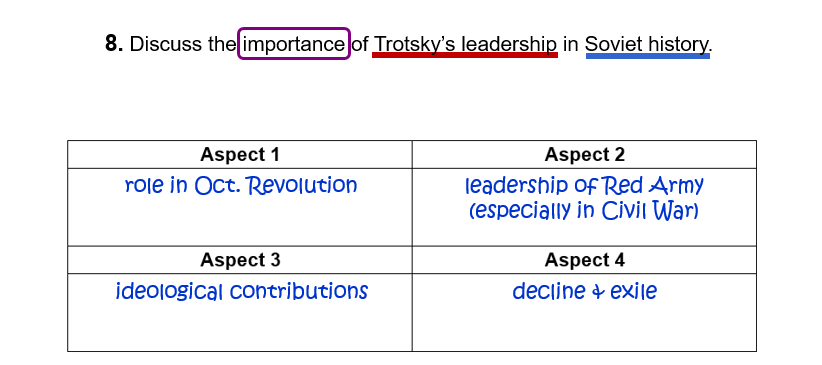
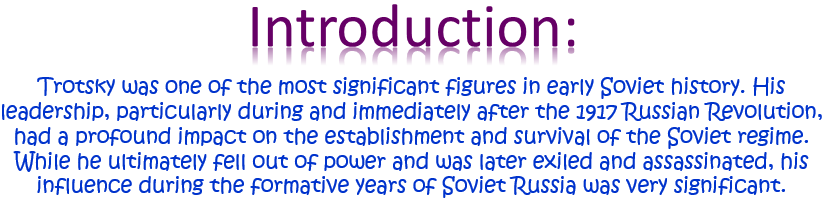
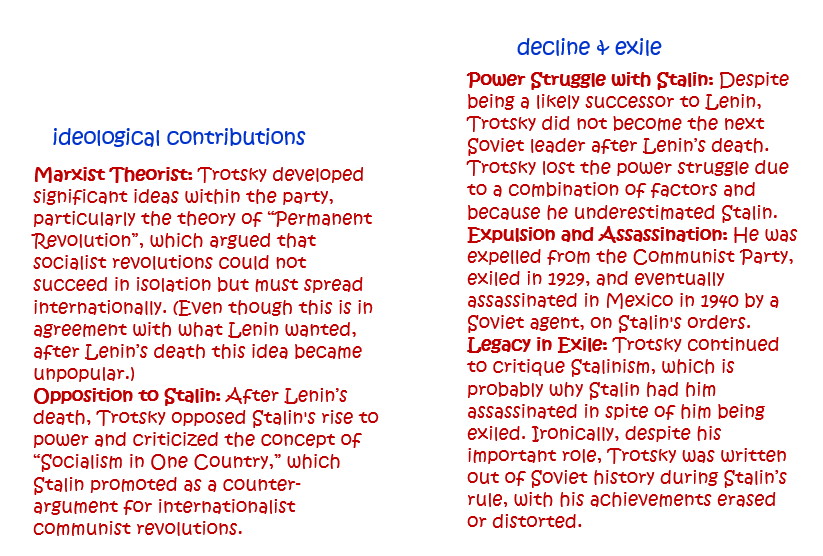
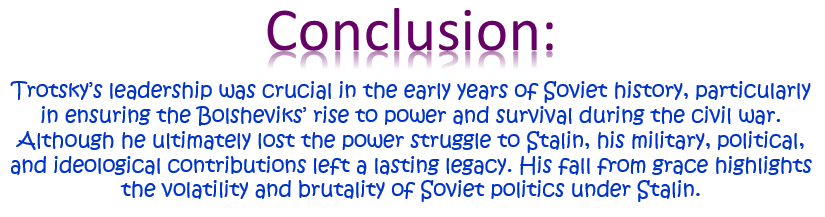
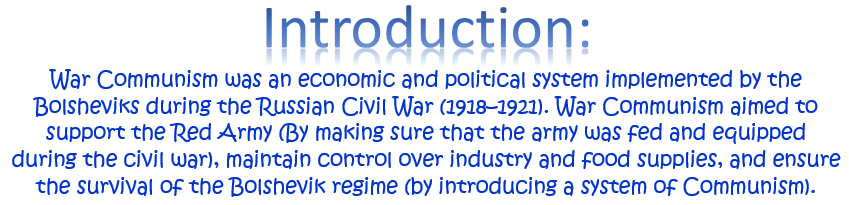
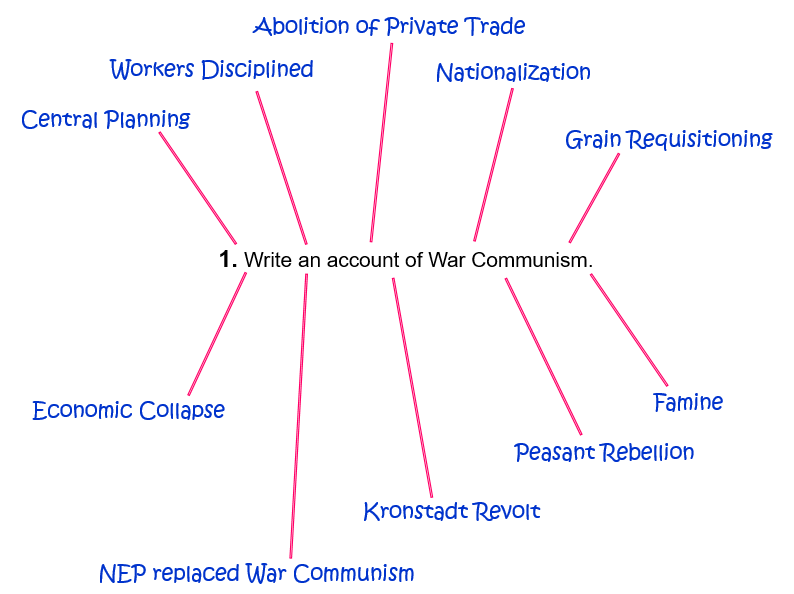
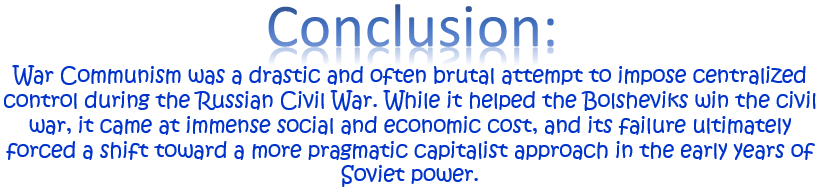
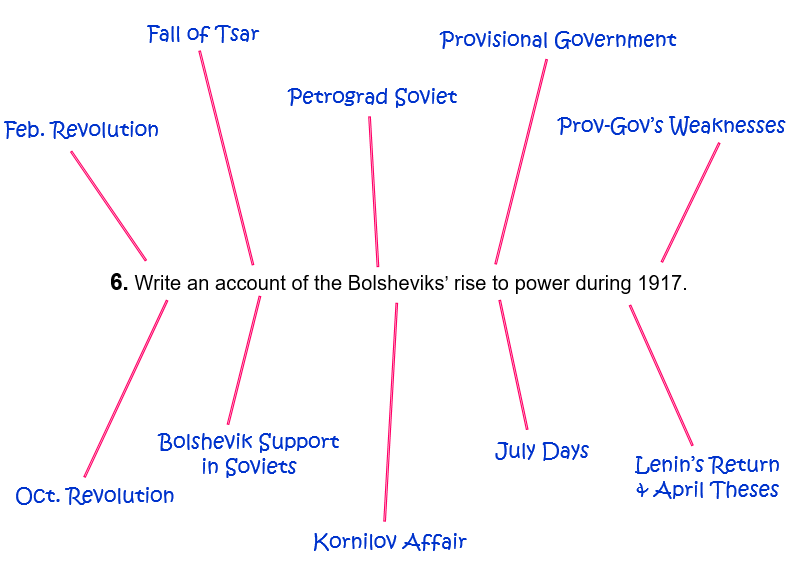
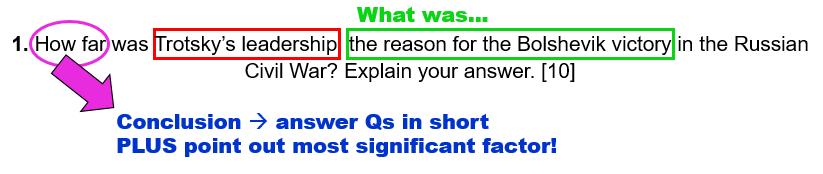
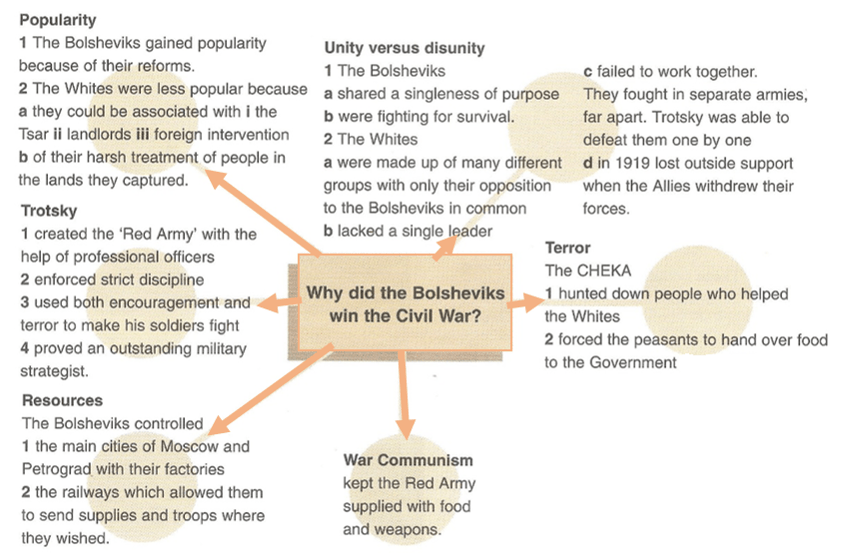
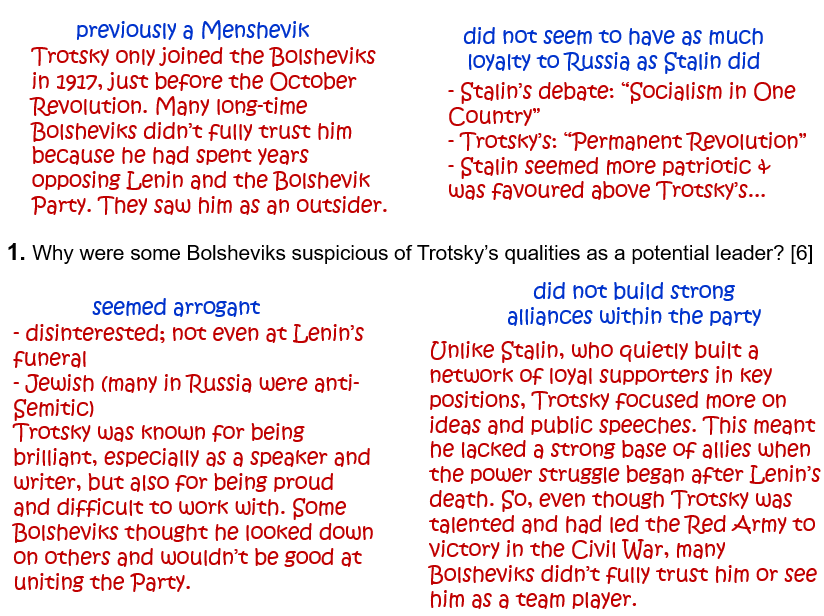
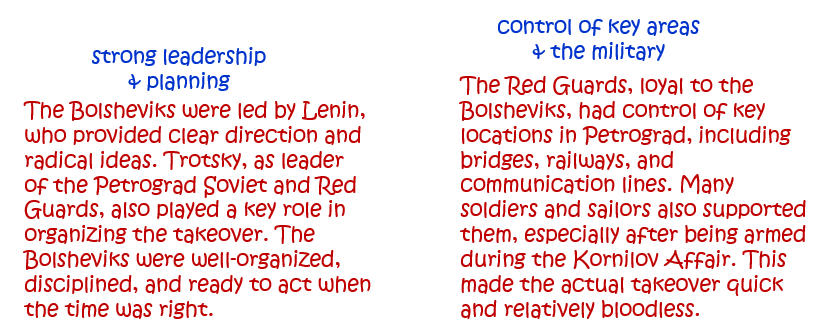
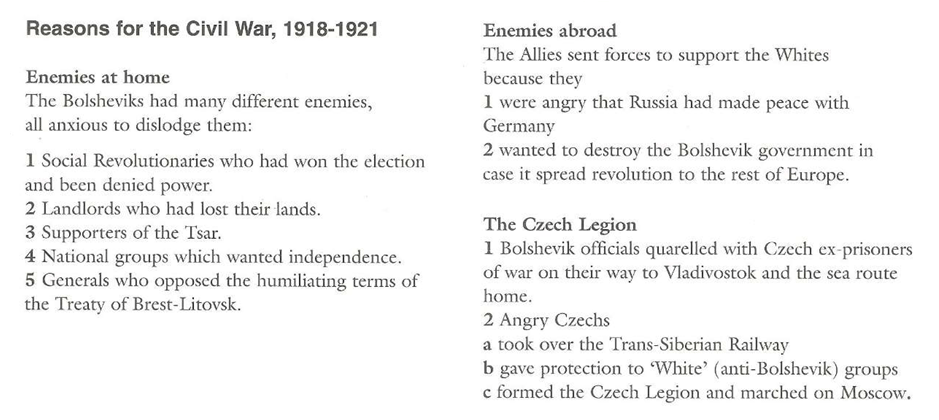
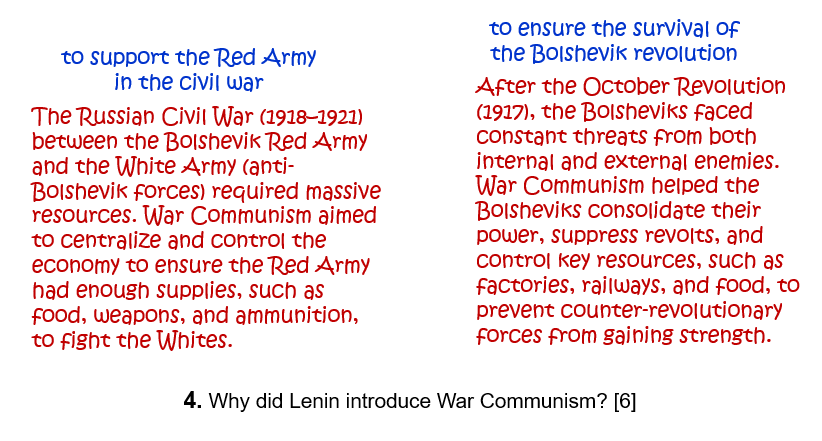
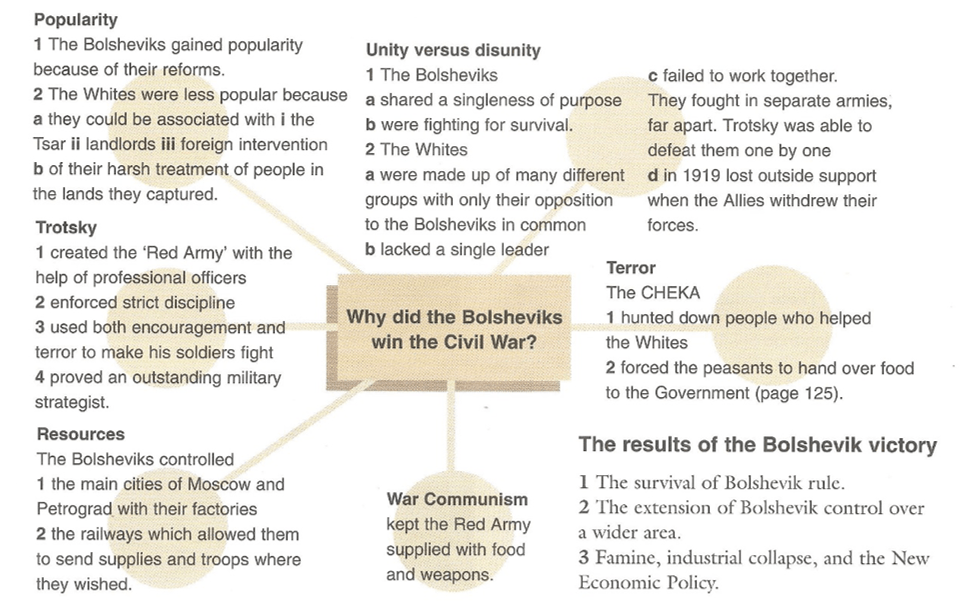
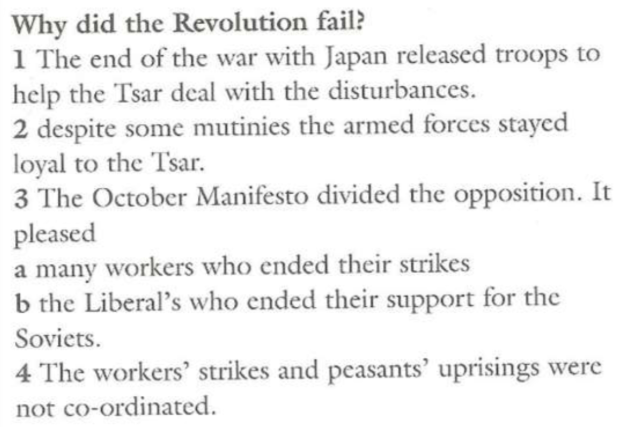
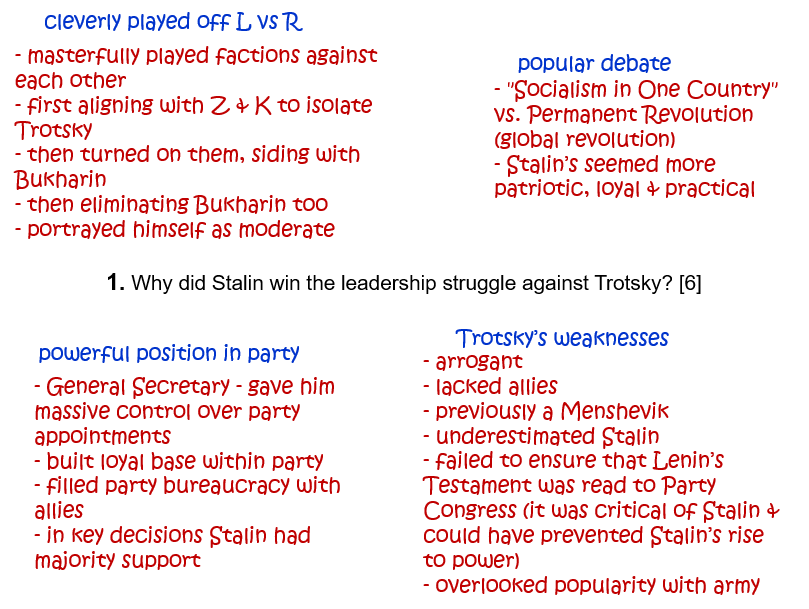
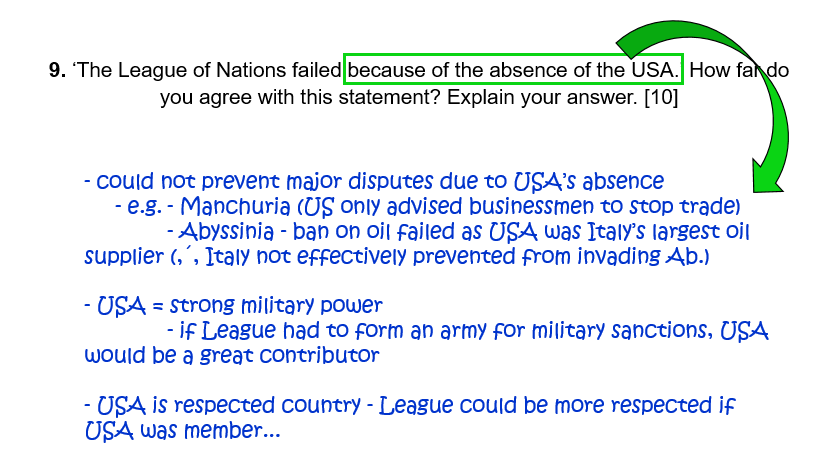
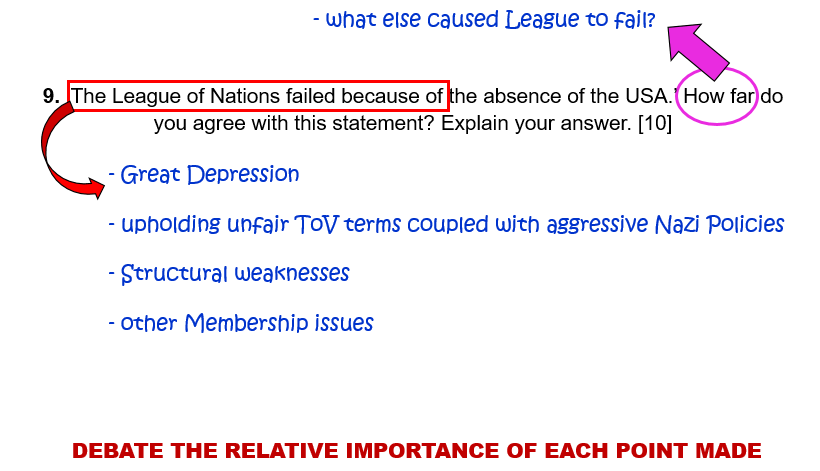
1. How far was Trotsky’s leadership the reason for the Bolshevik victory in the Russian Civil War? Explain your answer. [10]
Question 1.
(Alternative 1)
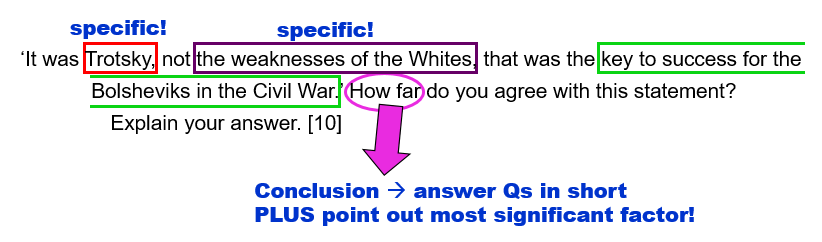
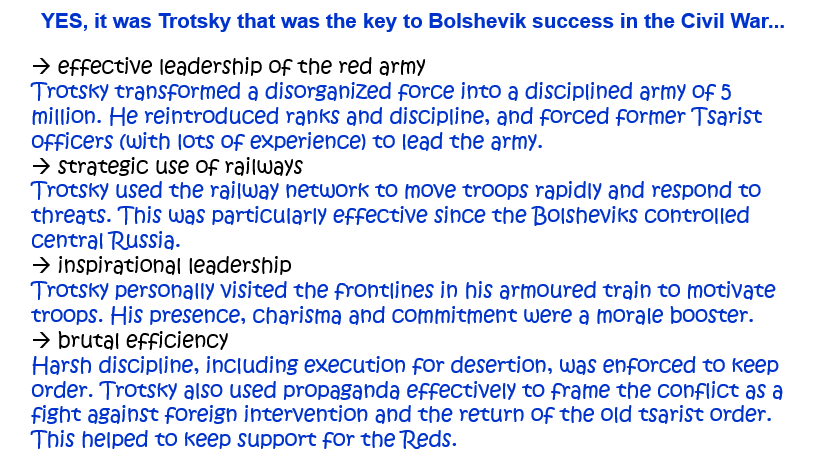
‘It was Trotsky, not the weaknesses of the Whites, that was the key to success for the Bolsheviks in the Civil War.’ How far do you agree with this statement? Explain your answer. [10]
Question 1.
(Alternative 2)
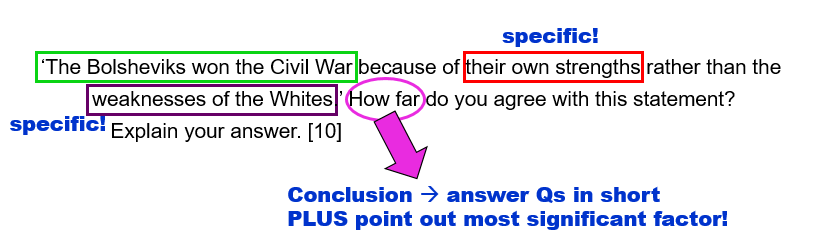
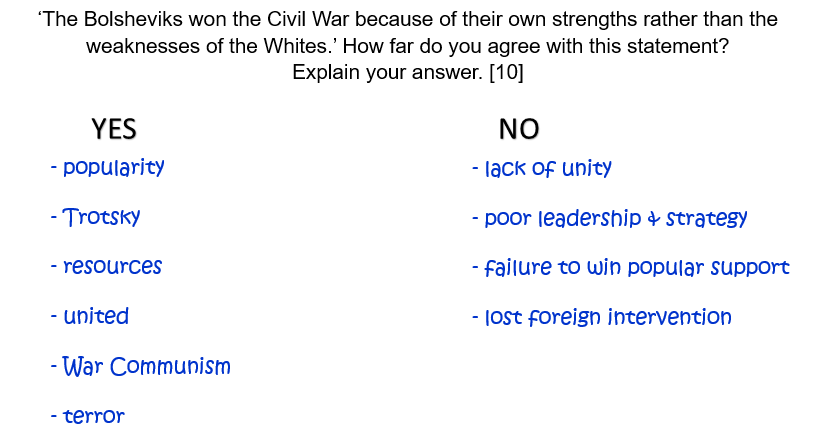
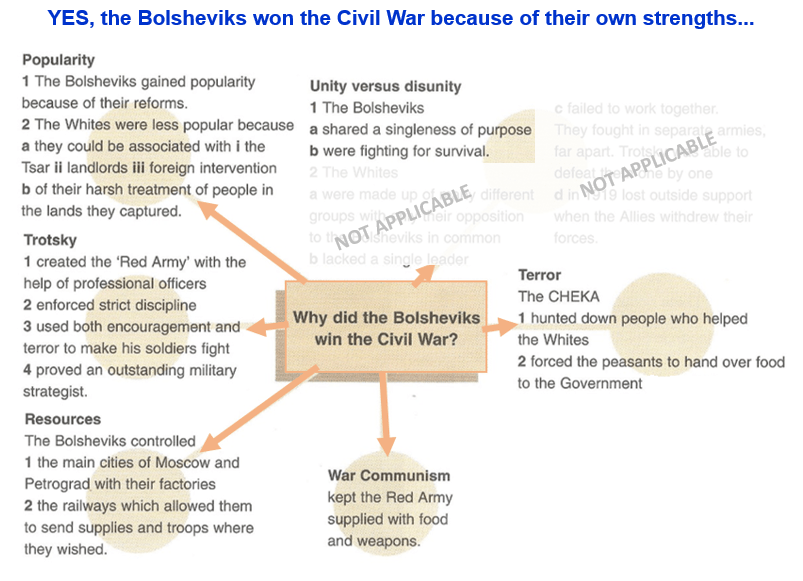
‘The Bolsheviks won the Civil War because of their own strengths rather than the weaknesses of the Whites.’ How far do you agree with this statement? Explain your answer. [10]
Question 1.
(Alternative 3)
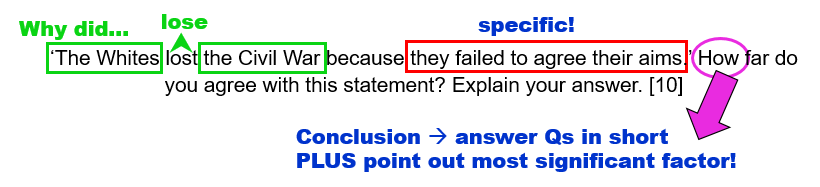
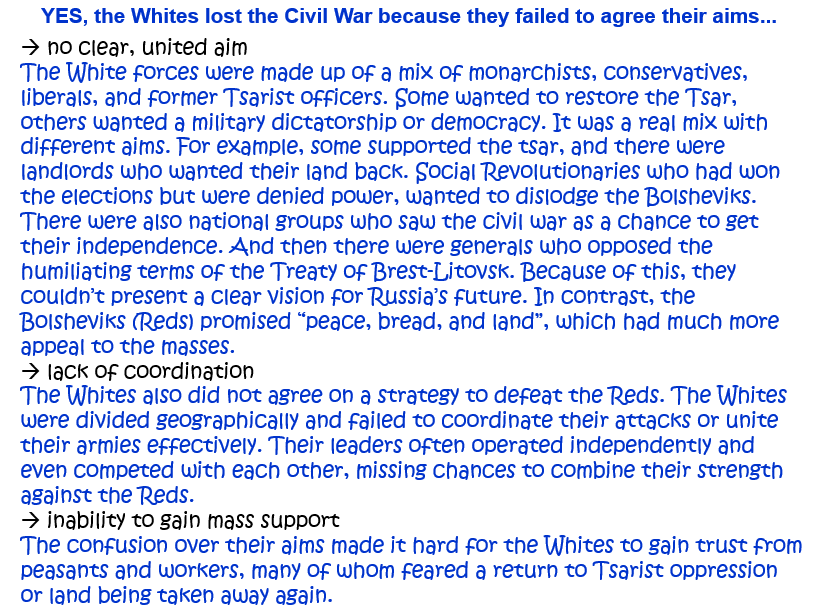
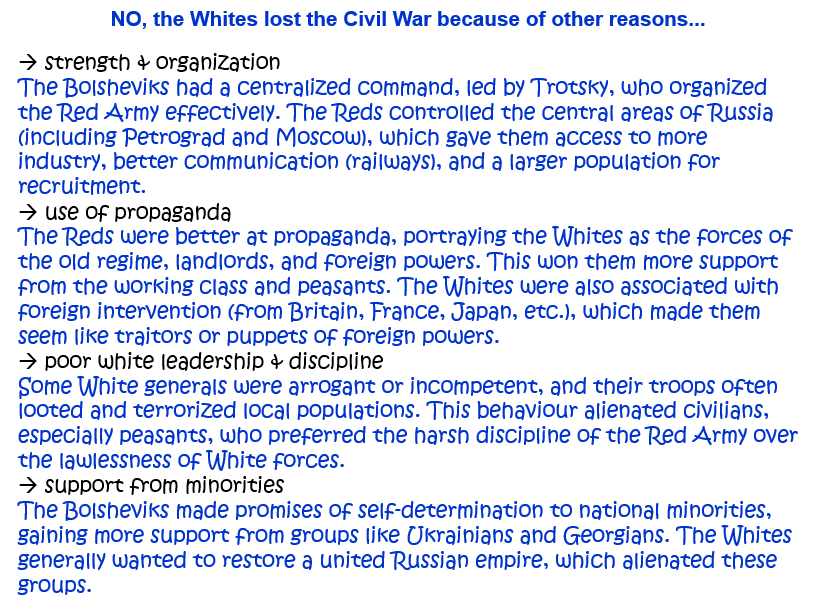
‘The Whites lost the Civil War because they failed to agree their aims.’ How far do you agree with this statement? Explain your answer. [10]
Question 1.
(Alternative 4)
‘The key to Bolshevik success in the Civil War was leadership.’ How far do you agree with this statement? Explain your answer. [10]
Question 1.
(Alternative 5)
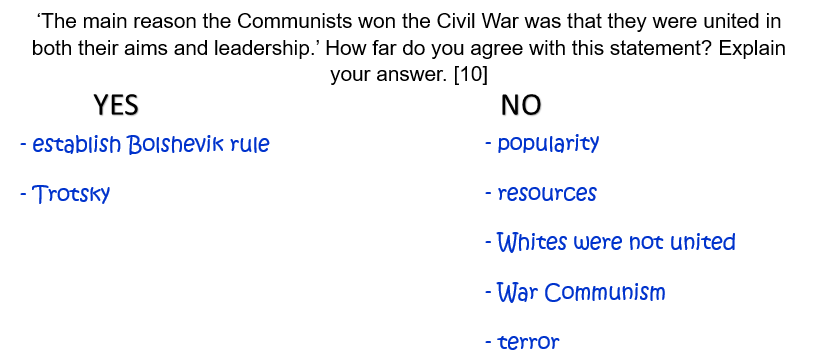
‘The main reason the Communists won the Civil War was that they were united in both their aims and leadership.’ How far do you agree with this statement? Explain your answer. [10]
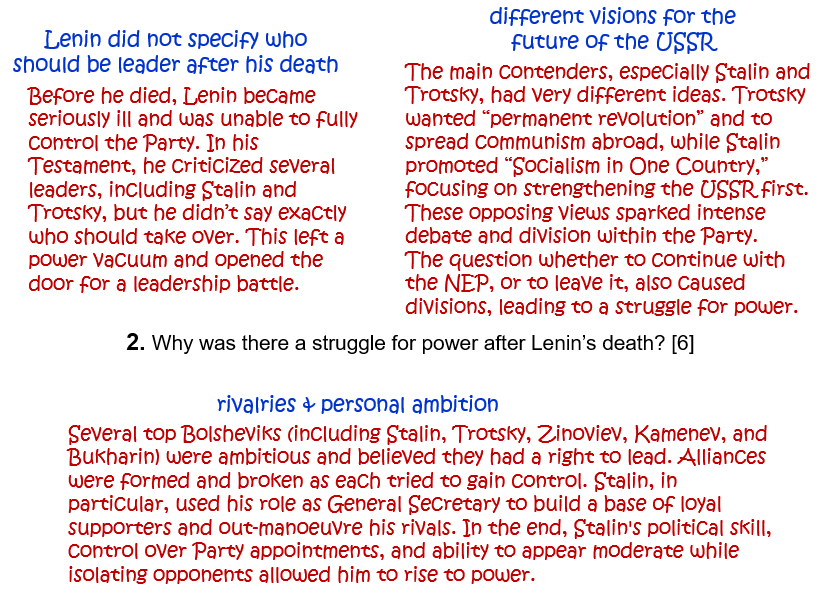
Question 2.
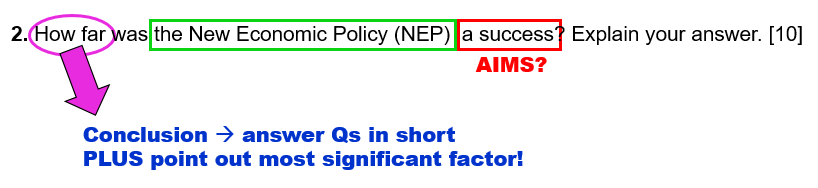
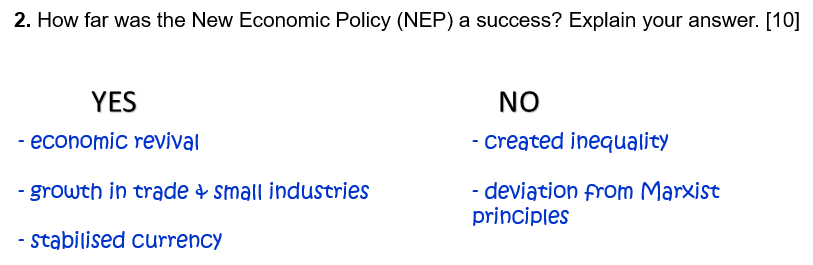
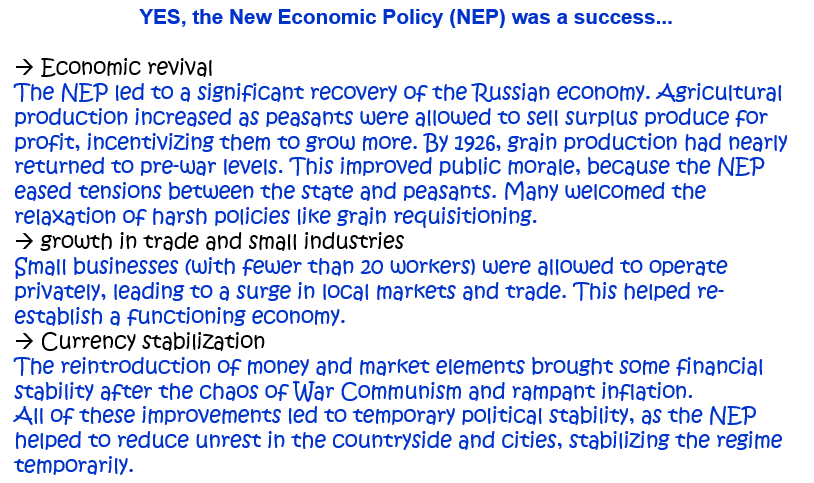
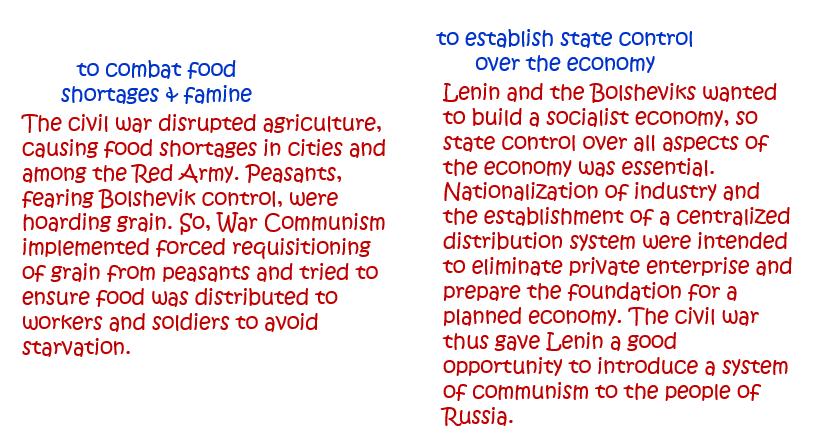
2. How far was the New Economic Policy (NEP) a success? Explain your answer. [10]
OR: How successful was Lenin’s New Economic Policy? Explain your answer. [10]
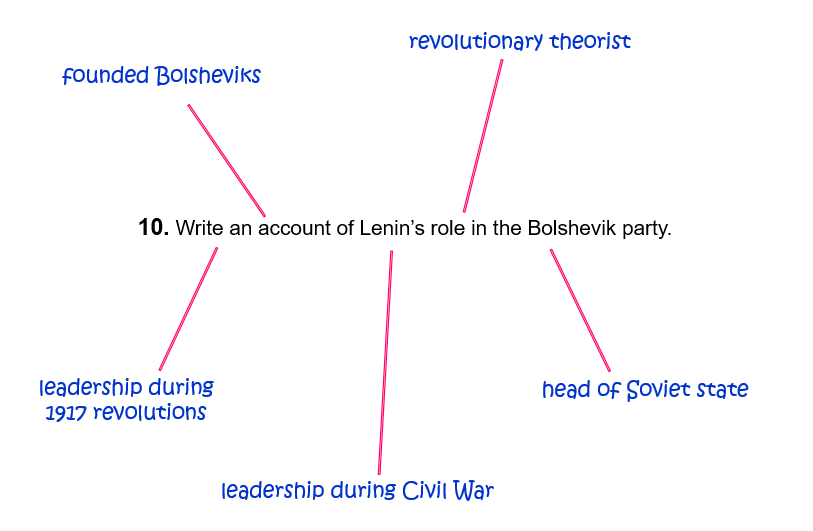
Question 3.
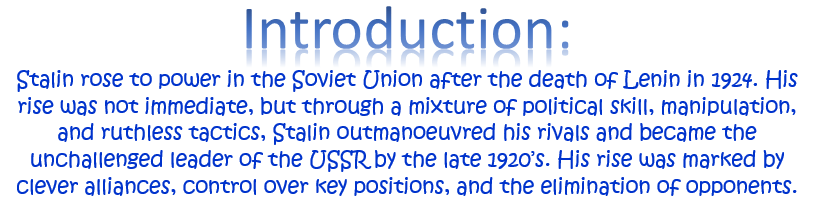
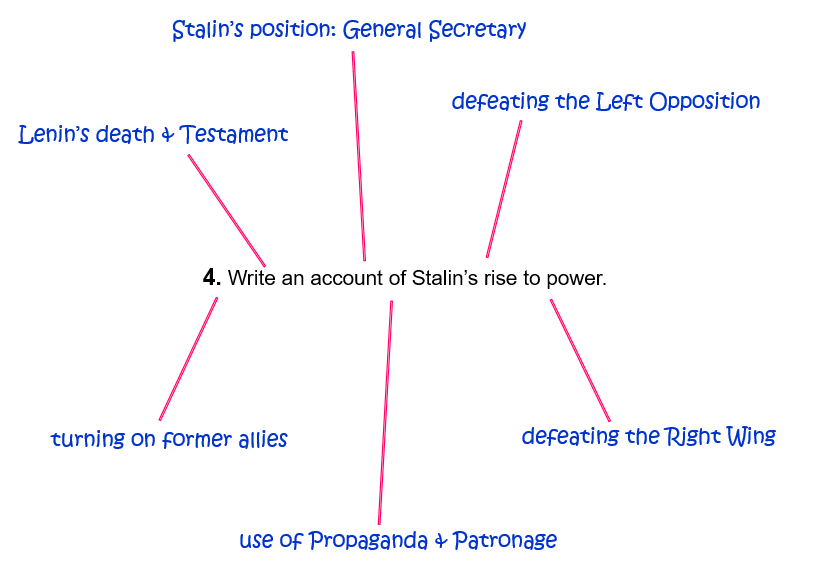
3. Who contributed more to the establishment of Bolshevik rule in the period 1917-1924: Lenin or Trotsky? Explain your answer. [10]
Question 4.
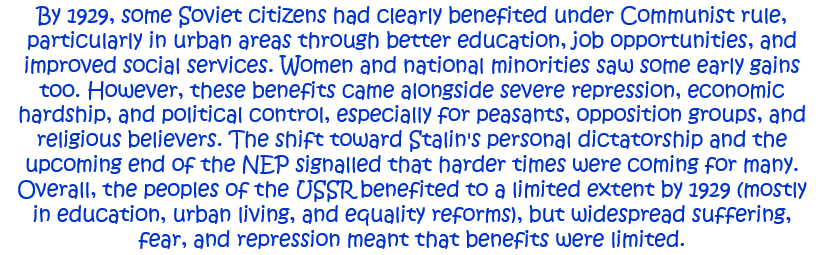
4. How far had the peoples of the USSR benefited from Communist rule by 1929? Explain your answer. [10]
Here are some awesome internet safety games that not only entertain but will also teach you essential online skills.
As you navigate through a virtual city, you will get pop-up questions at different points. By answering these questions, you do in an interactive quiz that helps you to learn essential internet safety skills.
Band Runner blends fast-paced action with important safety lessons. You play as characters Alfie and Ellie. They run from potential dangers. You will help them recognize online predators and make quick, safe decisions.
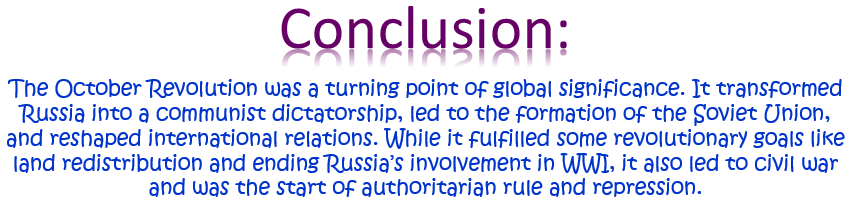
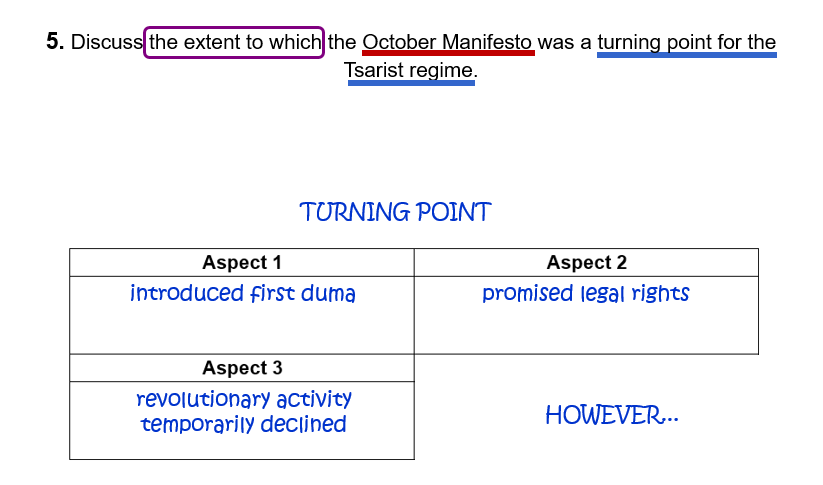
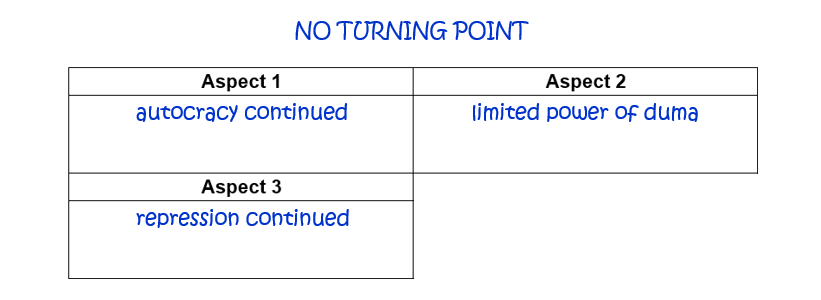
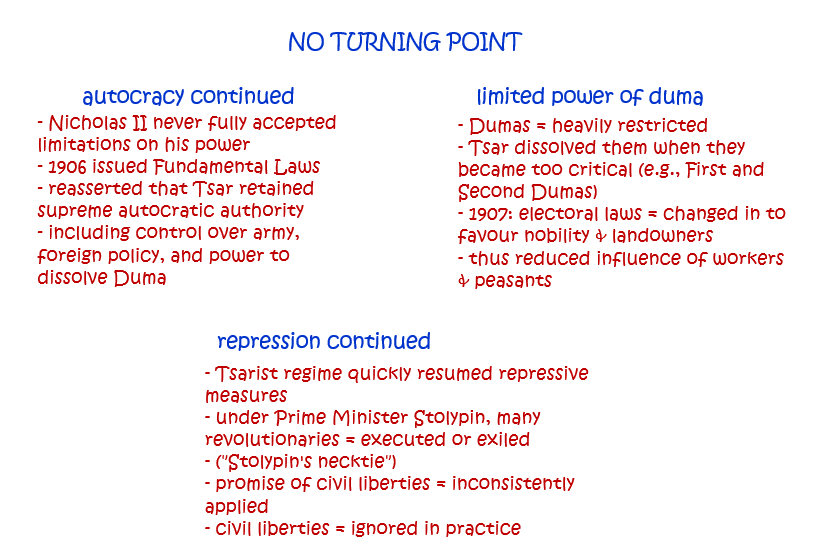
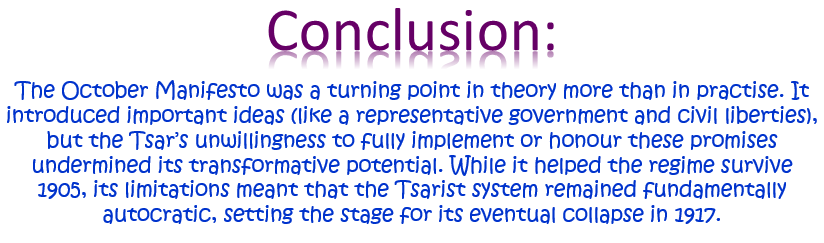
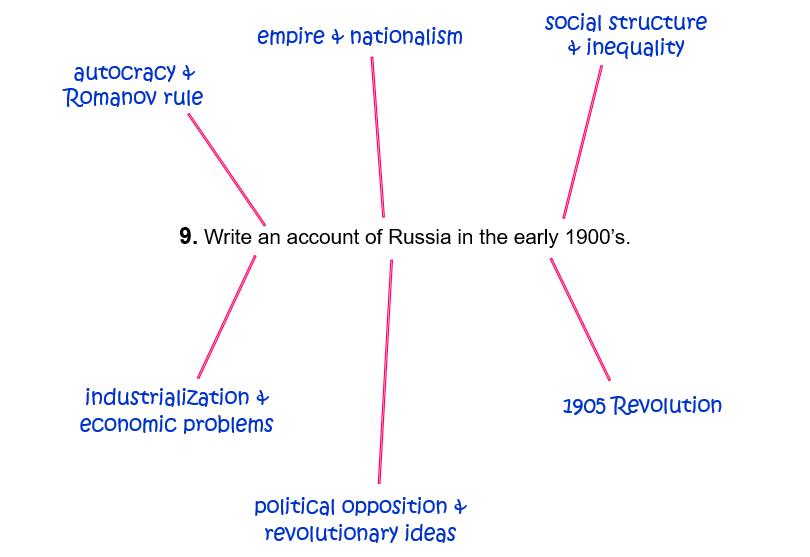
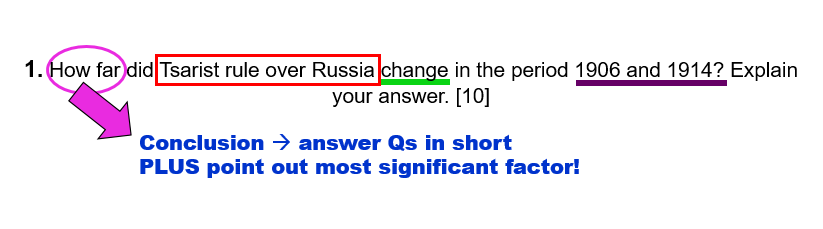
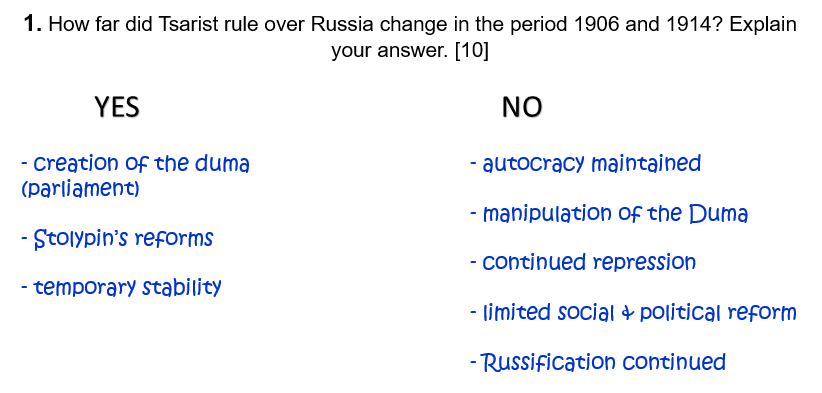
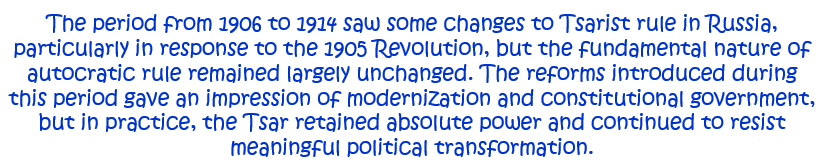
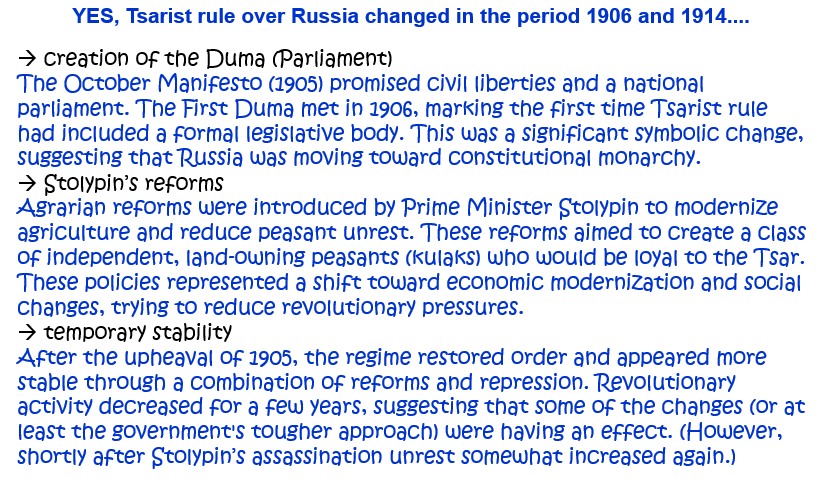
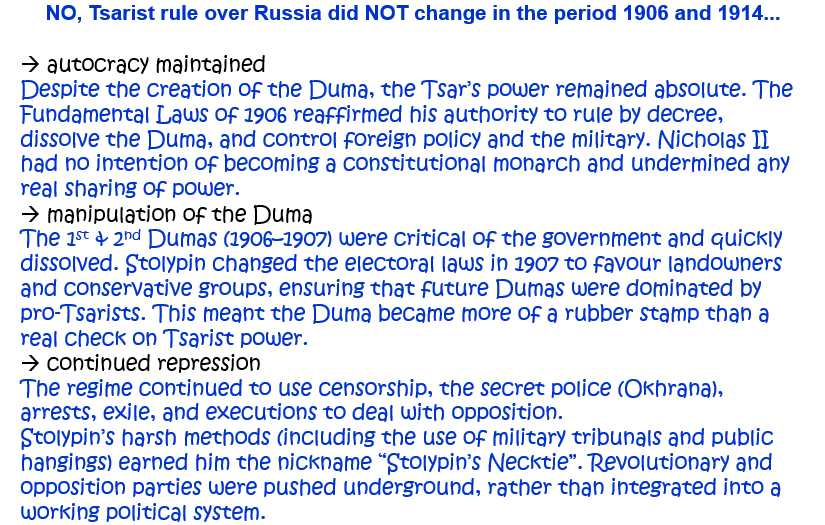
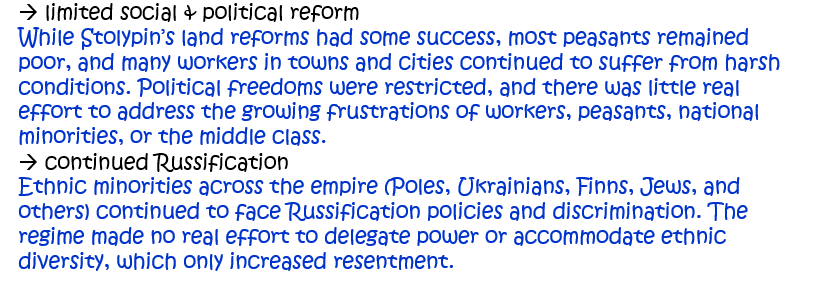
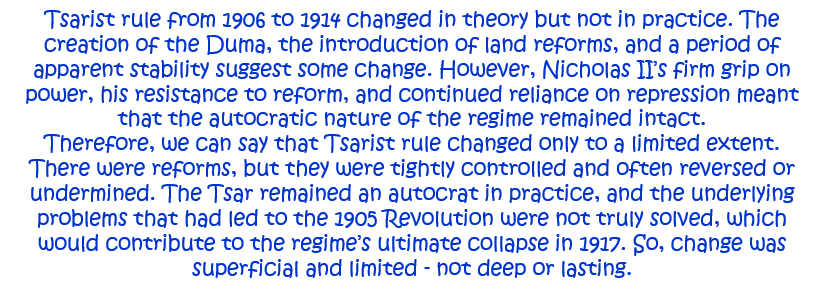
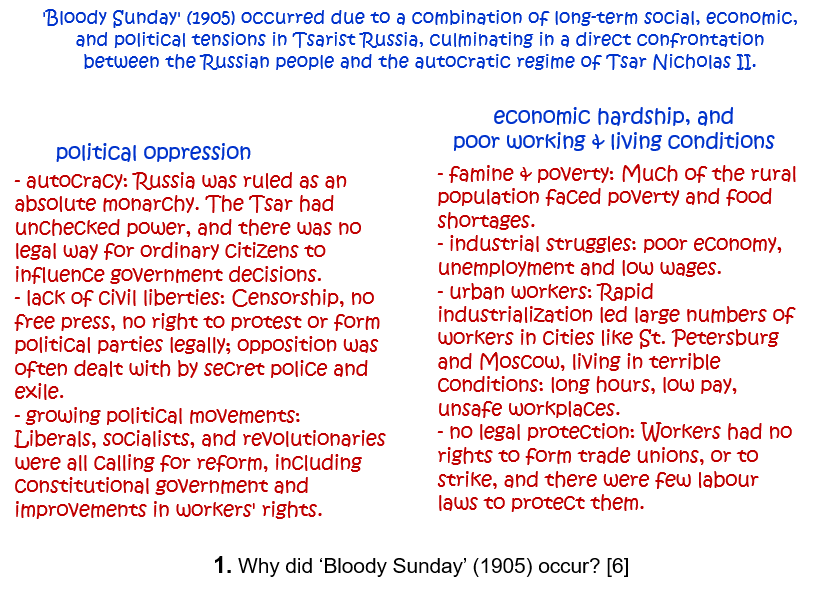
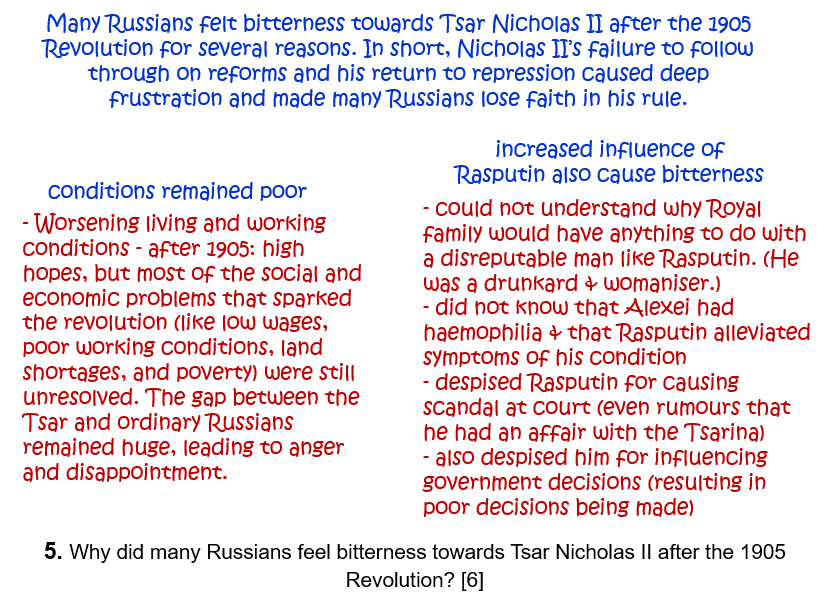
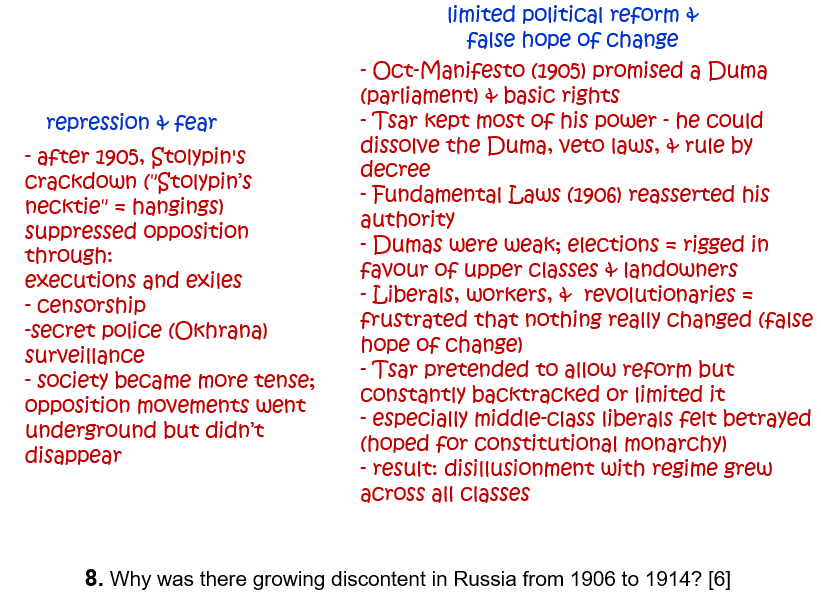
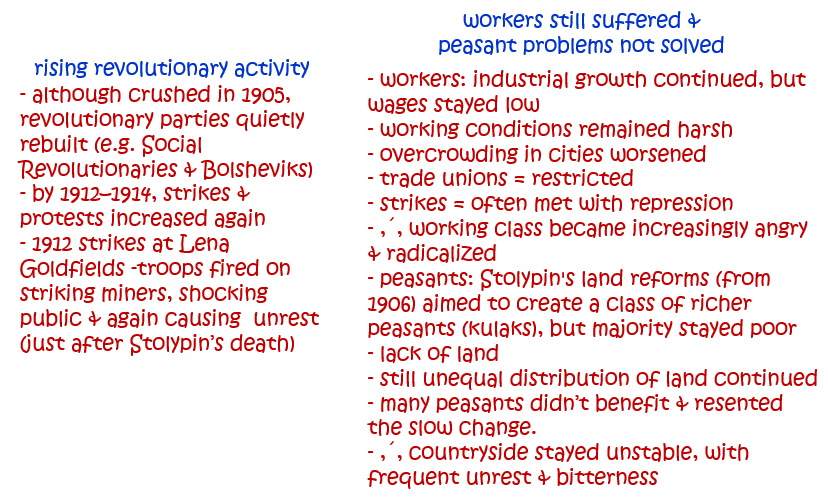
1. How far did Tsarist rule over Russia change in the period 1906 and 1914? Explain your answer. [10]
Question 2.
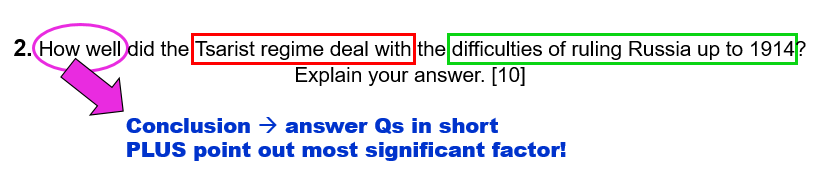
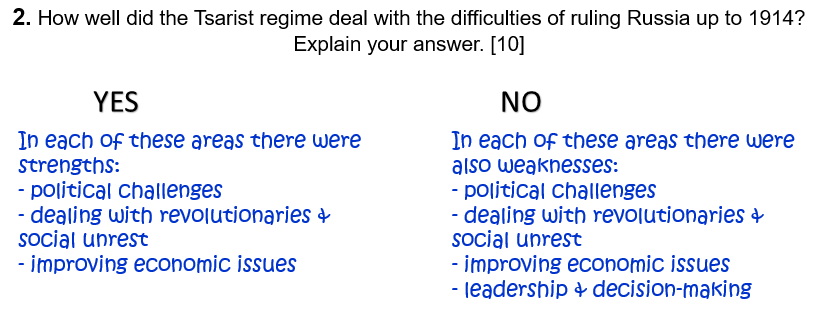
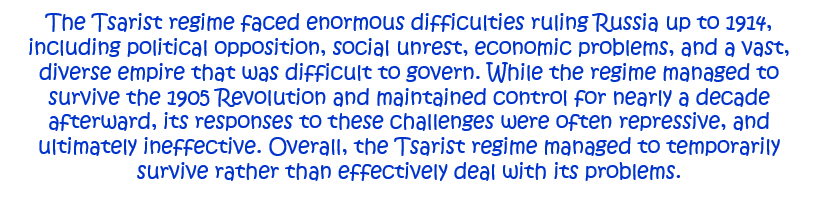
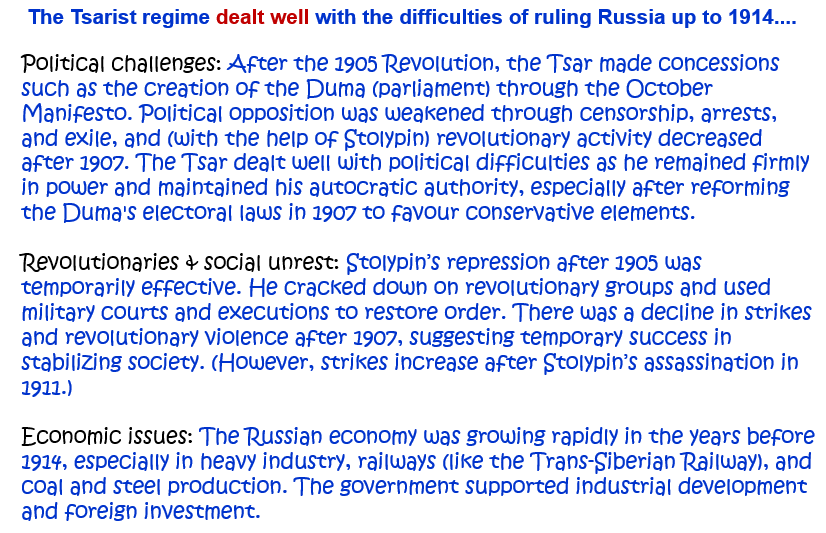
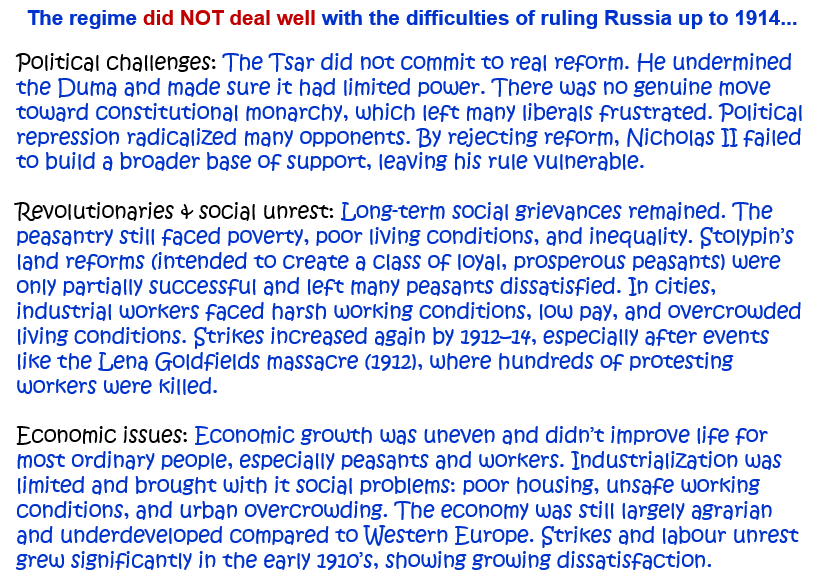
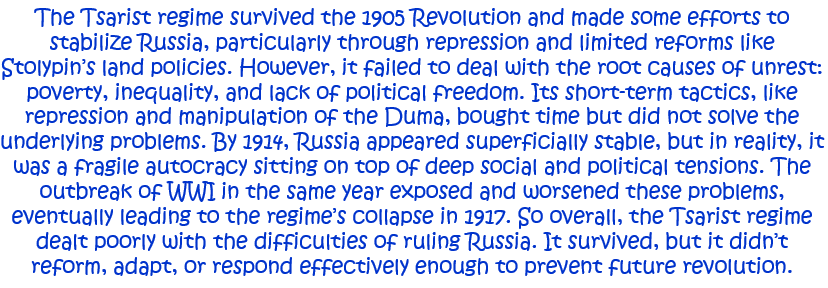
2. How well did the Tsarist regime deal with the difficulties of ruling Russia up to 1914? Explain your answer. [10]
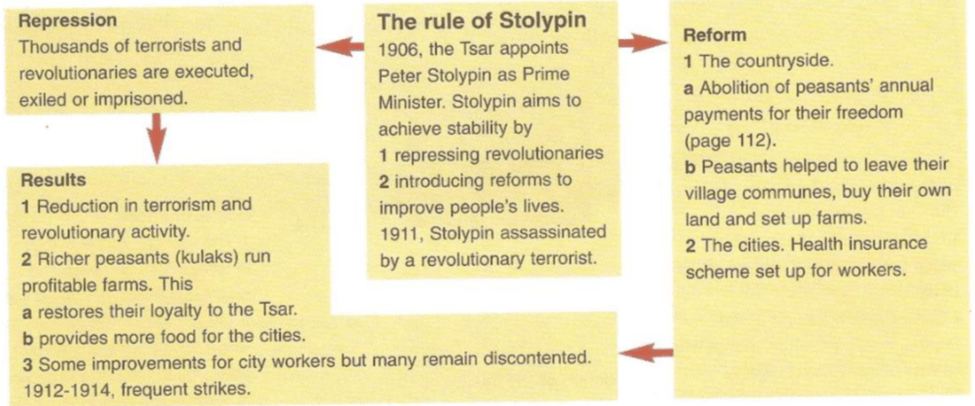
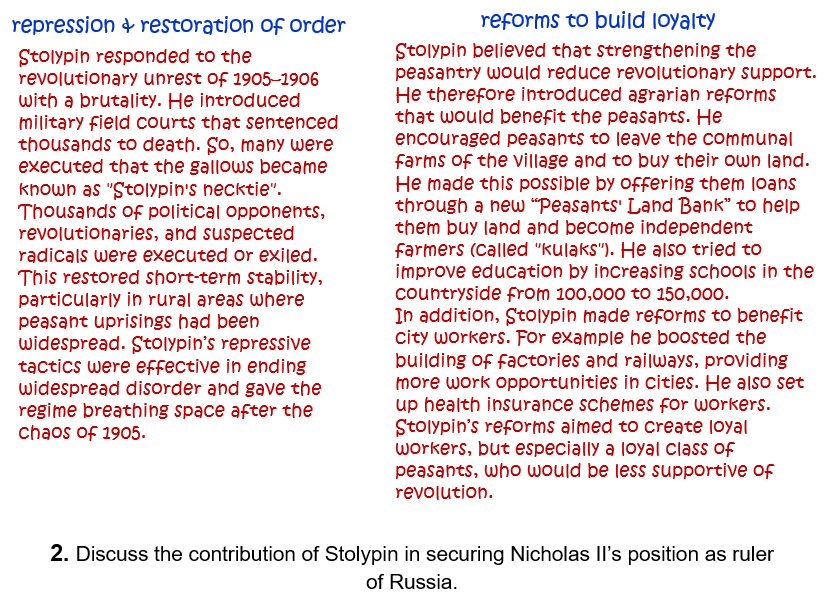
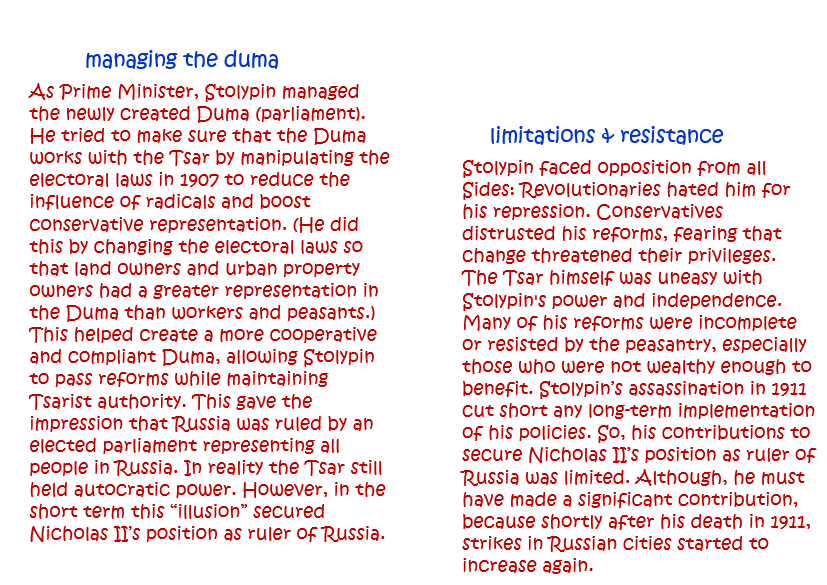
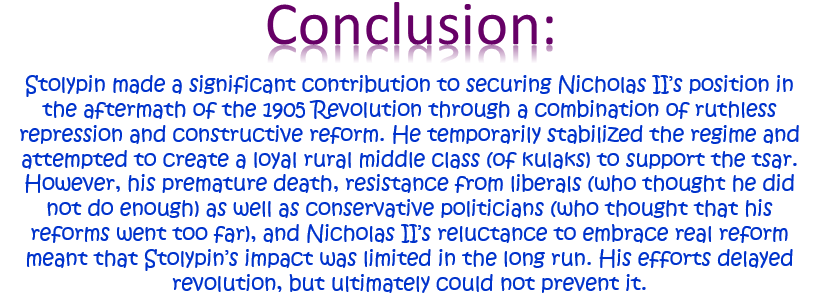
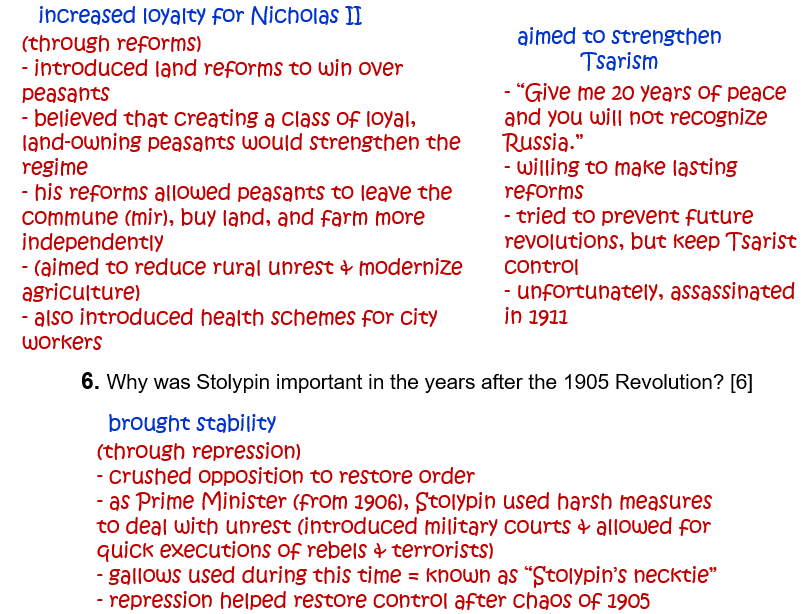
Question 3.
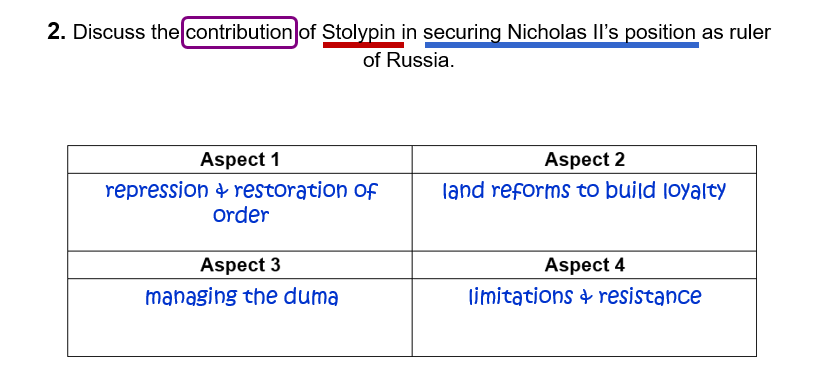
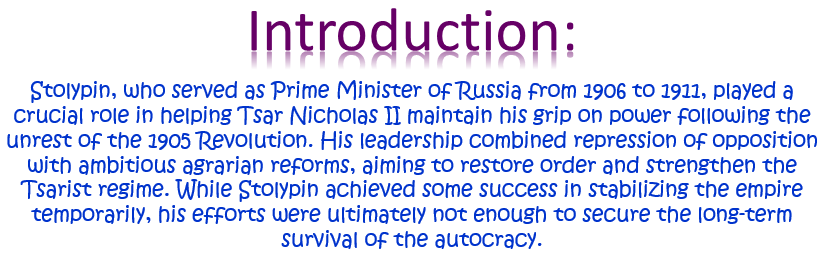
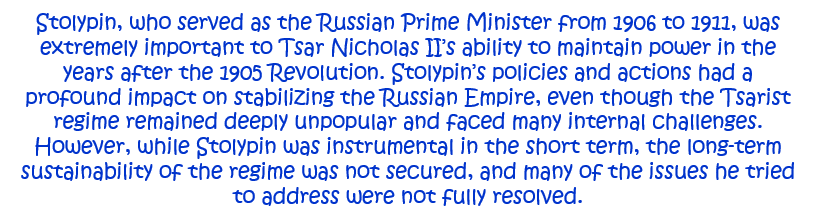
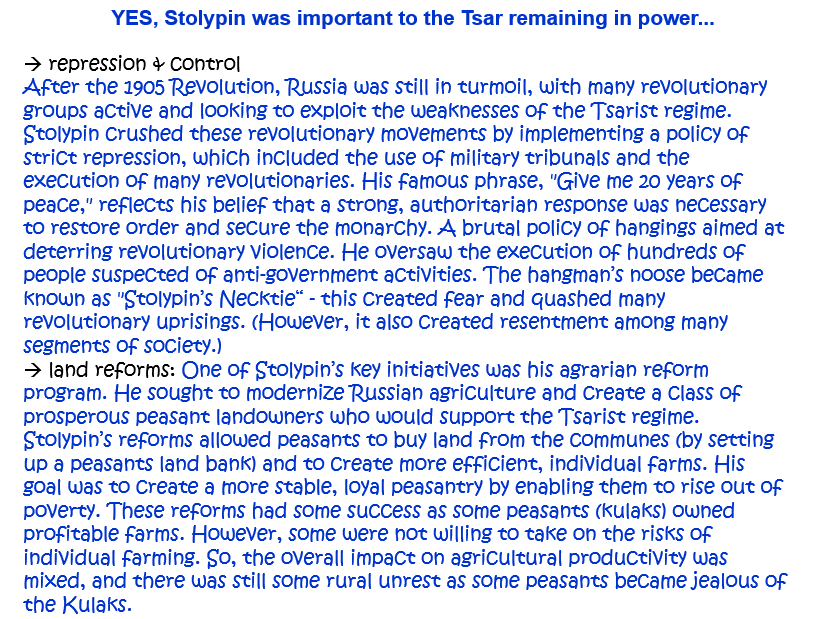
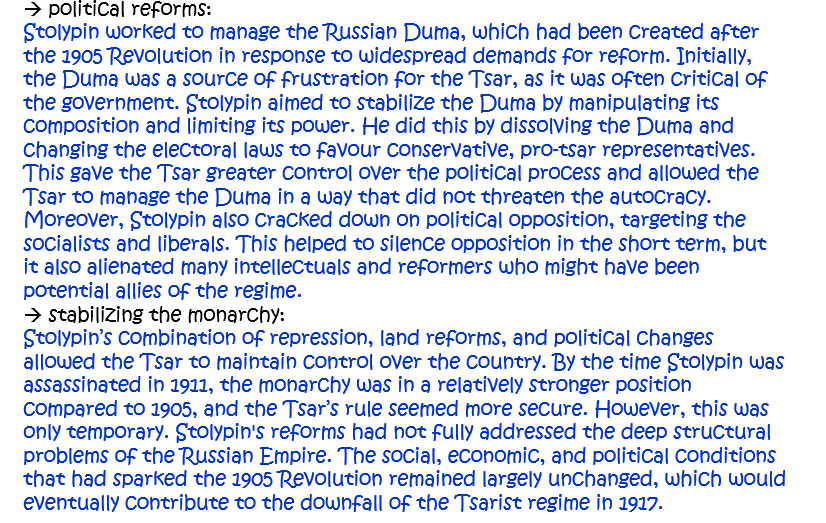
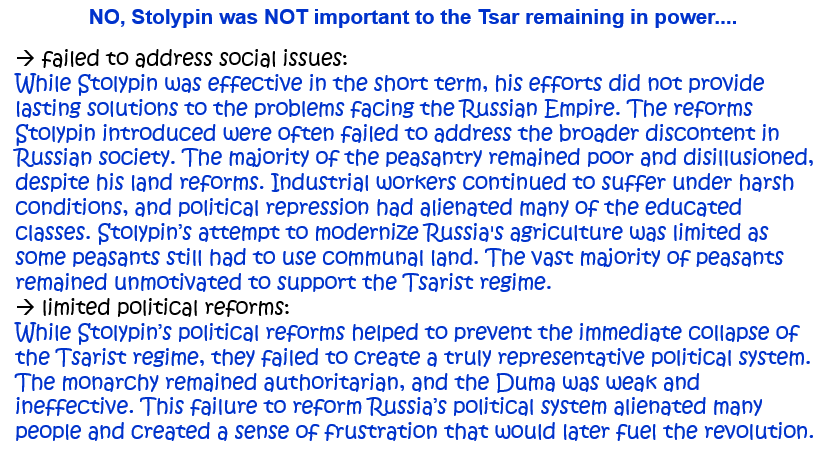
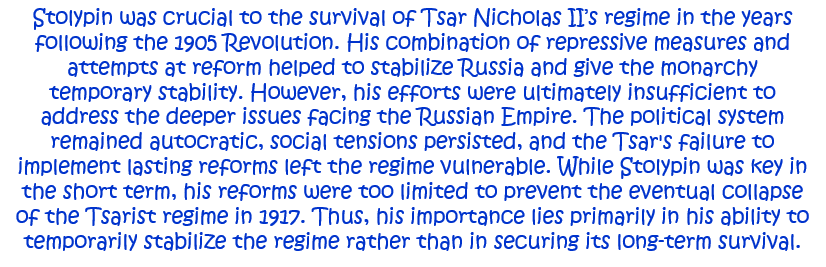
3. How important was Stolypin to the Tsar remaining in power in the years after the 1905 Revolution? Explain your answer. [10]
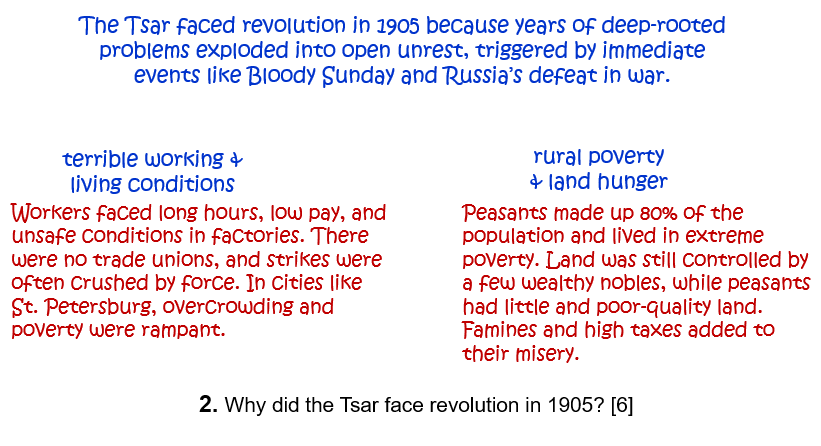
Question 4.
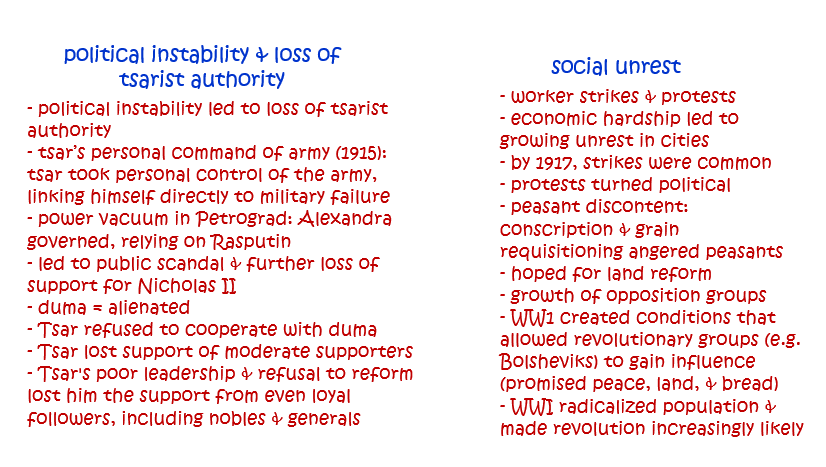
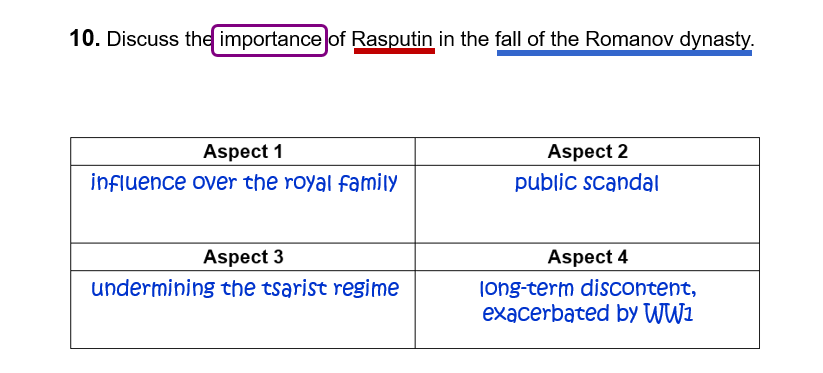
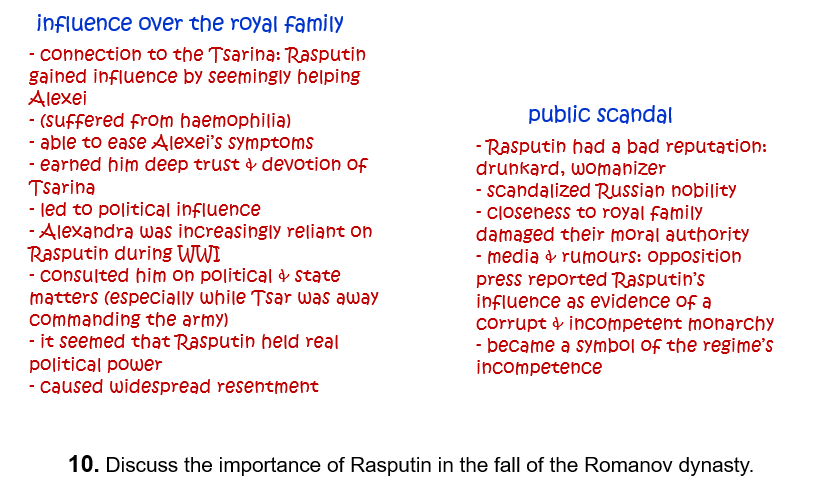
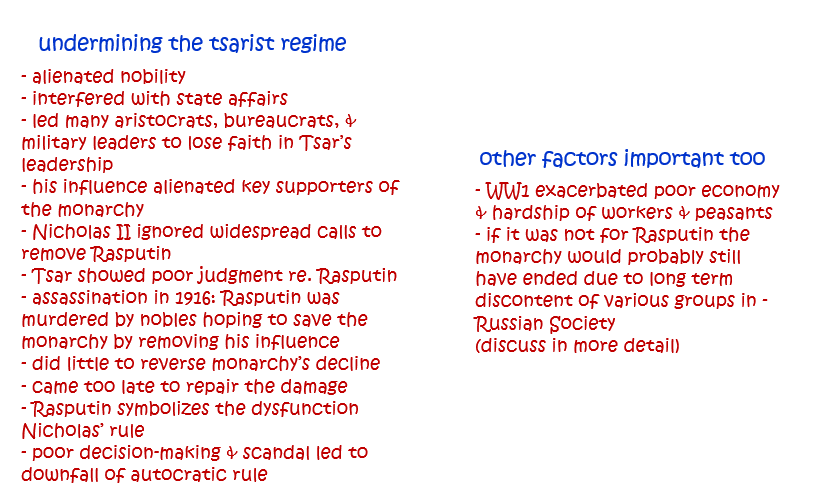
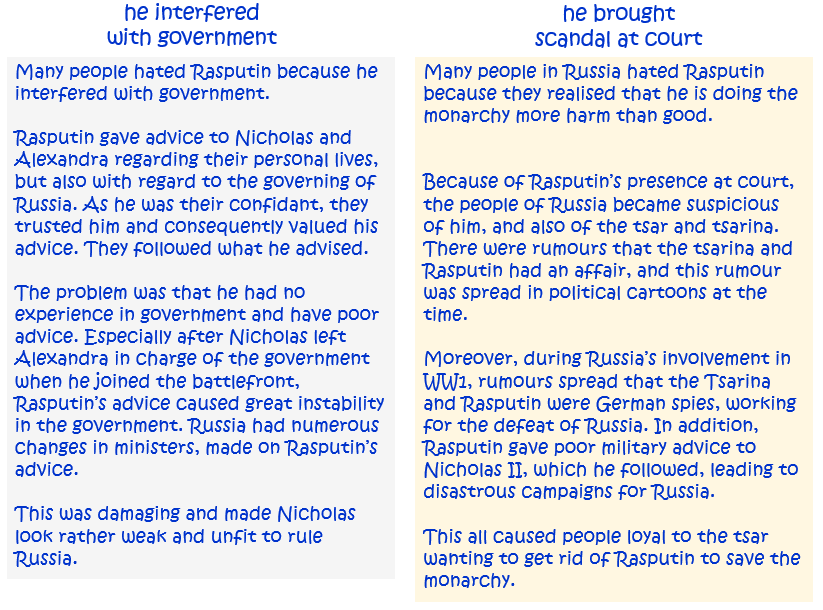
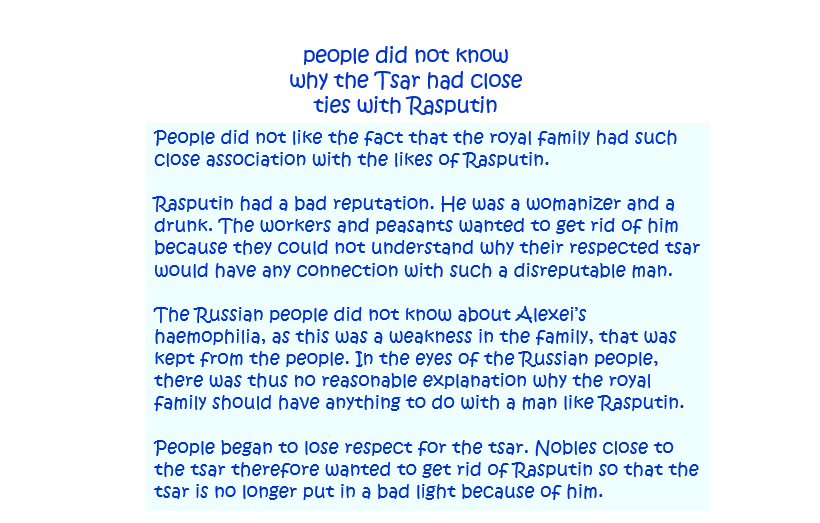
4. ‘Hatred of Rasputin was the main reason for revolution in March 1917.’ How far do you agree with this statement? Explain your answer. [10]
Question 5.
5. Which of the following was more responsible for revolution in Russia in 1917: the role of the Tsarina and her relationship with Rasputin; food shortages? Explain your answer. [10]
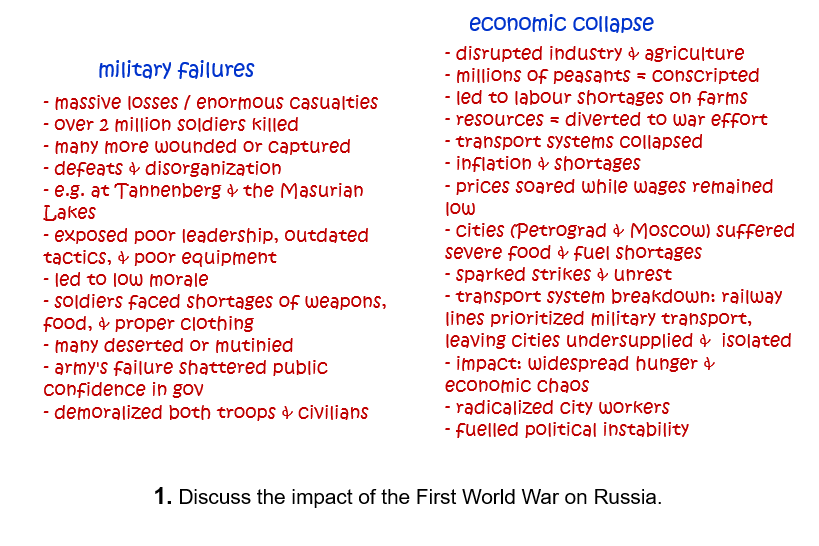
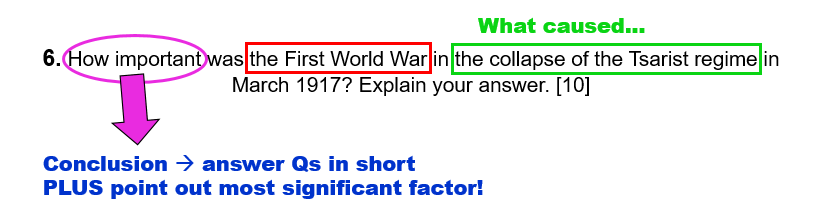
Question 6.
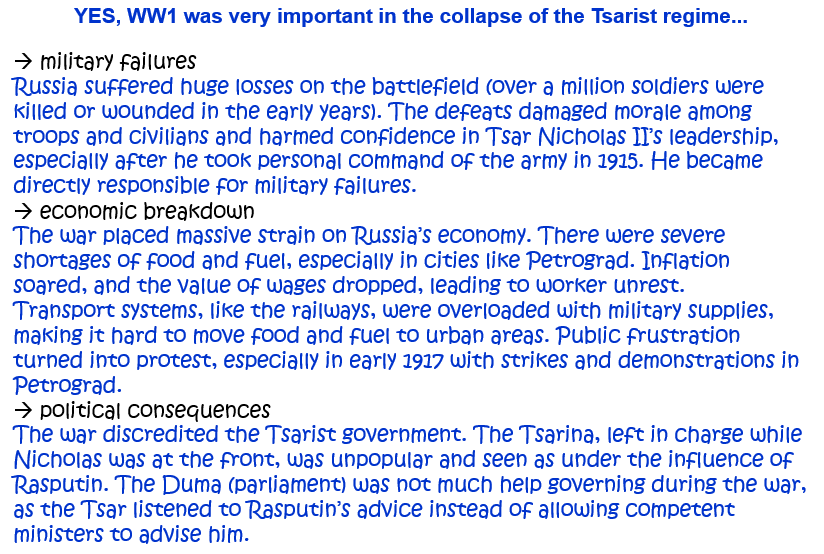
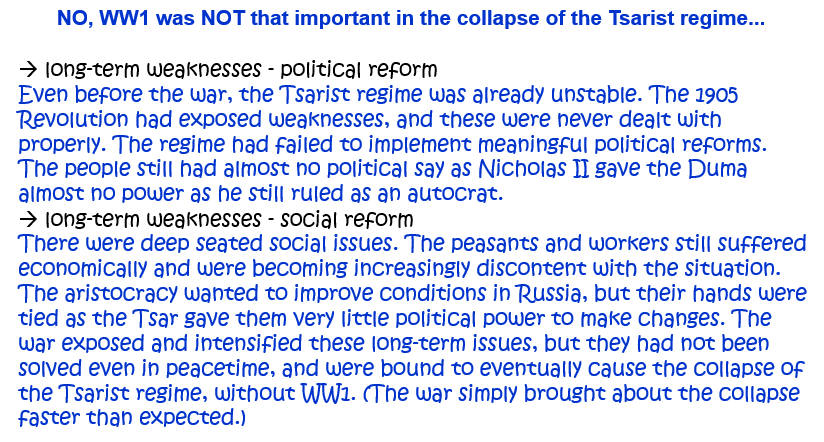
6. How important was the First World War in the collapse of the Tsarist regime in March 1917? Explain your answer. [10]
OR: ‘The First World War caused the collapse of Tsarism in Russia in 1917.’ How far do you agree? Explain your answer. [10]
OR: How far was it the First World War that caused the fall of Tsar Nicholas II in 1917? Explain your answer. [10]
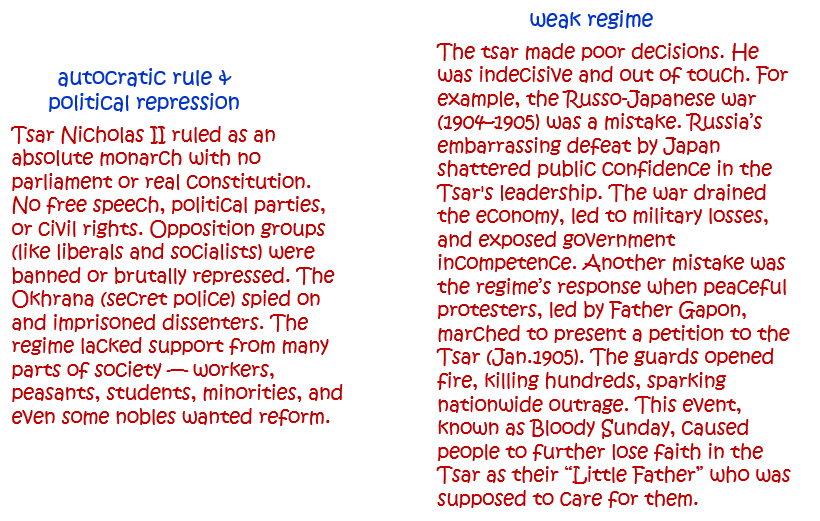
Question 7.
7. How far was Tsar Nicholas II responsible for his own downfall in 1917? Explain your answer. [10]
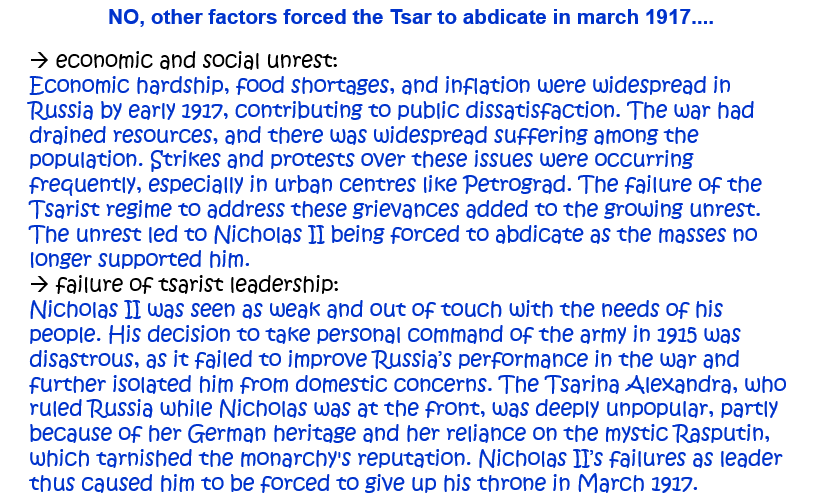
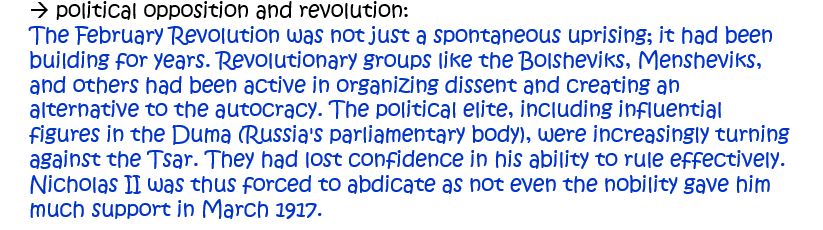
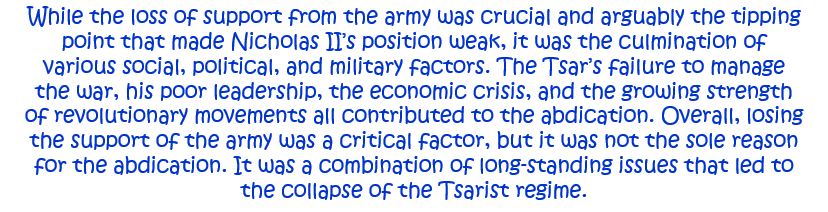
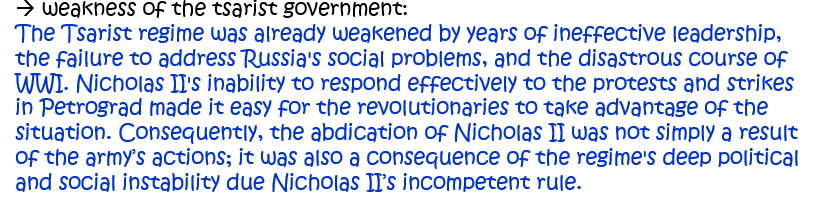
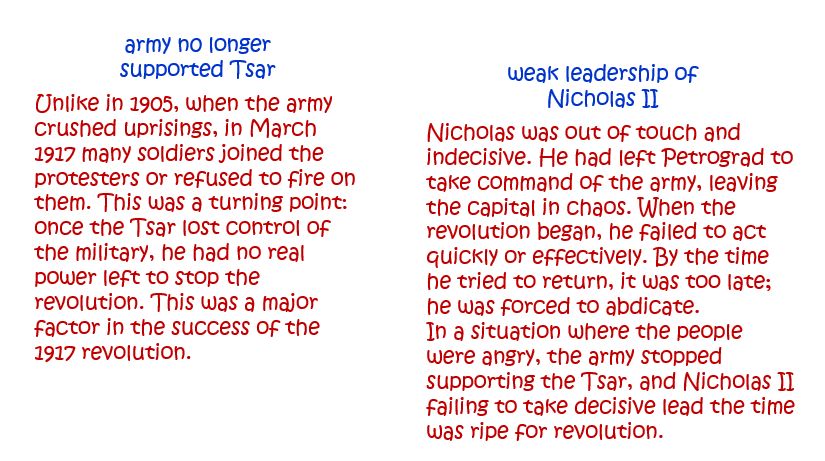
Question 8.
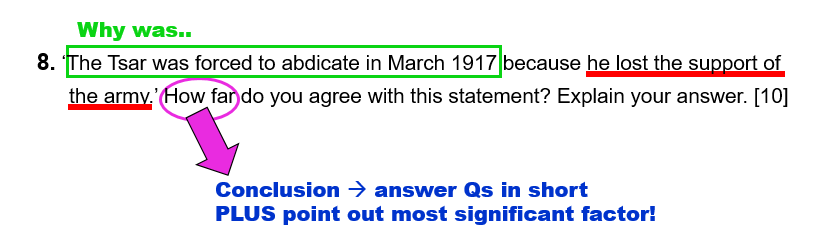
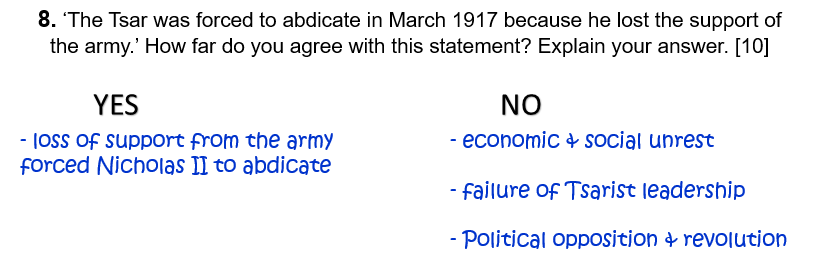
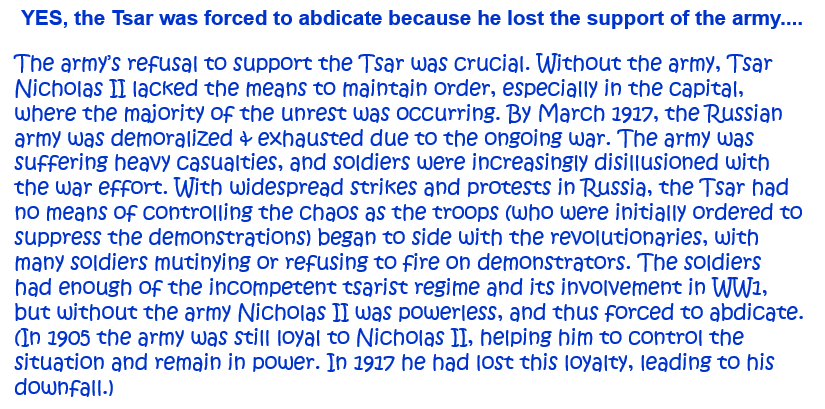
8. ‘The Tsar was forced to abdicate in March 1917 because he lost the support of the army.’ How far do you agree with this statement? Explain your answer. [10]
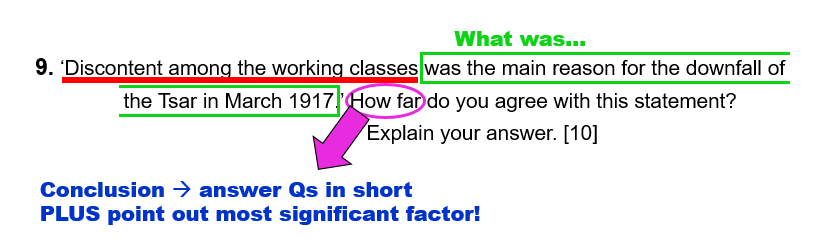
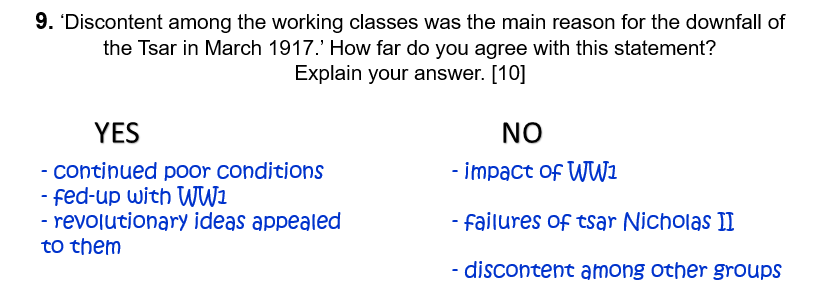
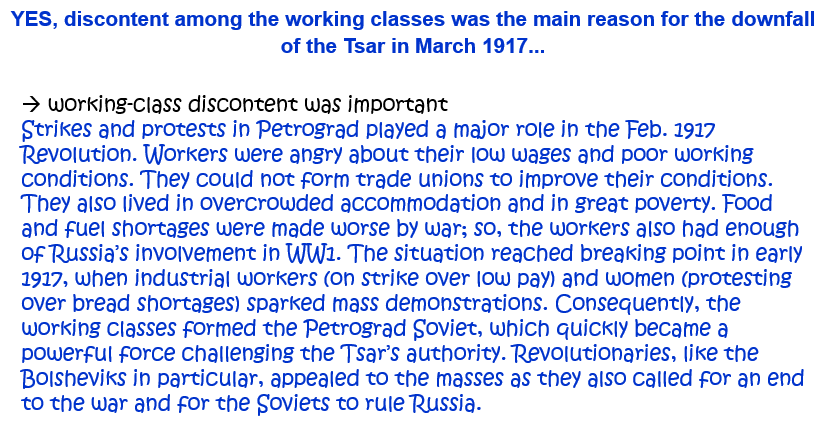
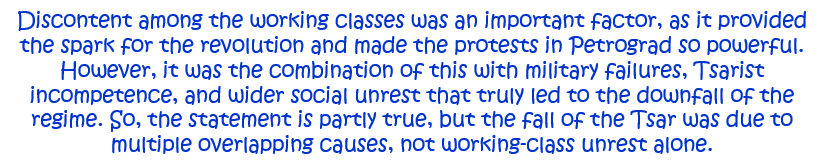
Question 9.
9. ‘Discontent among the working classes was the main reason for the downfall of the Tsar in March 1917.’ How far do you agree with this statement? Explain your answer. [10]
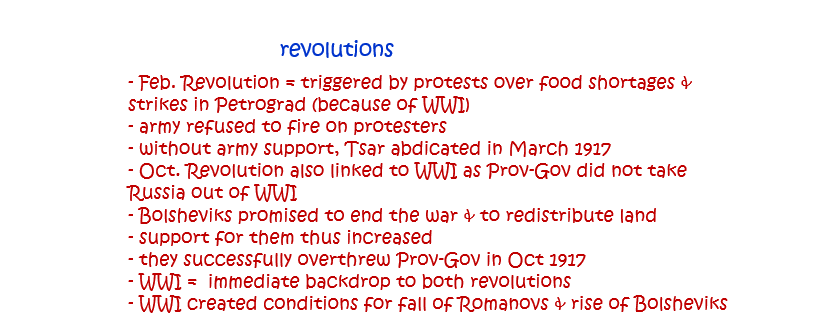
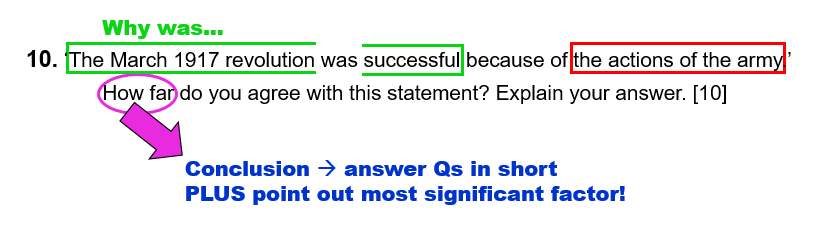
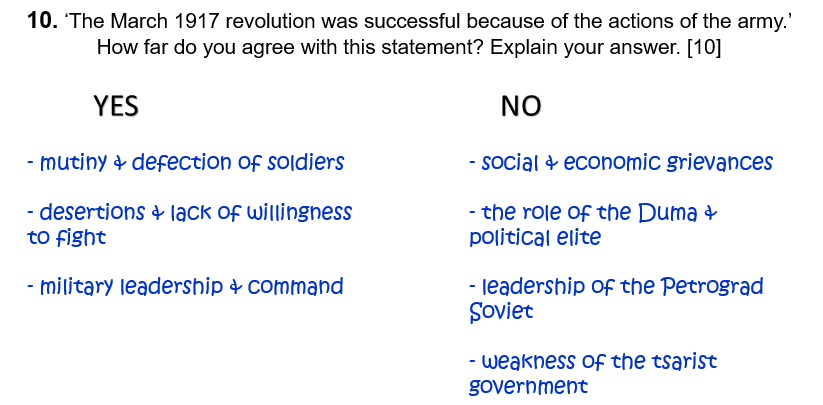
Question 10.
10. ‘The March 1917 revolution was successful because of the actions of the army.’ How far do you agree with this statement? Explain your answer. [10]
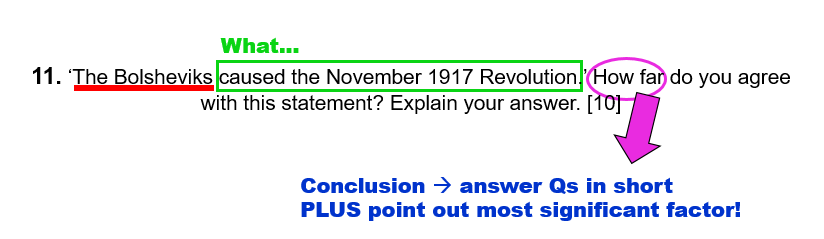
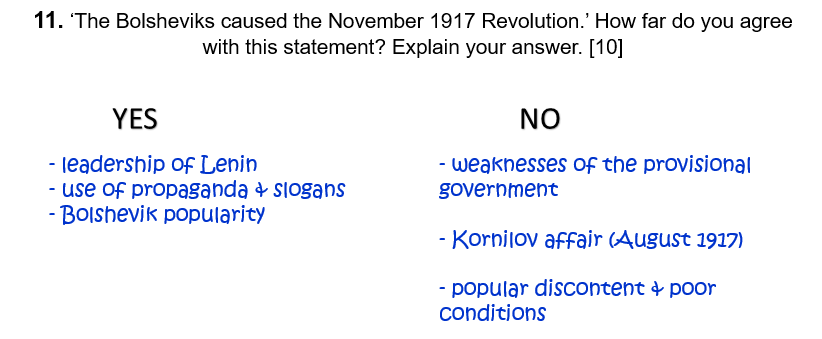
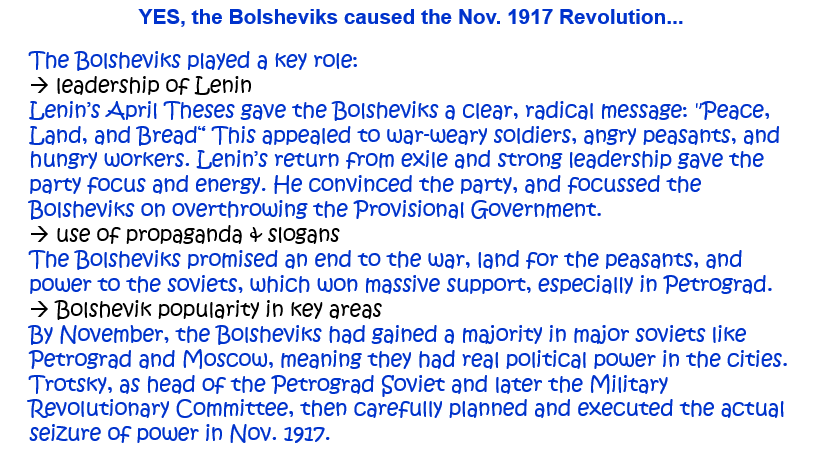
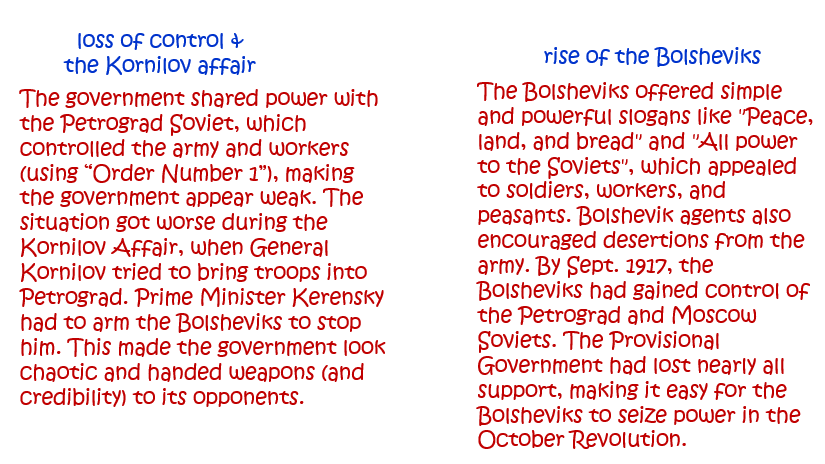
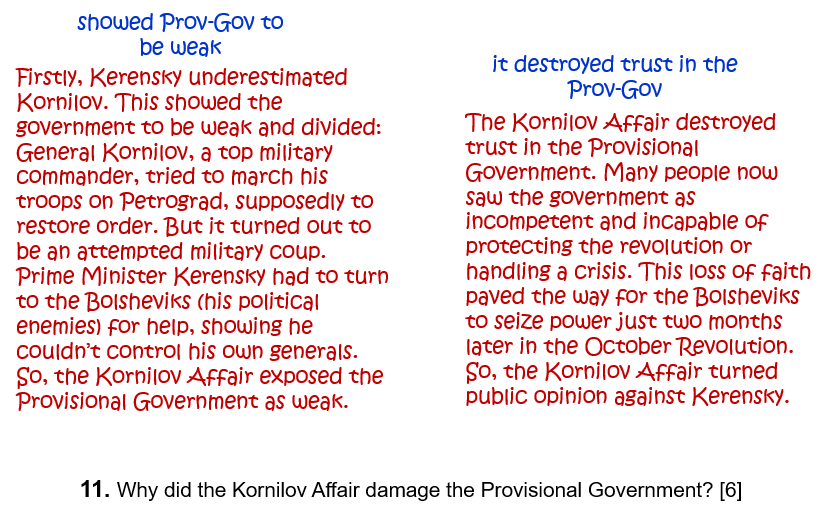
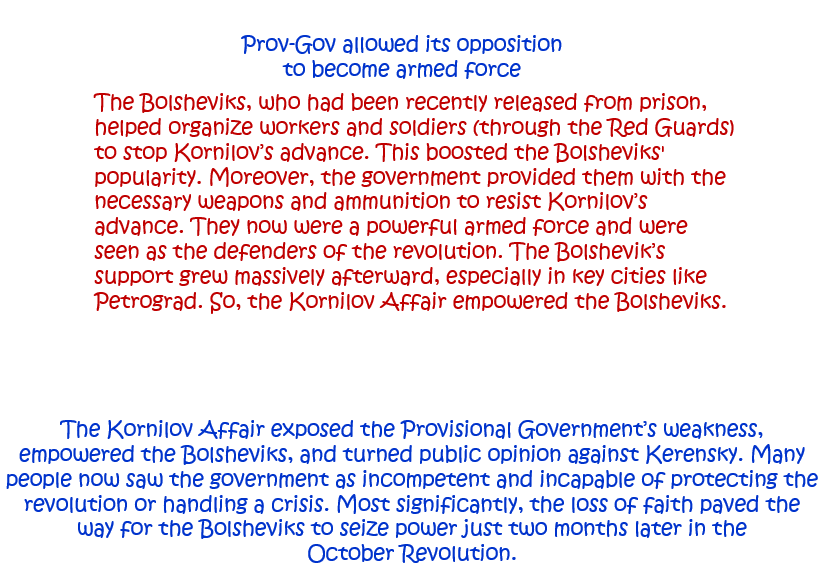
Question 11.
11. ‘The Bolsheviks caused the November 1917 Revolution.’ How far do you agree with this statement? Explain your answer. [10]
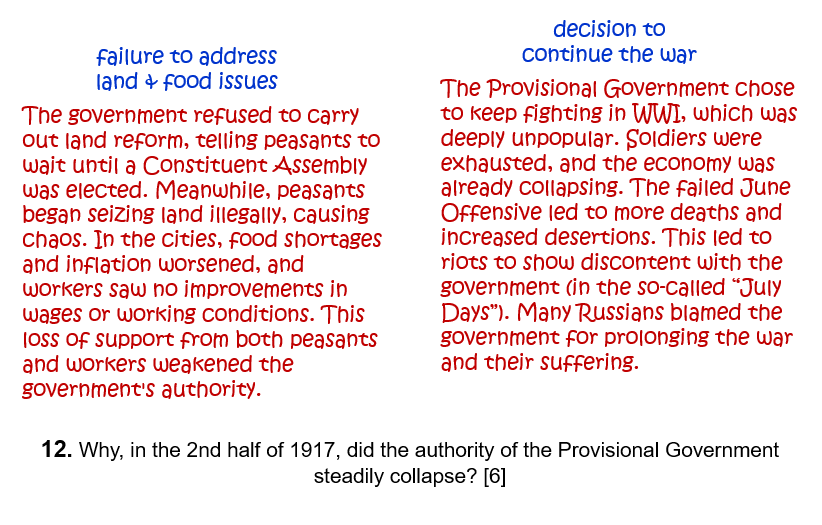
Question 12.
12. How far were the issues of ‘Land and Bread’ responsible for the overthrow of the Provisional Government in November 1917? Explain your answer. [10]
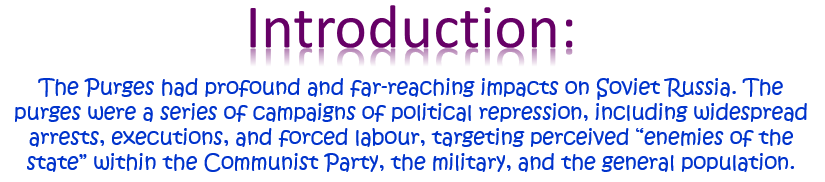
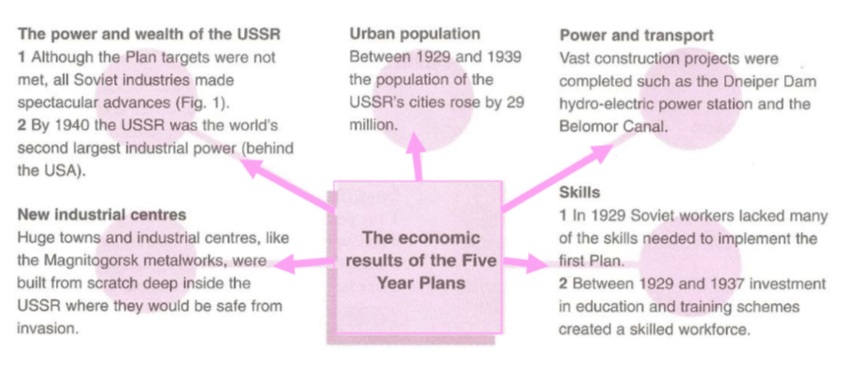
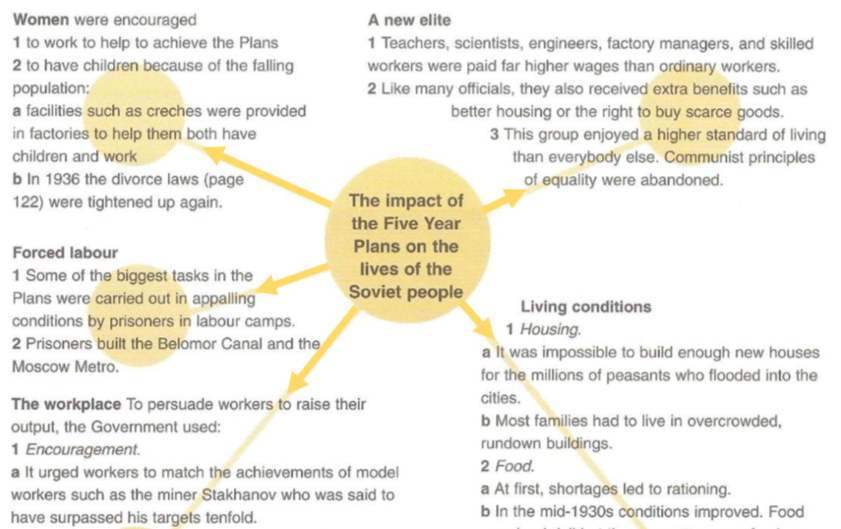
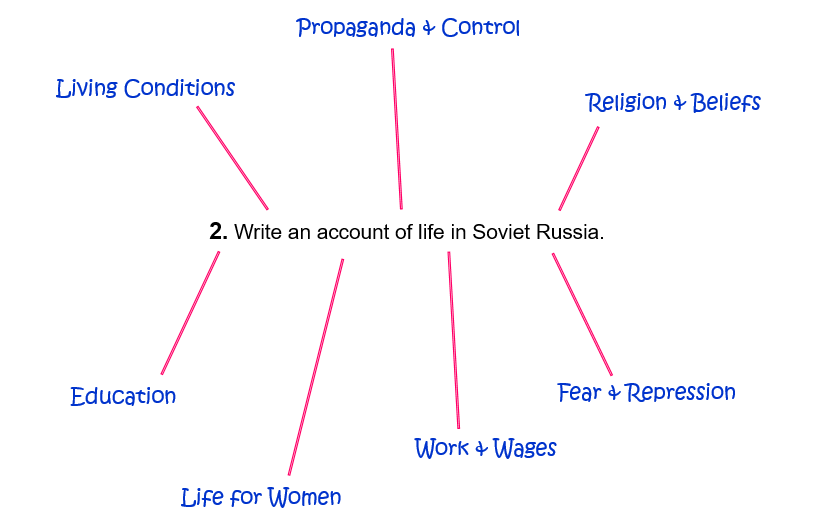
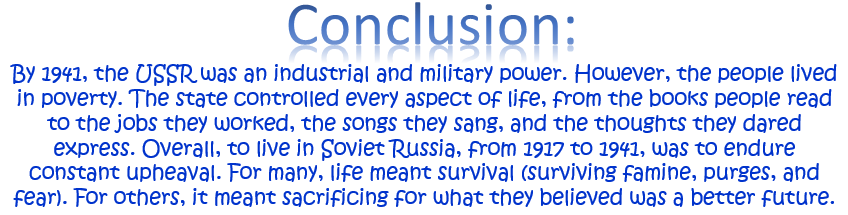
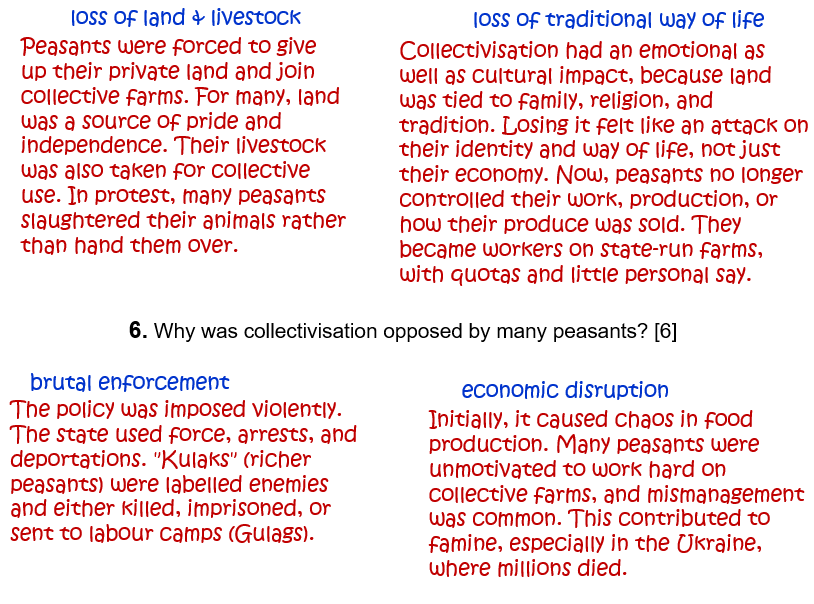
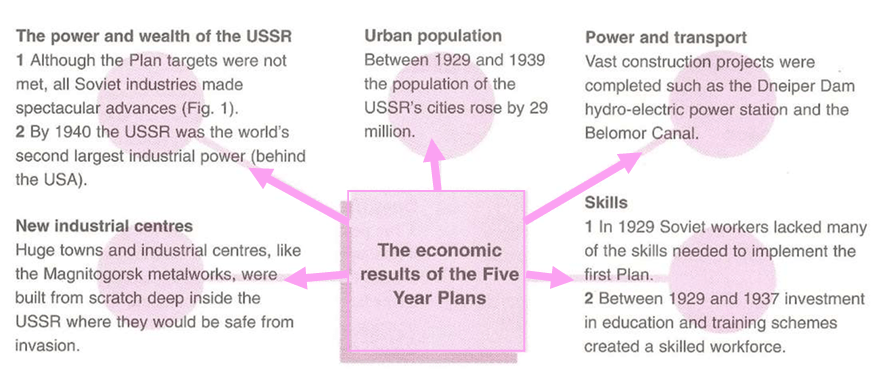
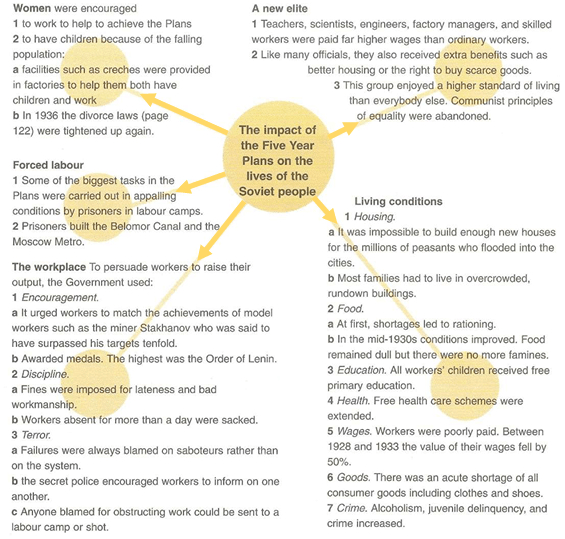
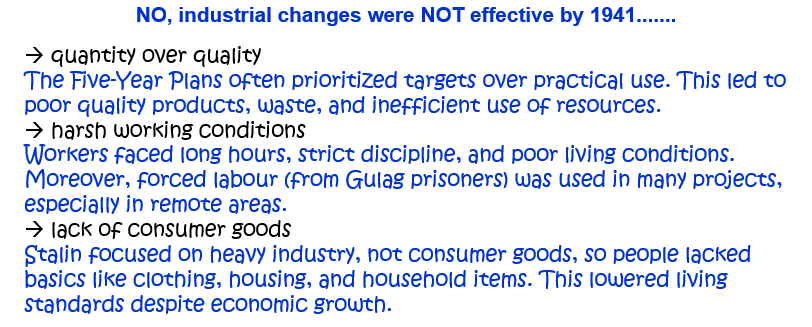
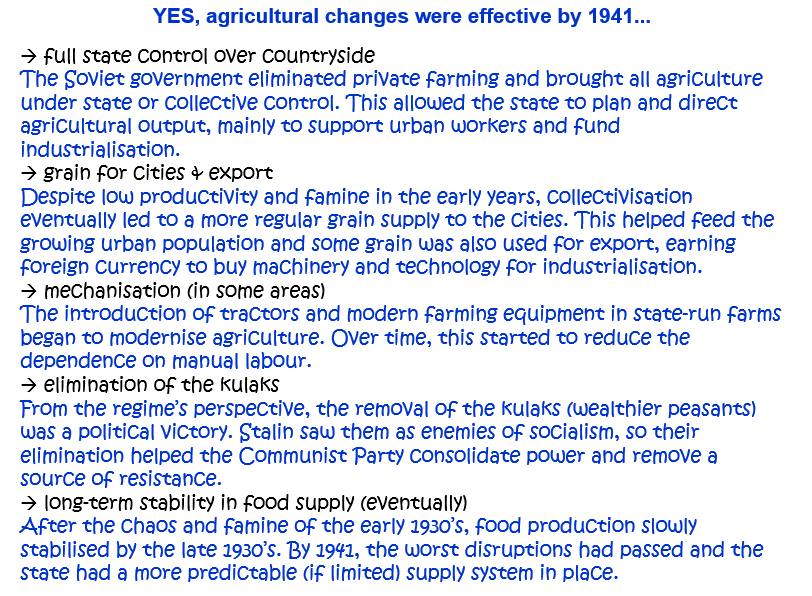
1. How far did collectivisation bring benefits to the USSR by 1941? Explain your answer. [10]
Question 2.
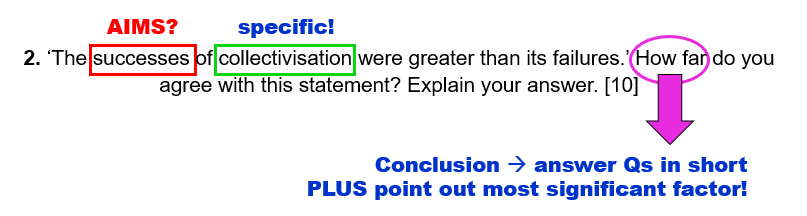
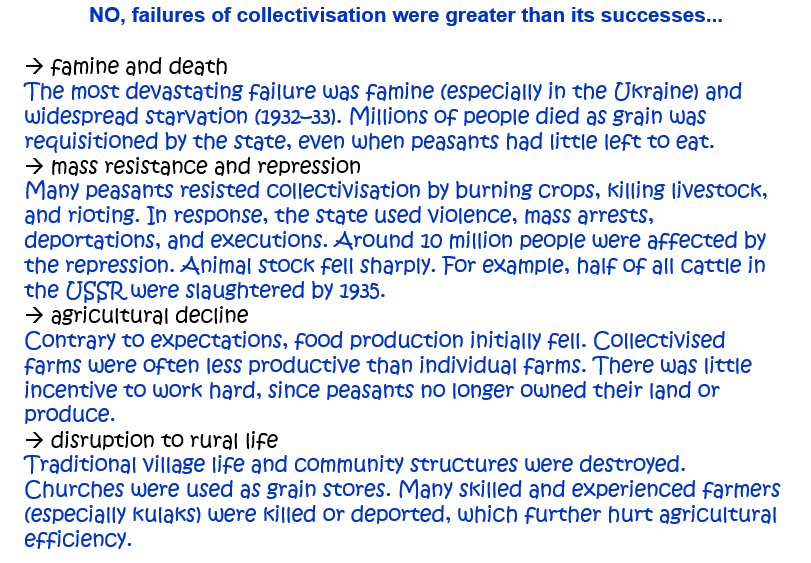
2. ‘The successes of collectivisation were greater than its failures.’ How far do you agree with this statement? Explain your answer. [10]
OR: How far was Stalin’s policy of collective farming successful? Explain your answer. [10]
Question 3.
3. ‘The Five Year Plans brought great benefit to the Soviet Union.’ How far do you agree? Explain your answer. [10]
OR: ‘Stalin’s Five-Year Plans brought misery to the Russian people.’ How far do you agree with this statement? Explain your answer. [10]
Question 4.
4. ‘Stalin’s Five-Year Plans affected the Soviet people more than they affected the economy.’ How far do you agree with this statement? Explain your answer. [10]
Question 5.
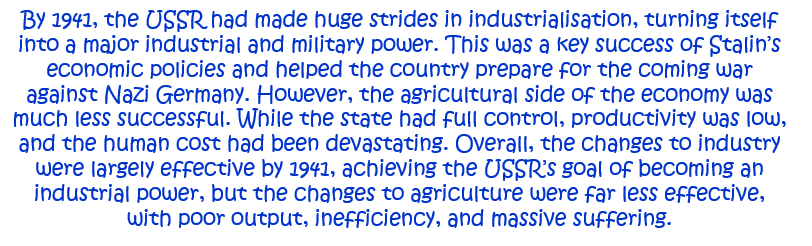
5. How successful was Stalin’s modernisation of Soviet industry by 1941? Explain your answer. [10]
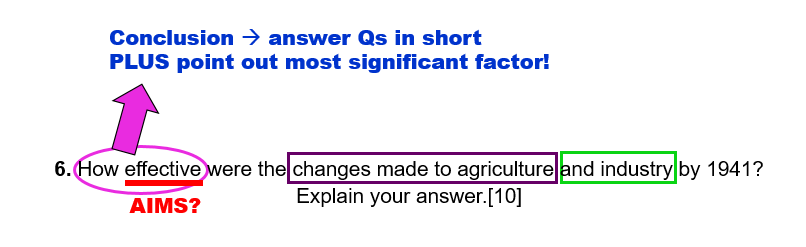
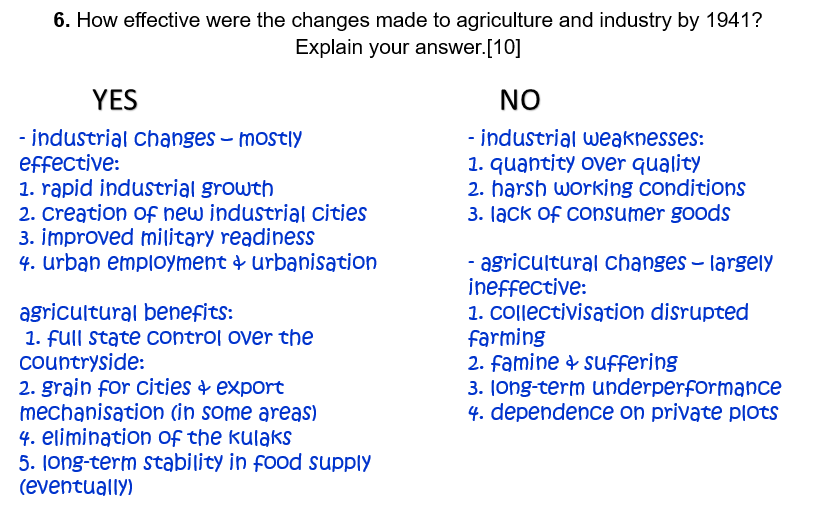
Question 6.
Questi6. How effective were the changes made to agriculture and industry by 1941? Explain your answer.[10]on
OR: How successful was Stalin in increasing industrial and agricultural output up to 1941? Explain your answer. [10]
Question 7.
7. How far did the Soviet people benefit from Stalin’s economic policies? Explain your answer. [10]
Question 8.
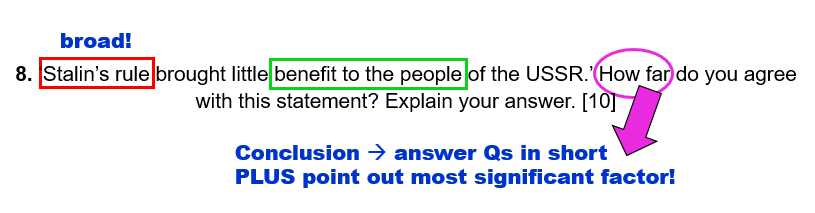
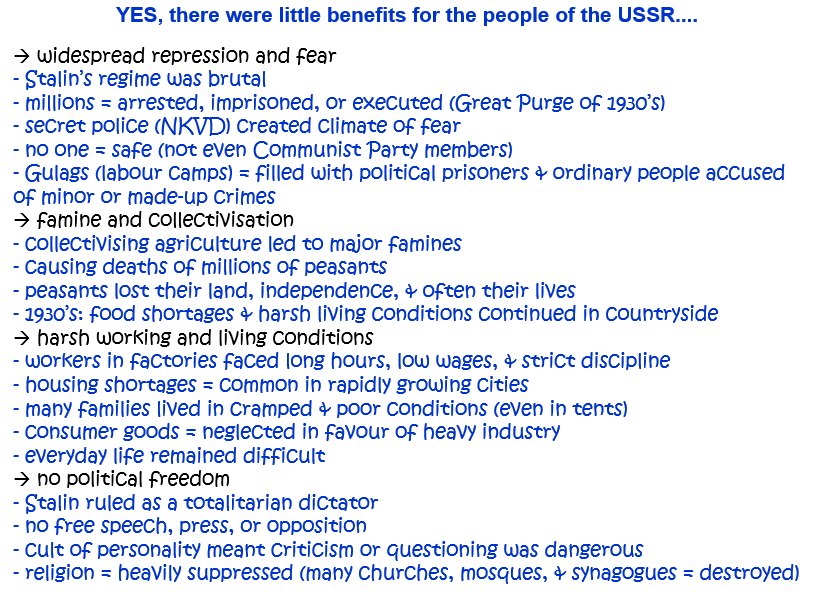
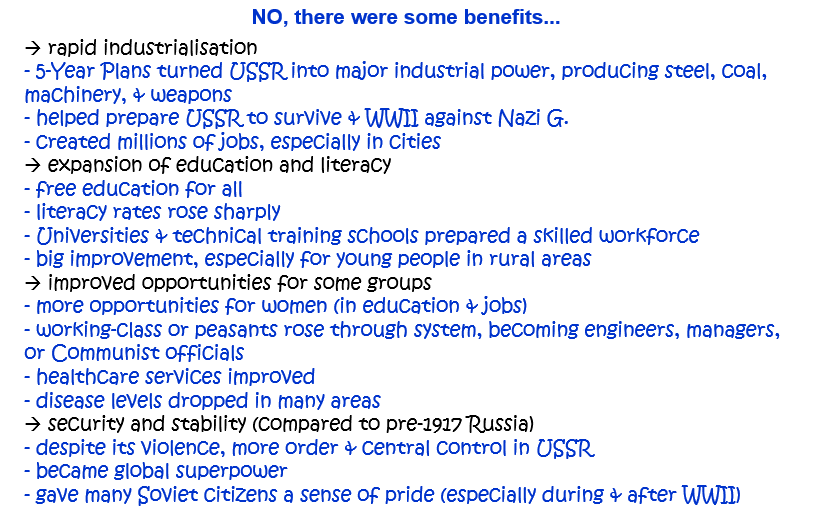
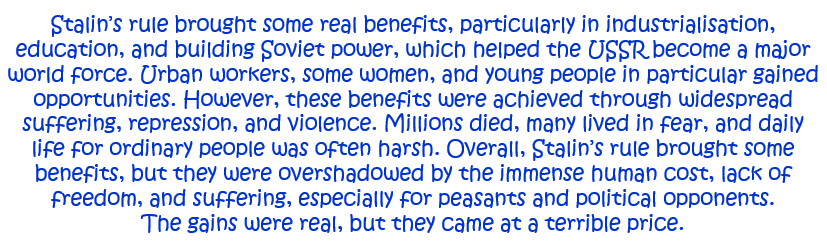
8. ‘Stalin’s rule brought little benefit to the people of the USSR.’ How far do you agree with this statement? Explain your answer. [10]
OR: How far did the lives of the Soviet people improve under Stalin’s rule to 1941? Explain your answer. [10]
Question 9.
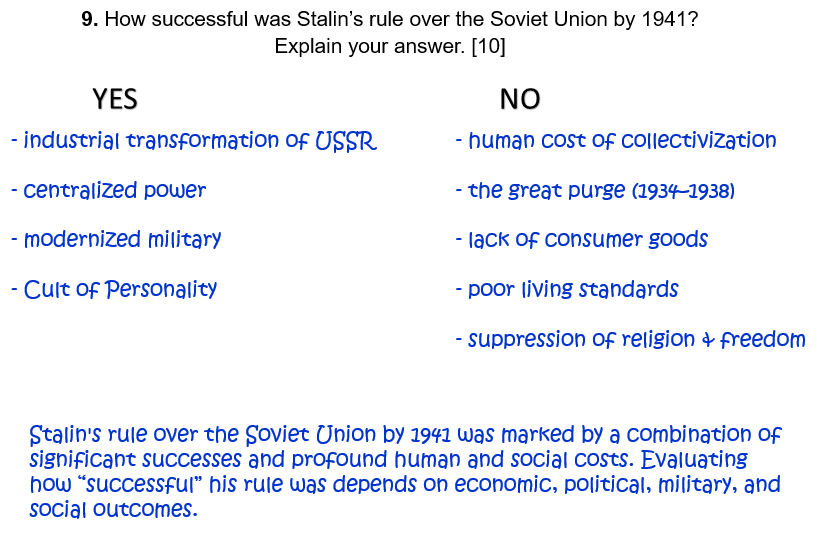
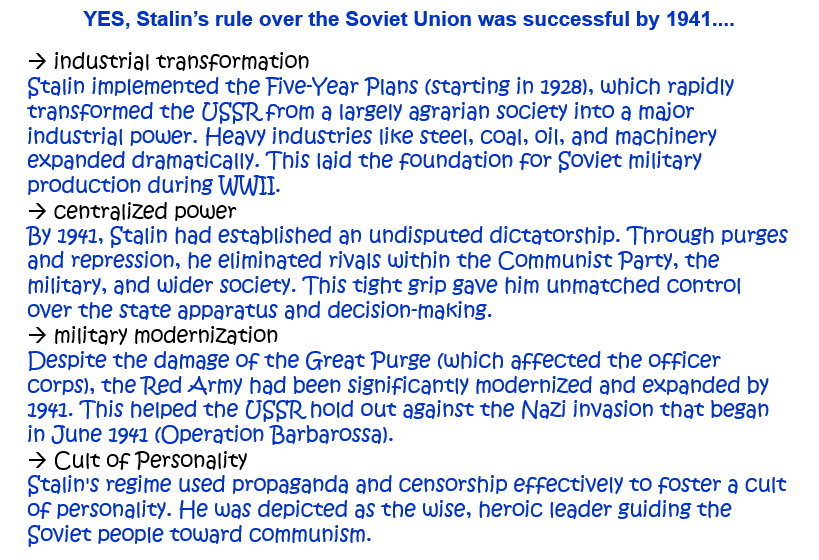
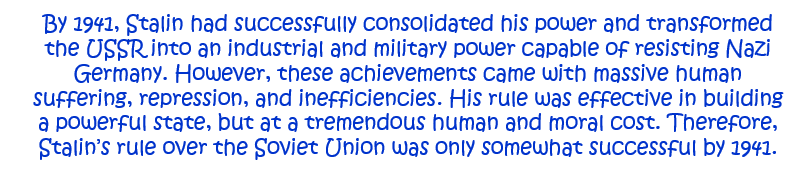
9. How successful was Stalin’s rule over the Soviet Union by 1941? Explain your answer. [10]
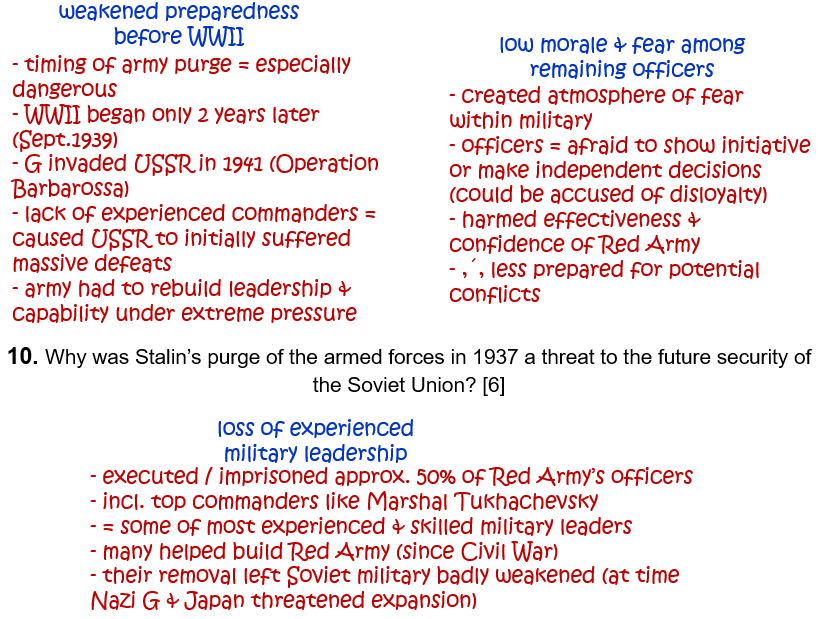
Question 10.
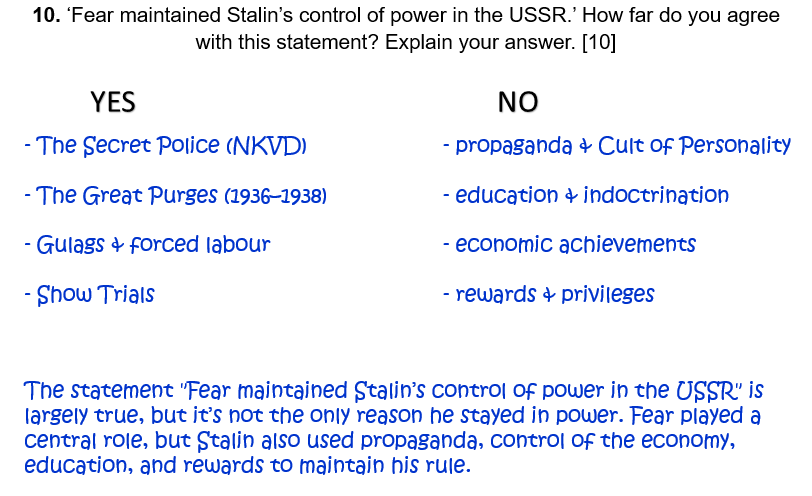
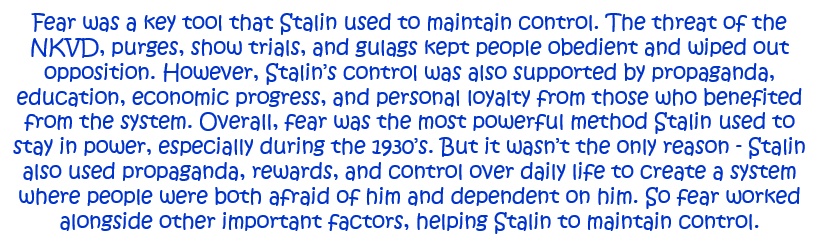
10. ‘Fear maintained Stalin’s control of power in the USSR.’ How far do you agree with this statement? Explain your answer. [10]
Question 10.
(Alternative 1)
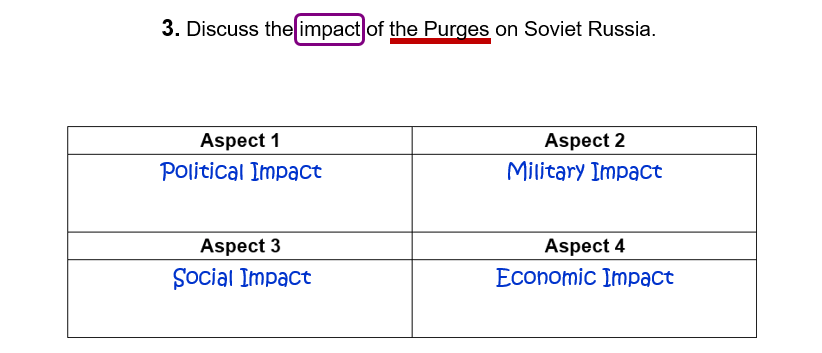
‘Stalin only kept control in Russia by repression and the elimination of opponents.’ How far do you agree with this statement? Explain your answer. [10]
Question 10.
(Alternative 2)
‘The Purges were more effective than the cult of personality in allowing Stalin to control the Soviet Union.’ How far do you agree with this statement? Explain your answer. [10]
Question 10.
(Alternative 3)
Which was the more effective of Stalin’s methods of controlling the people of the Soviet Union – the cult of personality or terror? Explain your answer. [10]
Question 10.
(Alternative 4)
‘Propaganda was the most effective method used by Stalin to control the people of Russia.’ How far do you agree with this statement? Explain your answer. [10]
Question 10.
(Alternative 5)
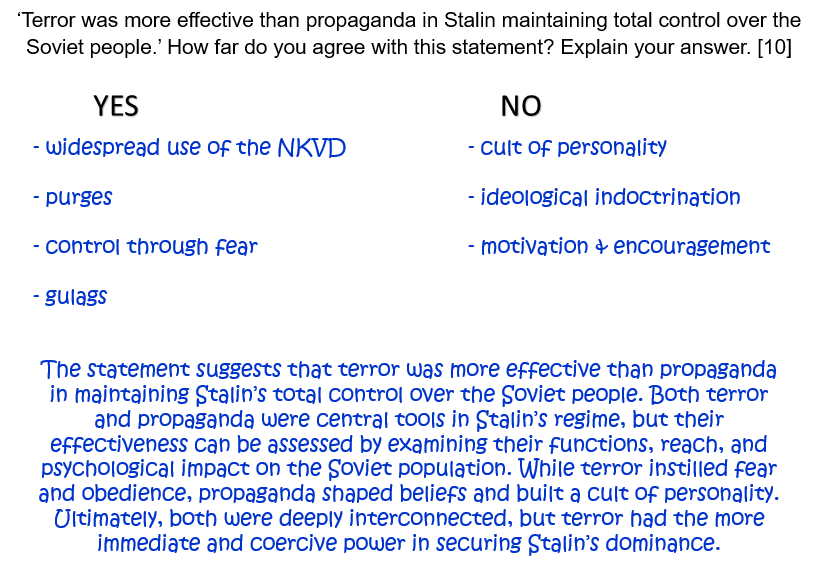
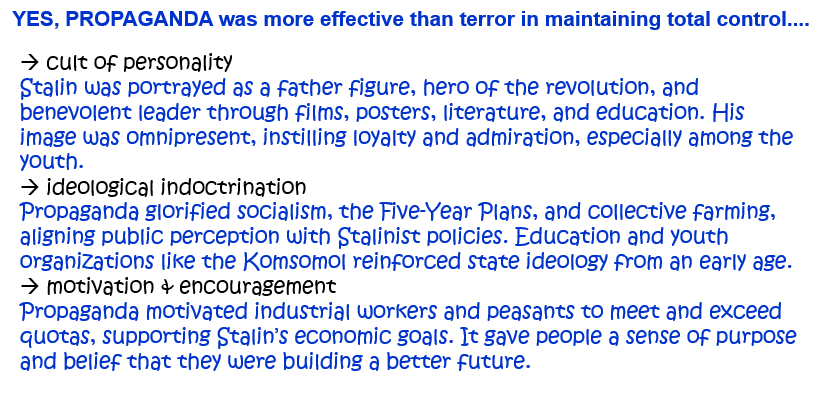
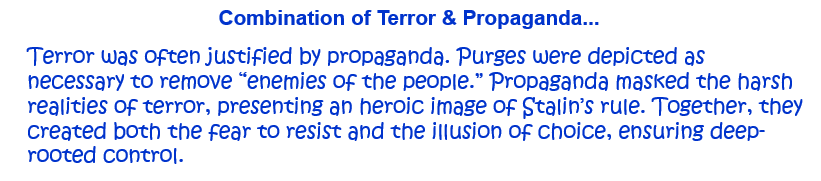
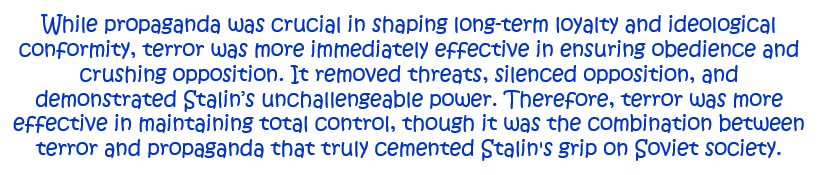
‘Terror was more effective than propaganda in Stalin maintaining total control over the Soviet people.’ How far do you agree with this statement? Explain your answer. [10]
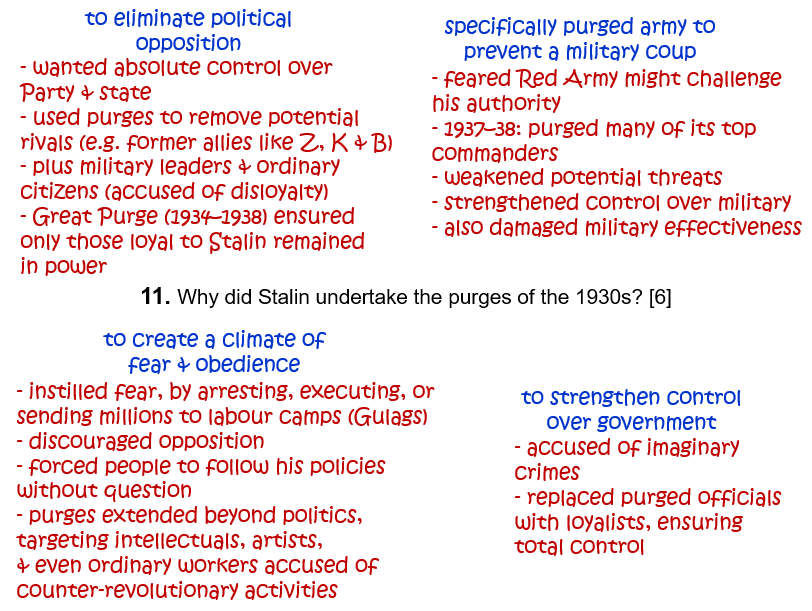
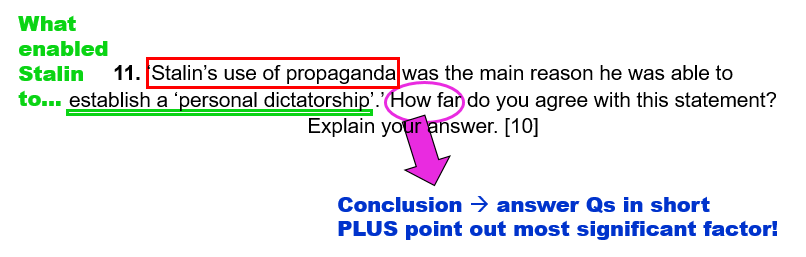
Question 11.
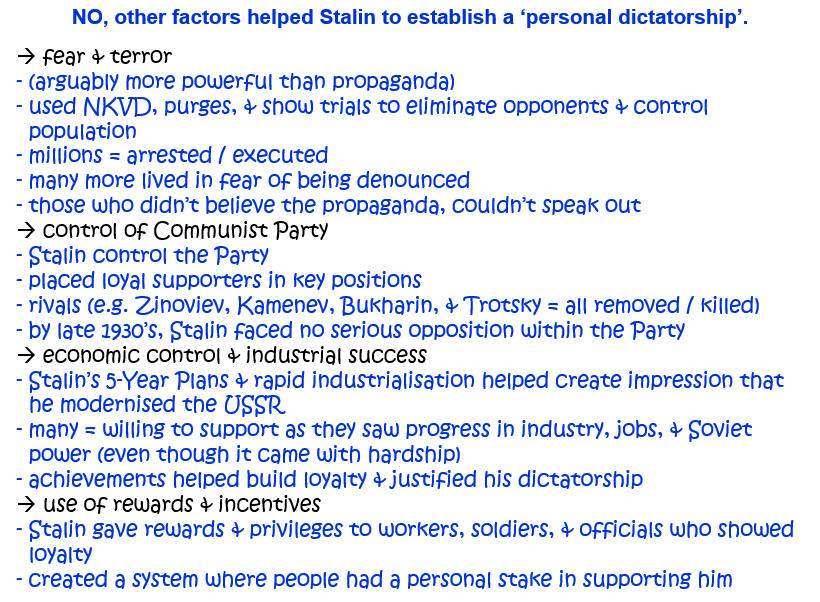
11. ‘Stalin’s use of propaganda was the main reason he was able to establish a ‘personal dictatorship’.’ How far do you agree with this statement? Explain your answer. [10]
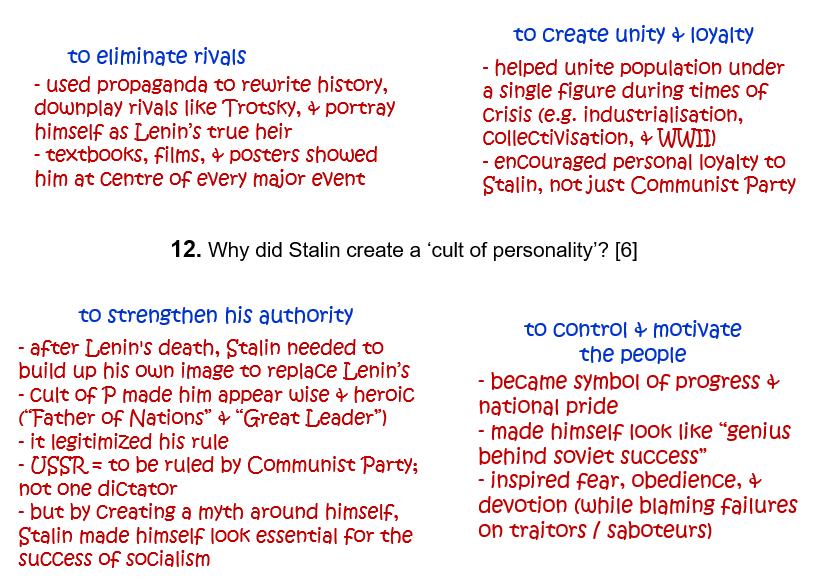
Question 12.
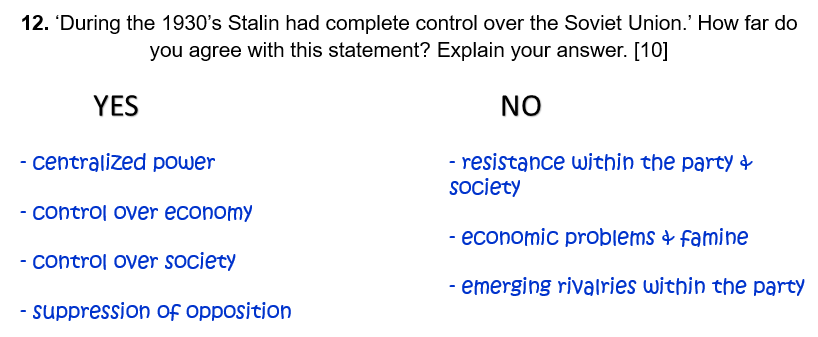
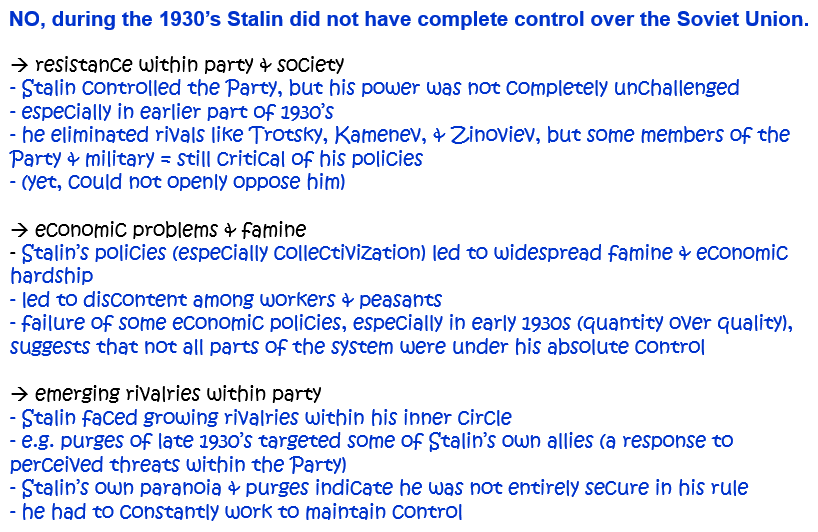
12. ‘During the 1930s Stalin had complete control over the Soviet Union.’ How far do you agree with this statement? Explain your answer. [10]
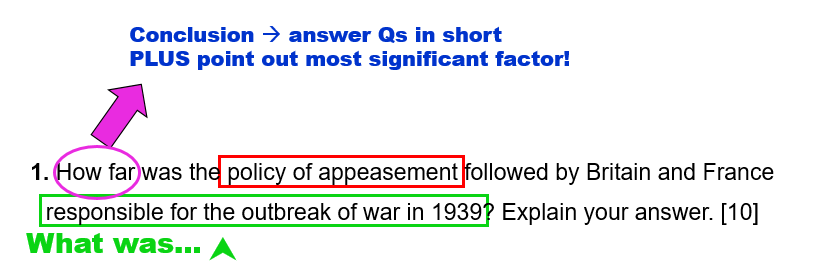
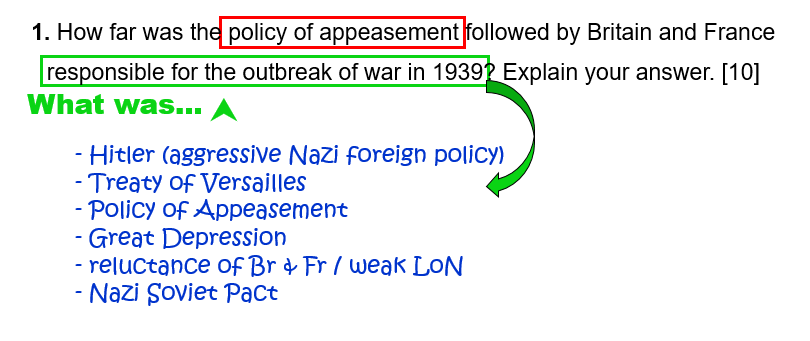
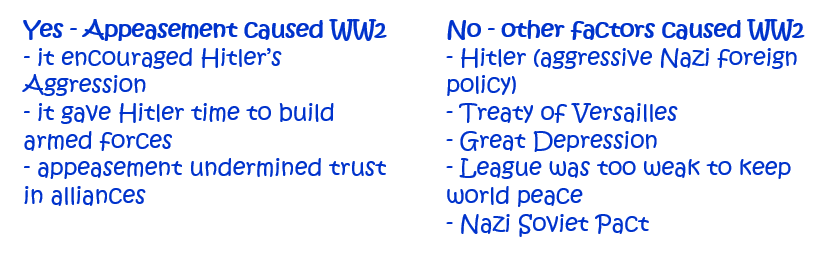
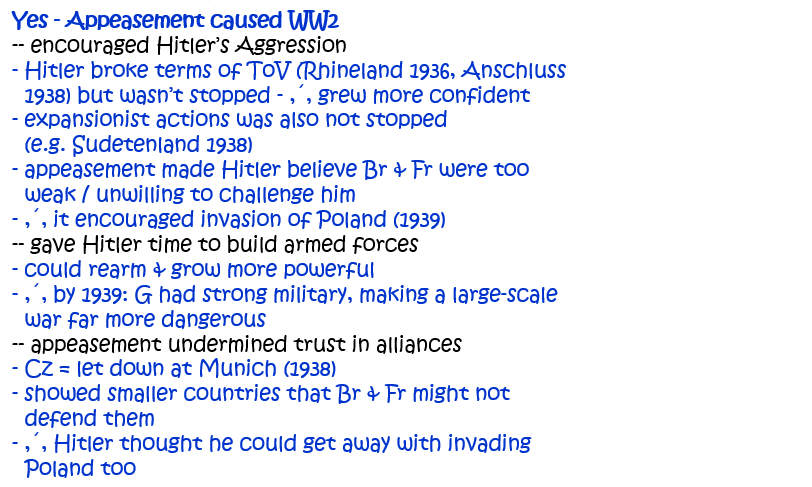
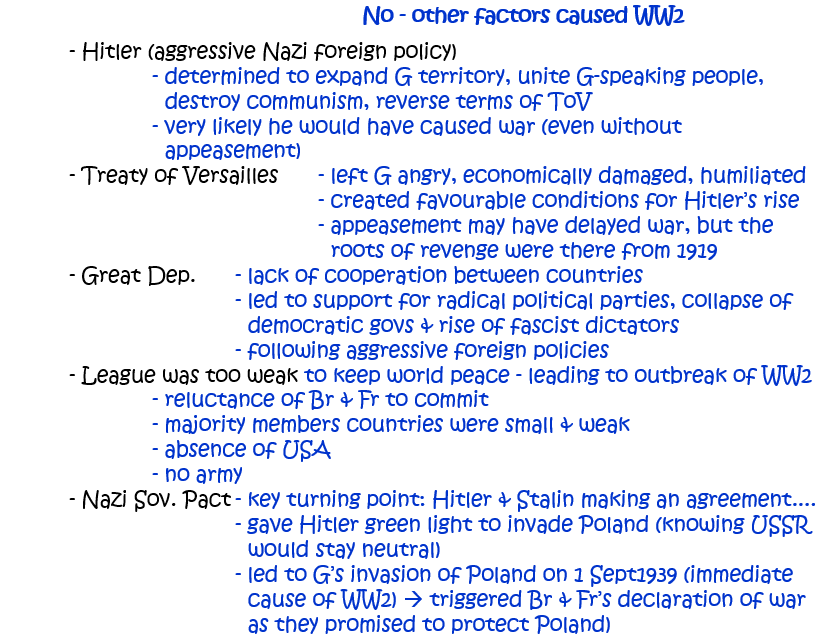
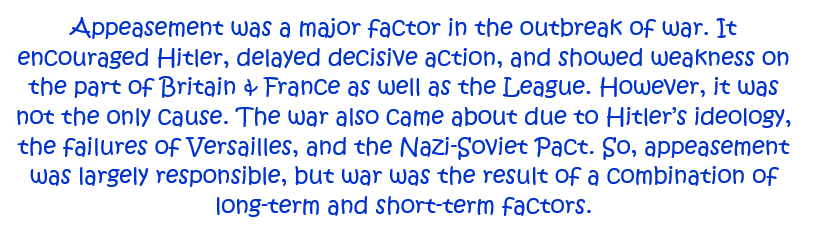
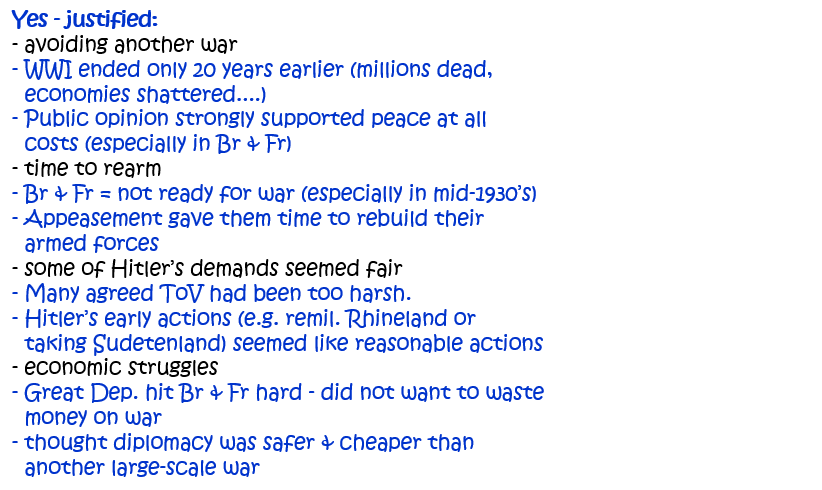
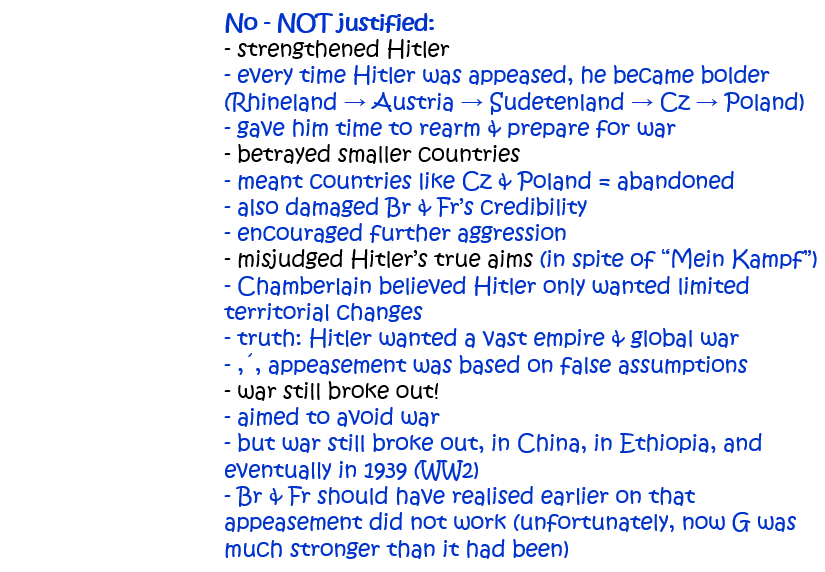
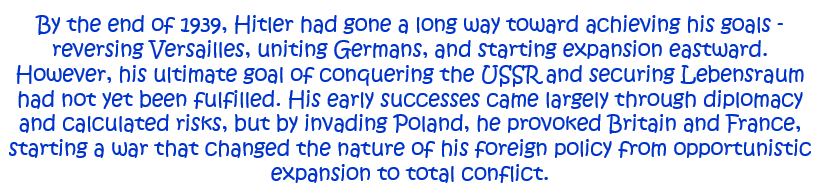
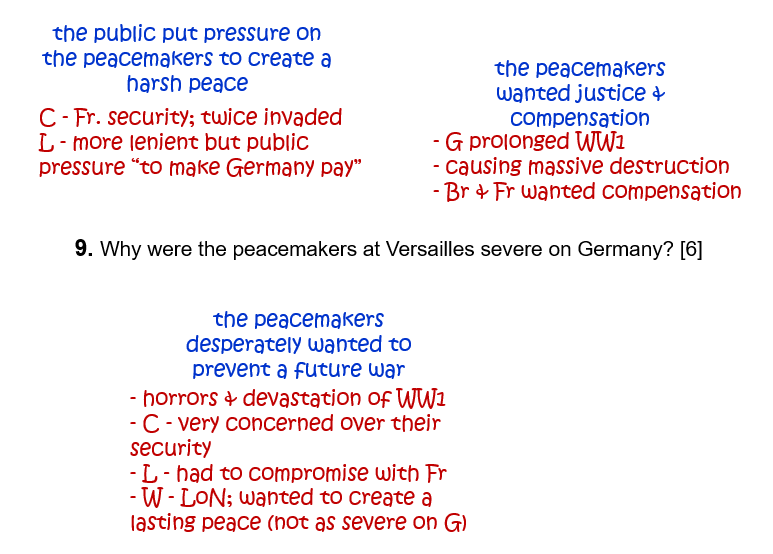
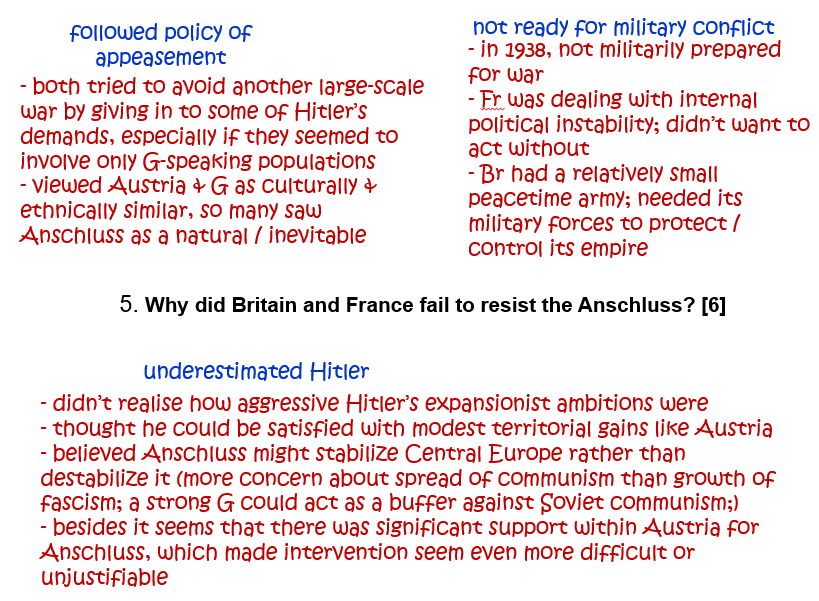
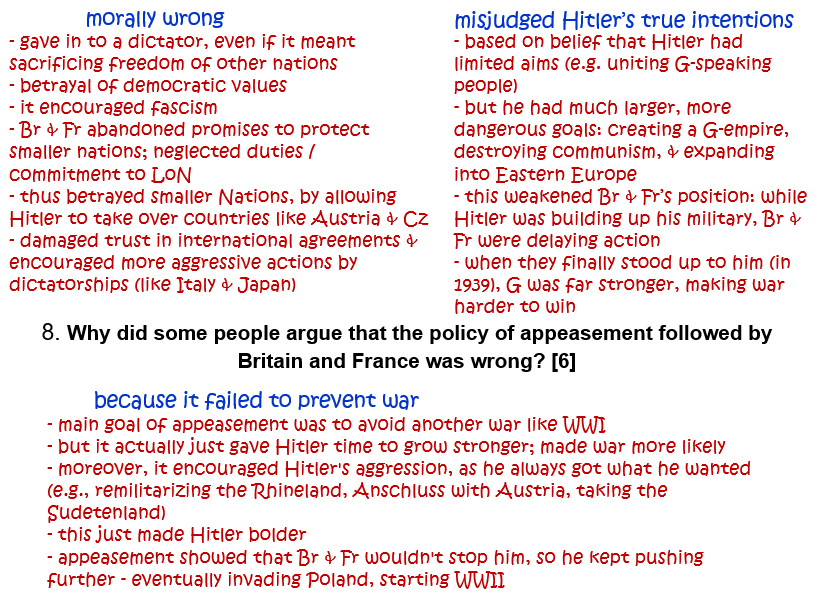
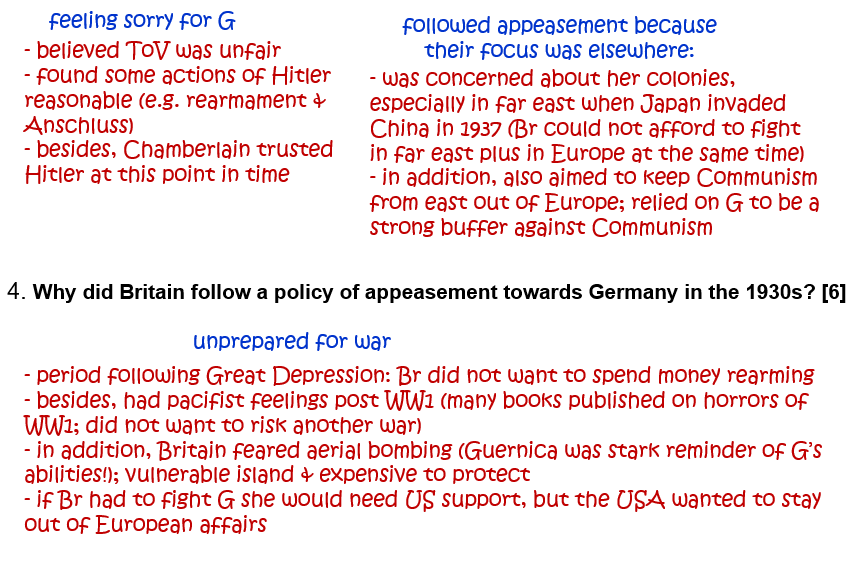
1. How far was the policy of appeasement followed by Britain and France responsible for the outbreak of war in 1939? Explain your answer. [10]
Question 2.
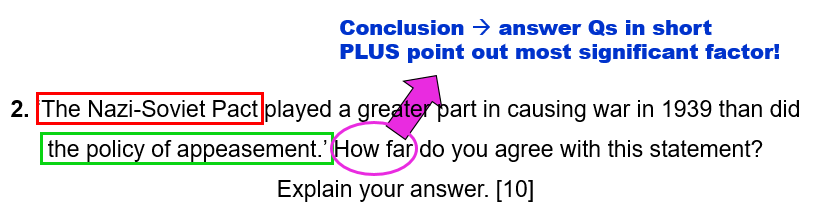
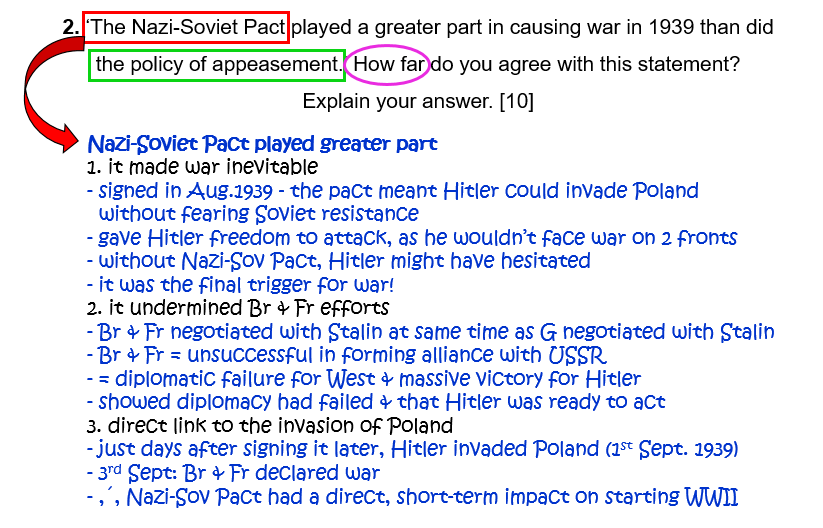
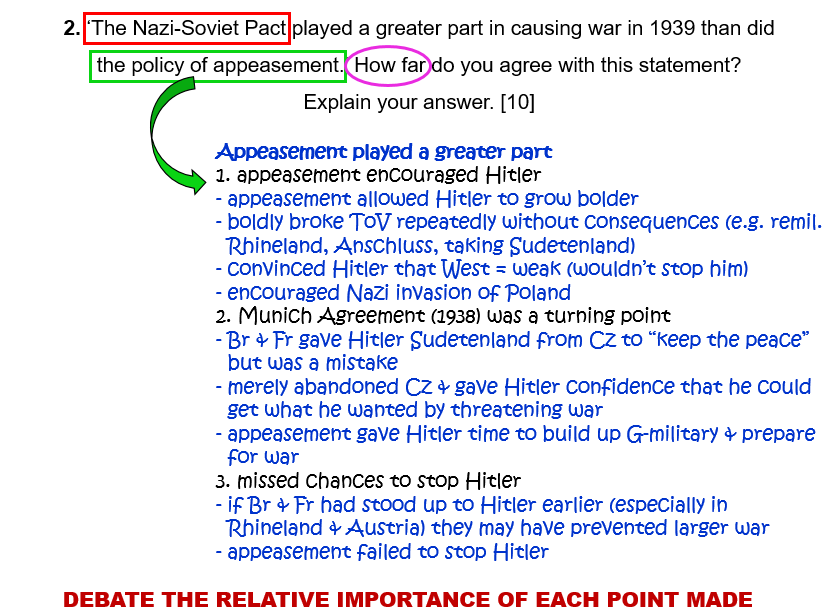
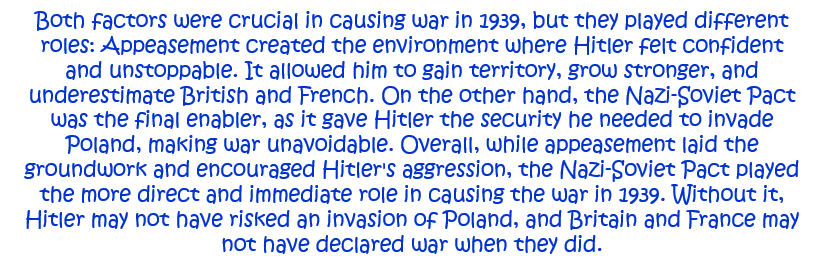
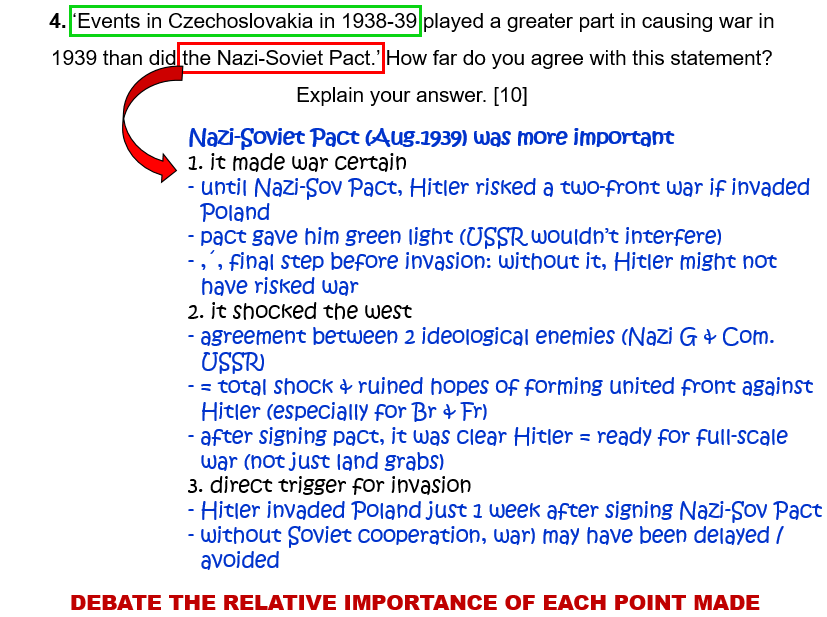
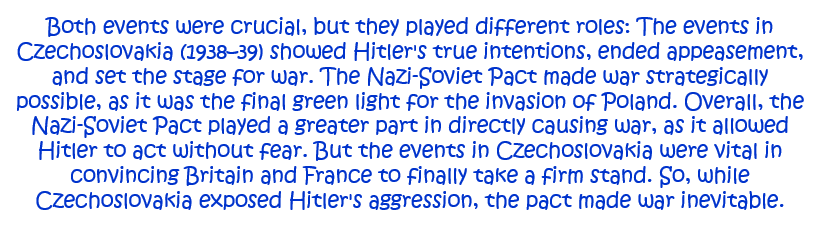
2. ‘The Nazi-Soviet Pact played a greater part in causing war in 1939 than did the policy of appeasement.’ How far do you agree with this statement? Explain your answer. [10]
Question 3.
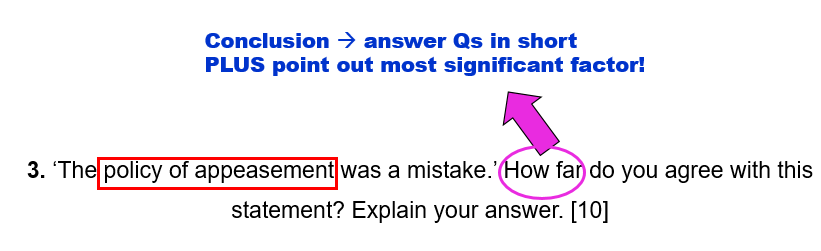
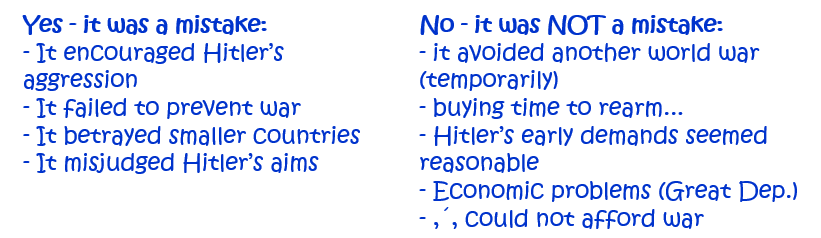
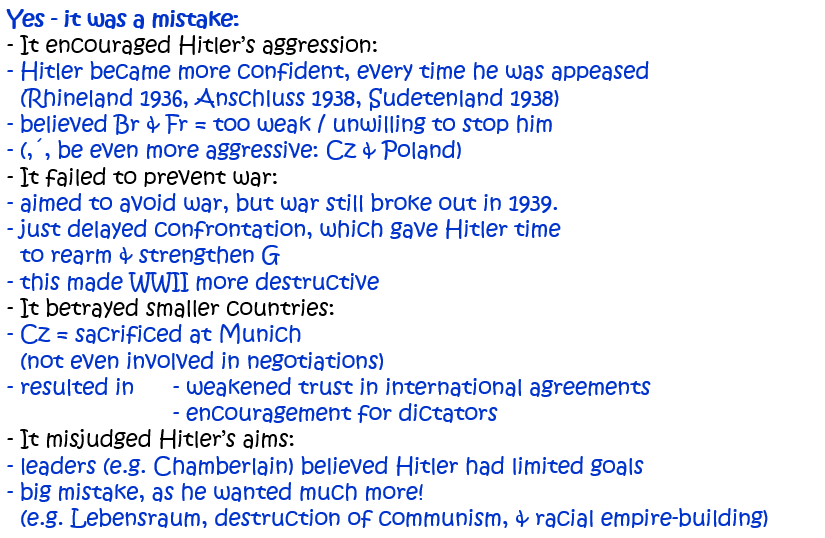
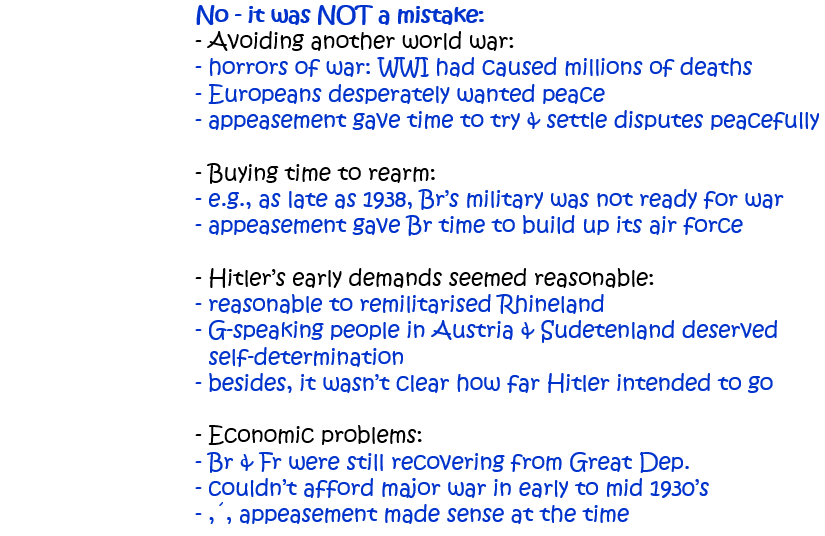
3. ‘The policy of appeasement was a mistake.’ How far do you agree with this statement? Explain your answer. [10]
Question 4.
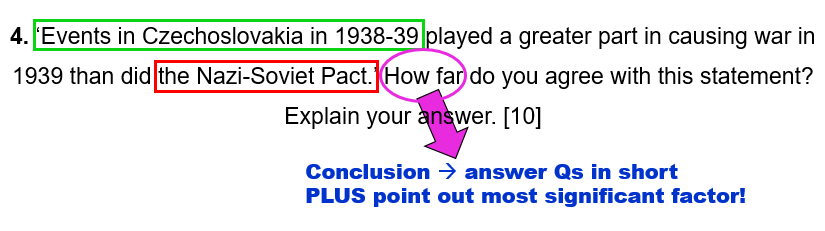
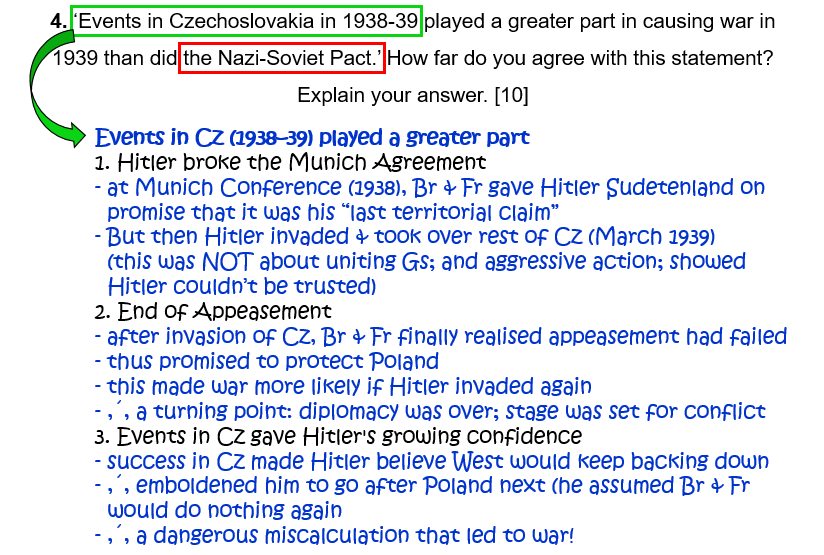
4. ‘Events in Czechoslovakia in 1938–9 played a greater part in causing war in 1939 than did the Nazi-Soviet Pact.’ How far do you agree with this statement? Explain your answer. [10]
Question 5.
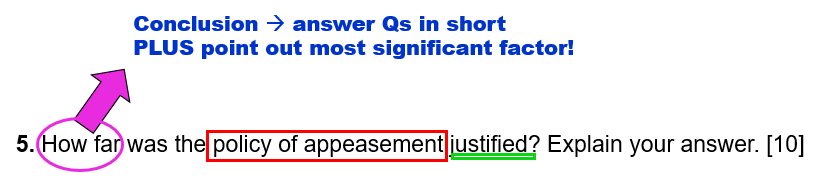
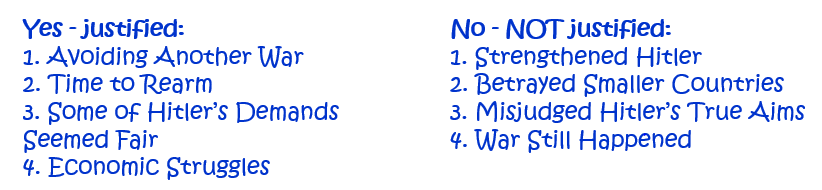
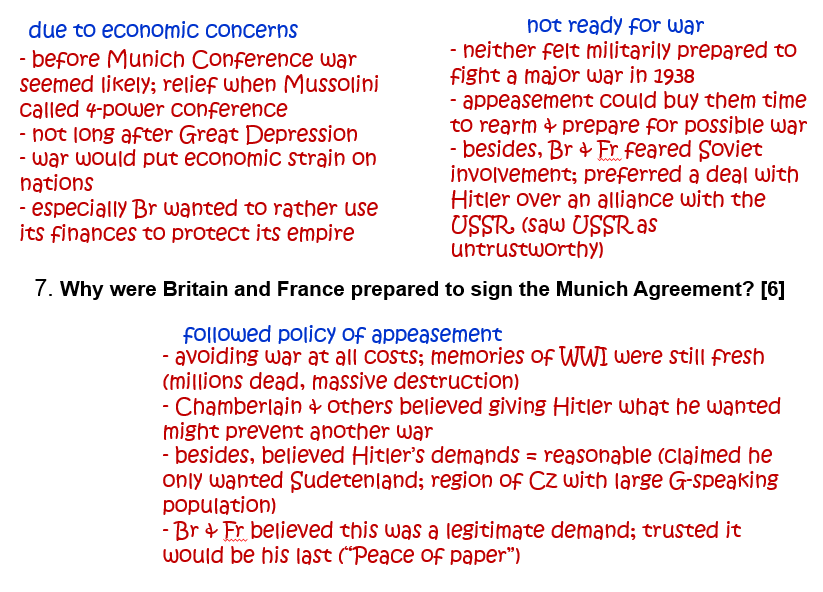
5. How far was the policy of appeasement justified? Explain your answer. [10]
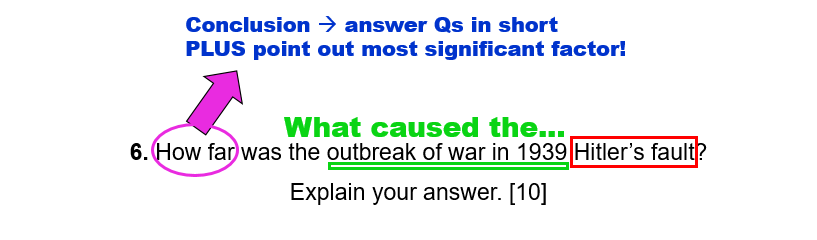
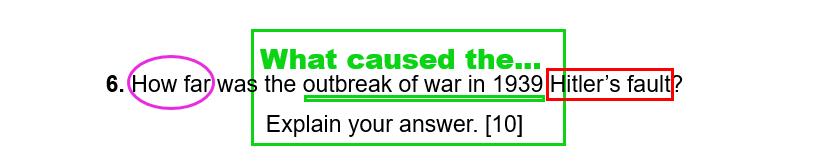
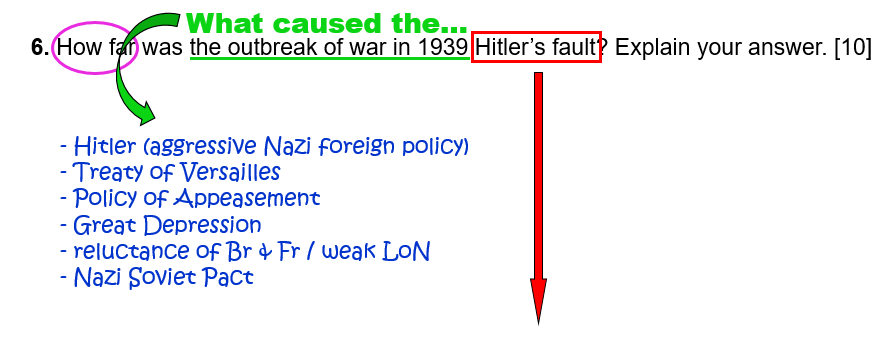
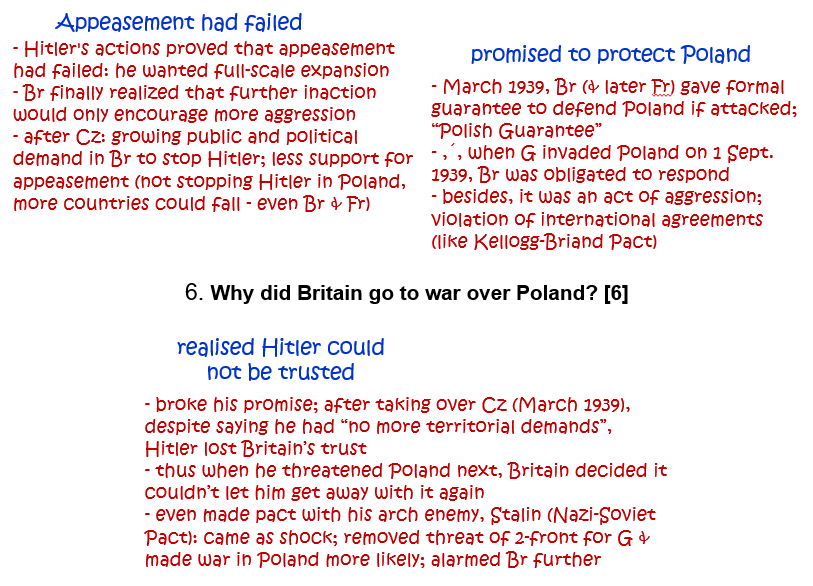
Question 6.
6. How far was the outbreak of war in 1939 Hitler’s fault? Explain your answer. [10]
Question 7.
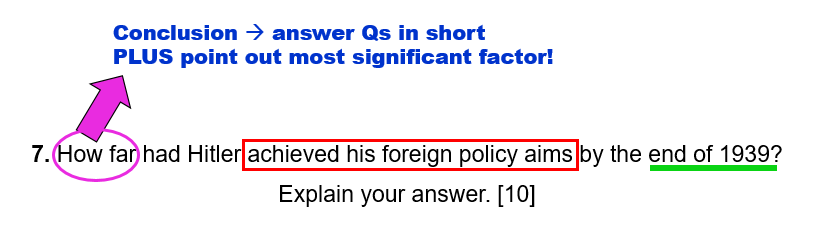
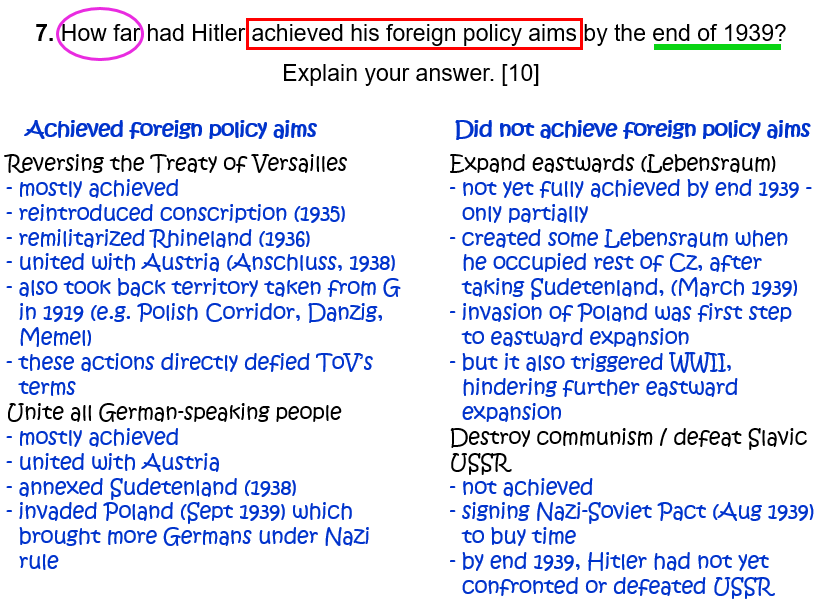
7. How far had Hitler achieved his foreign policy aims by the end of 1939? Explain your answer. [10]
Question 8.
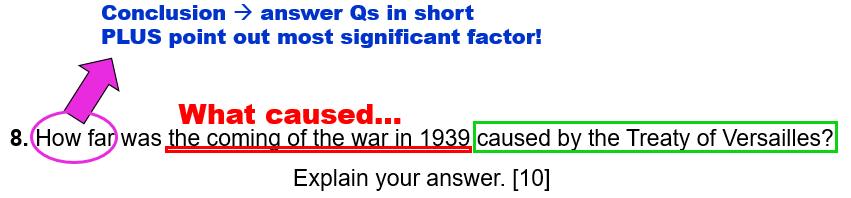
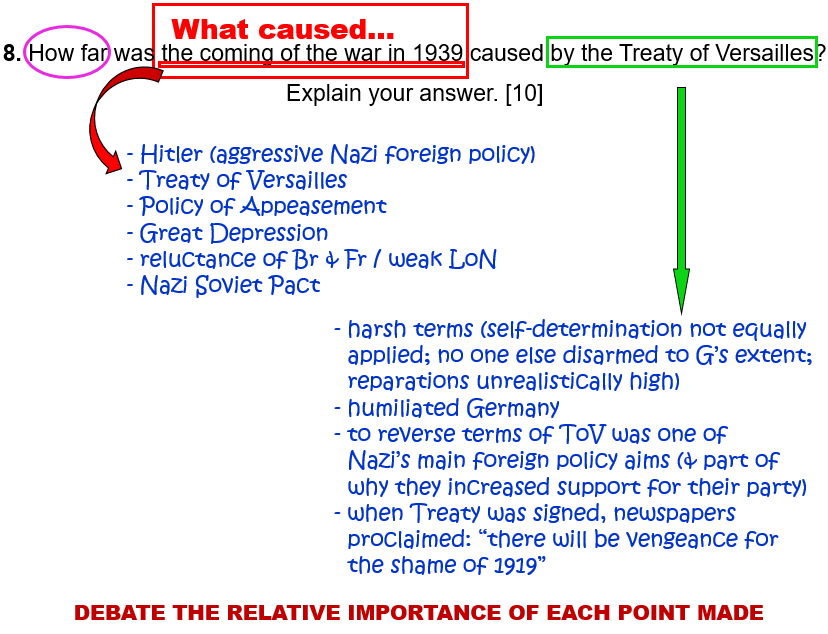
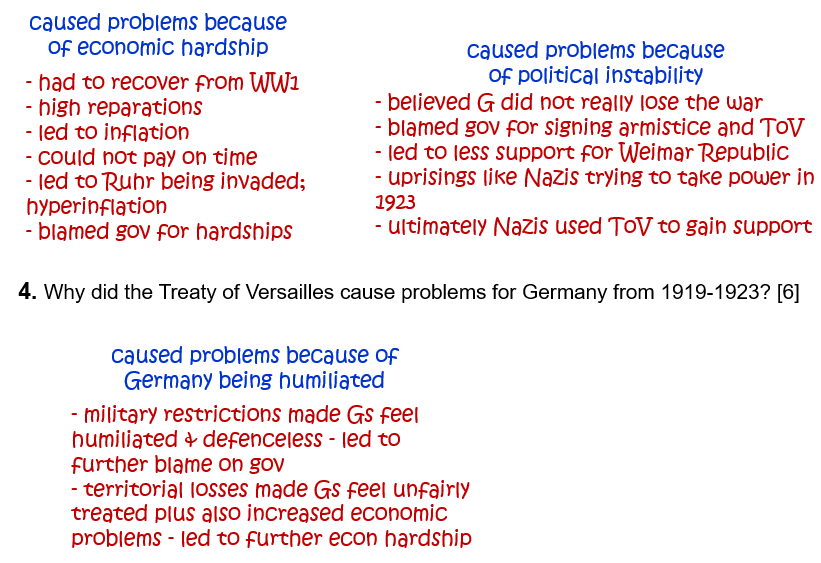
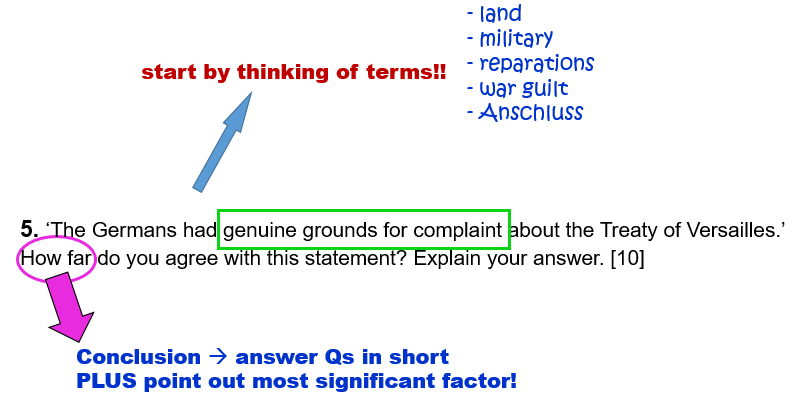
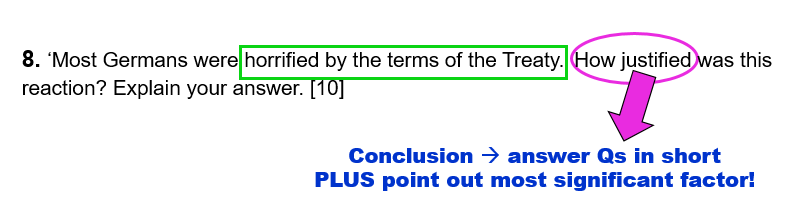
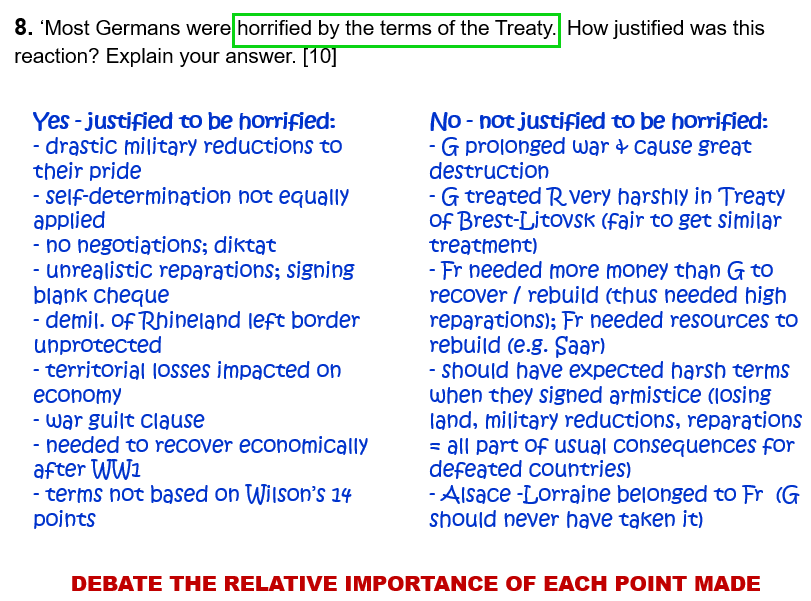
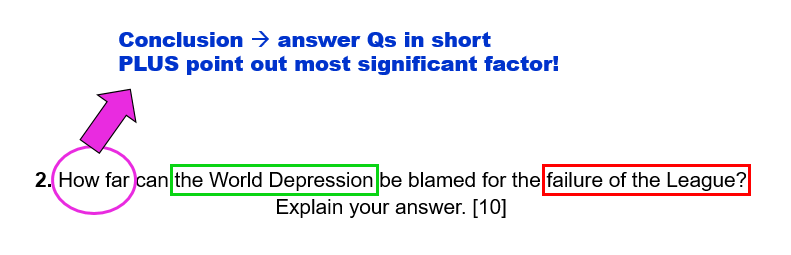
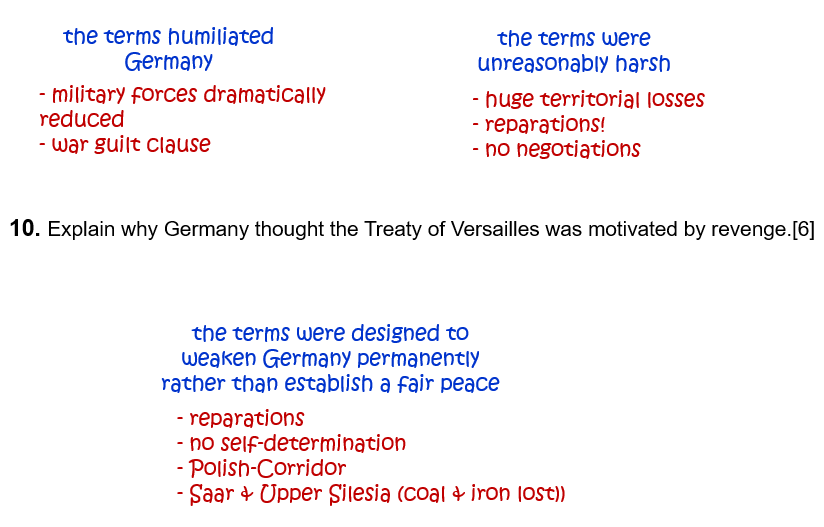
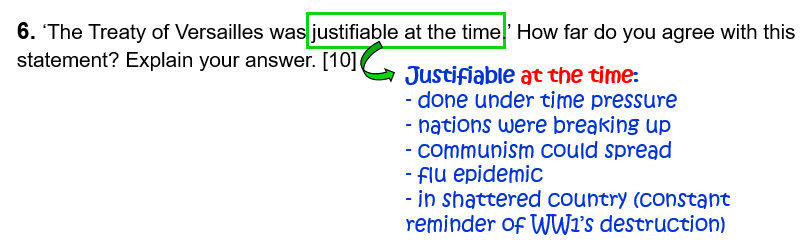
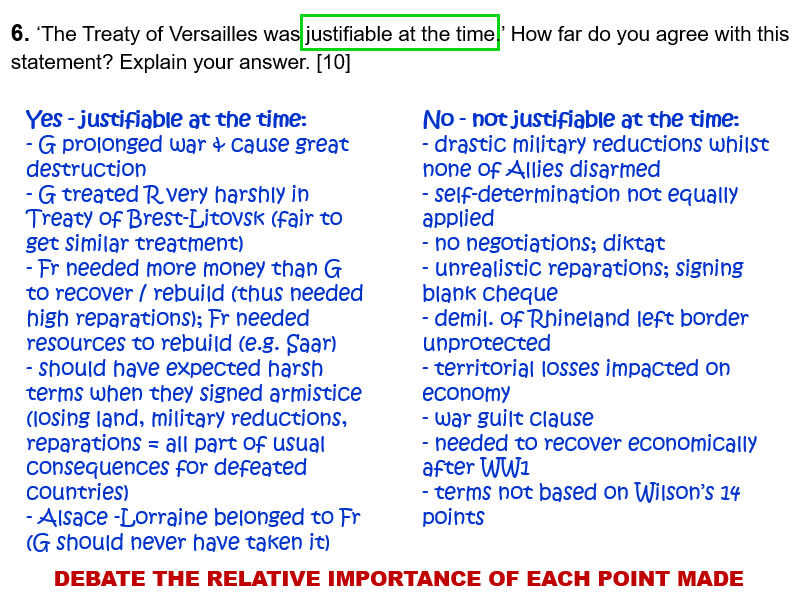
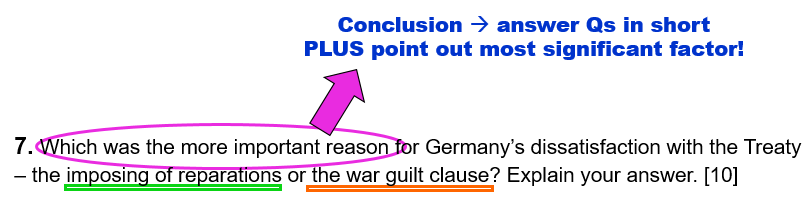
8. How far was the coming of the war in 1939 caused by the Treaty of Versailles? Explain your answer. [10]
Question 9.
(…but take note of the different date!)
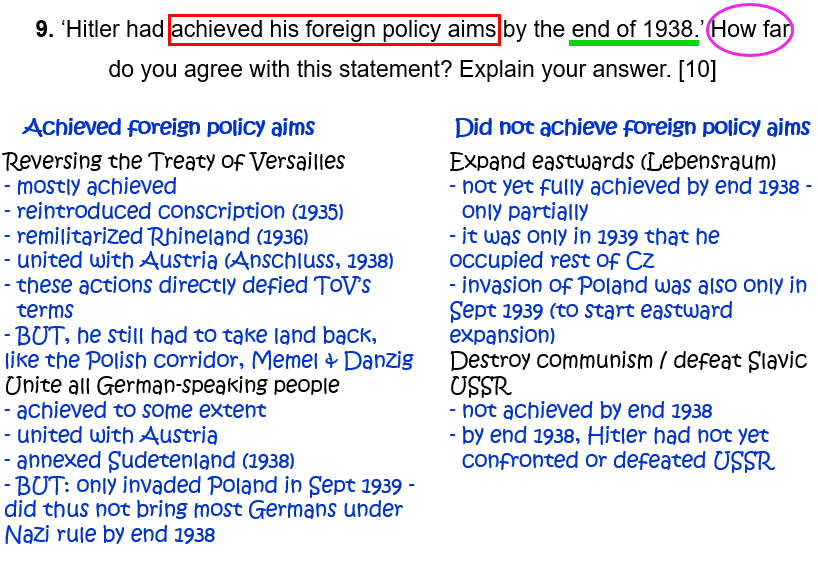
9. ‘Hitler had achieved his foreign policy aims by the end of 1938.’ How far do you agree with this statement? Explain your answer. [10]
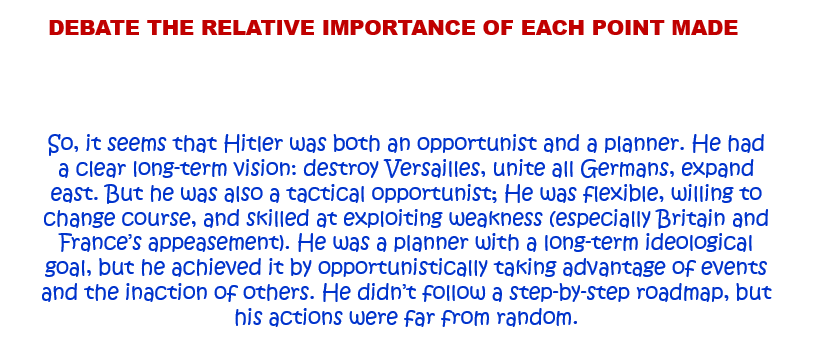
Question 10.
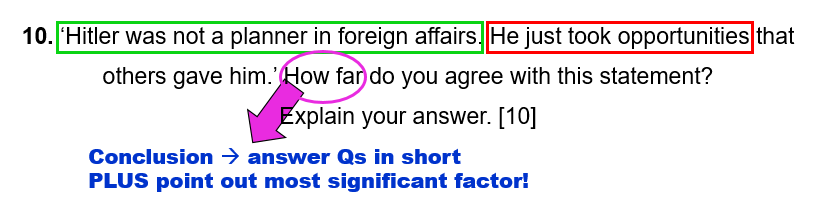
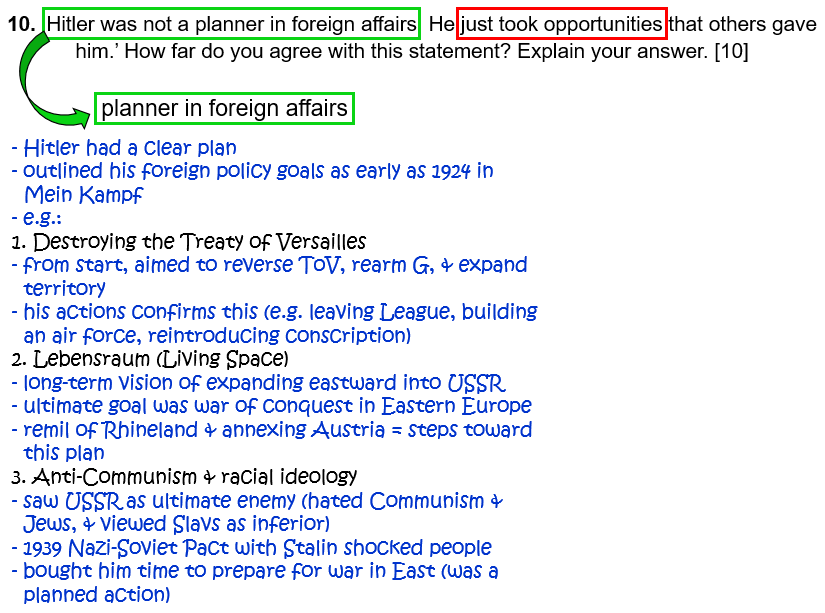
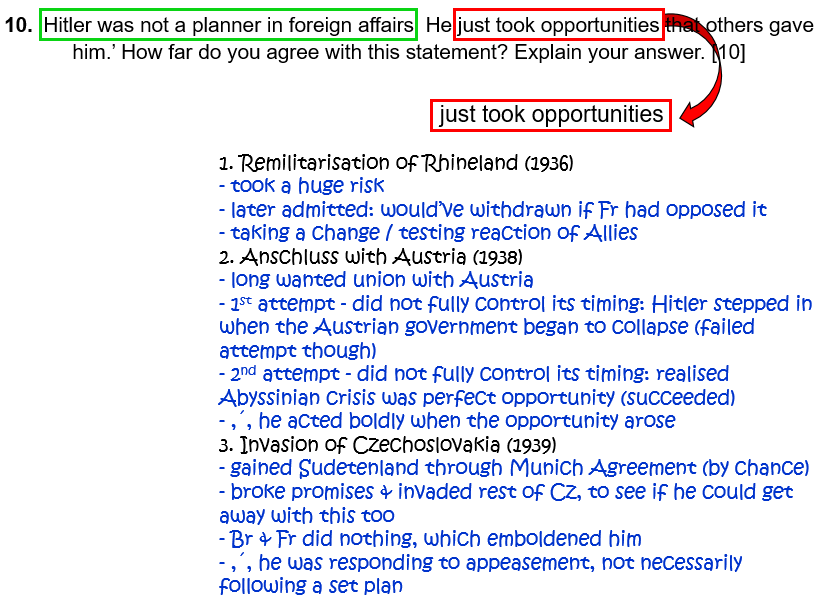
10. ‘Hitler was not a planner in foreign affairs. He just took opportunities that others gave him.’ How far do you agree with this statement? Explain your answer. [10]
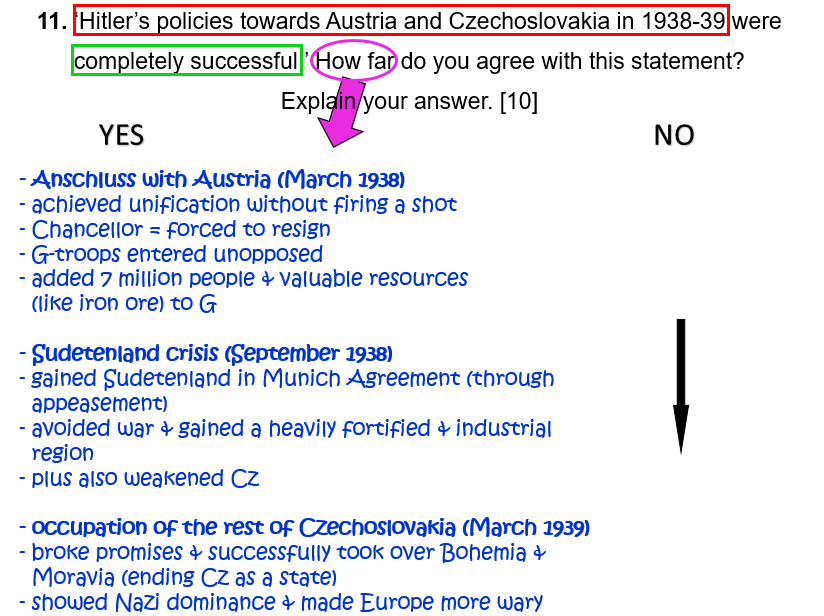
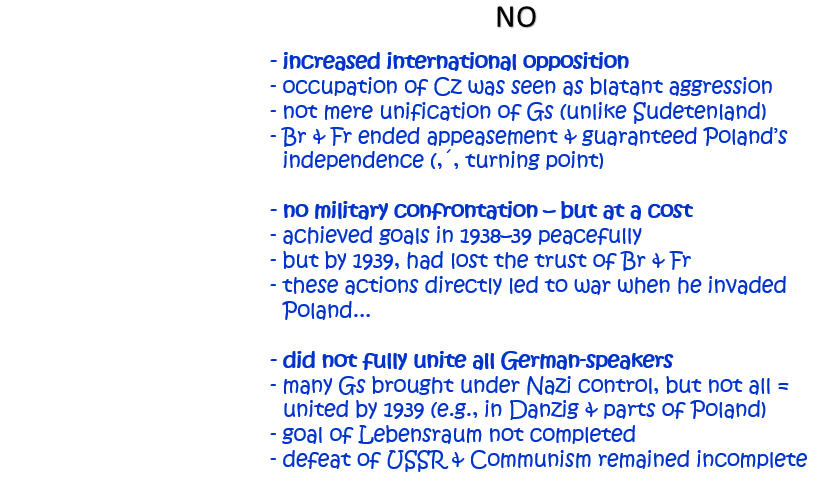
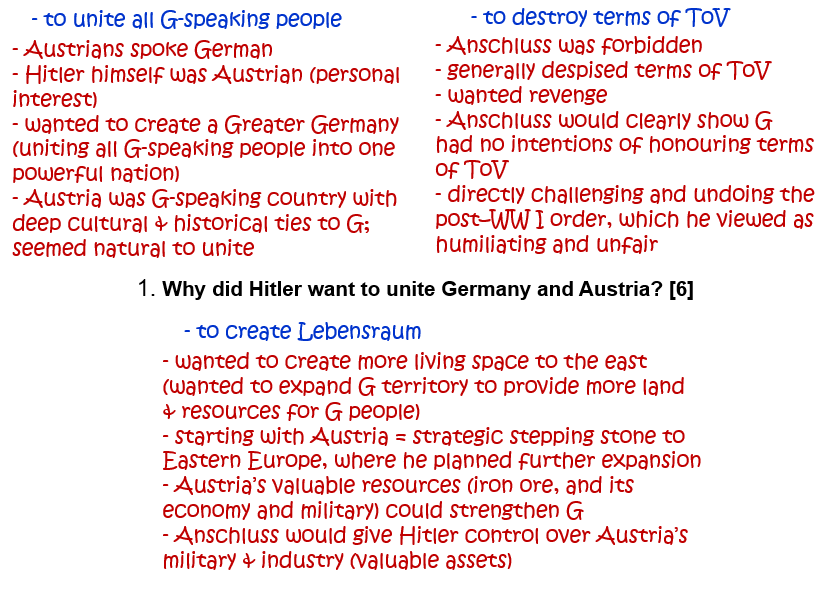
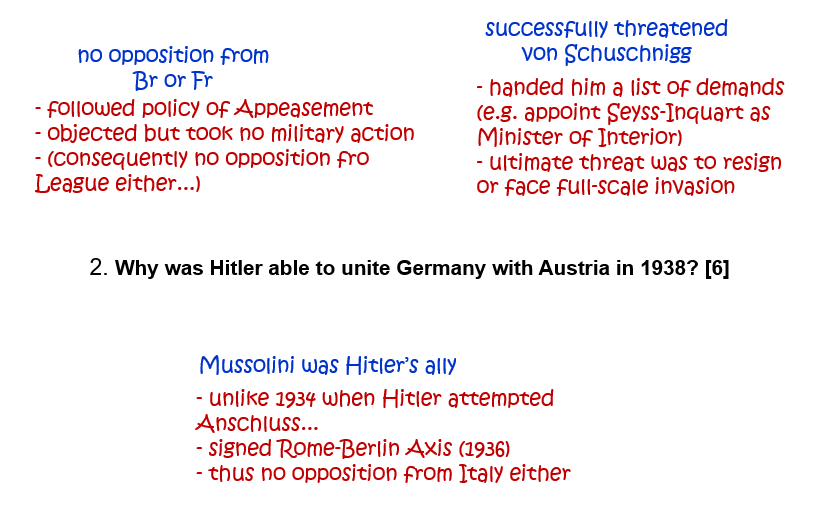
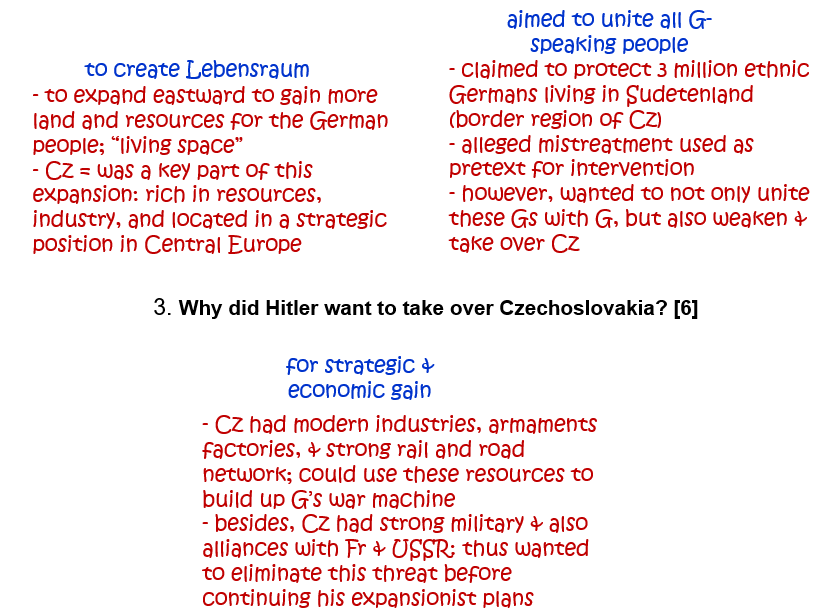
Question 11.
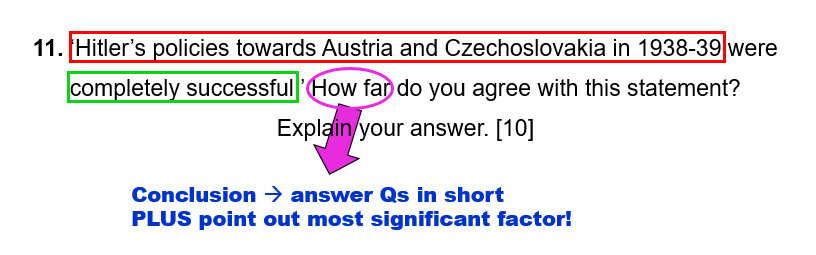
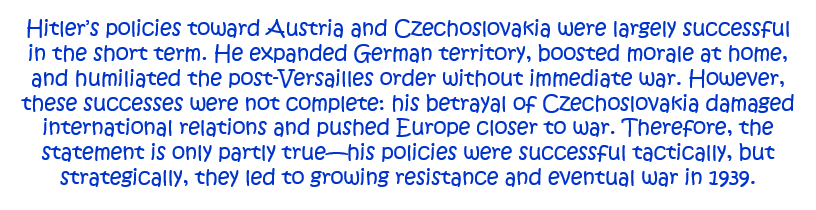
11. ‘Hitler’s policies towards Austria and Czechoslovakia in 1938–9 were completely successful.’ How far do you agree with this statement? Explain your answer. [10]
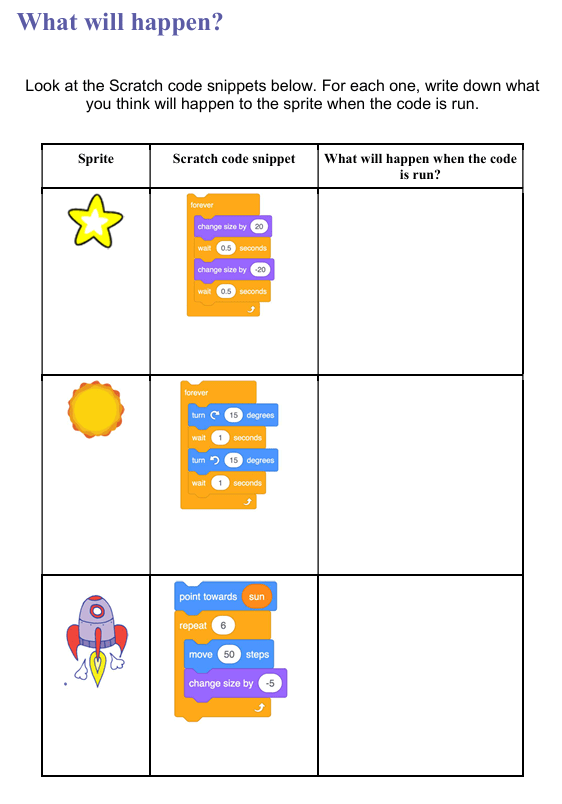
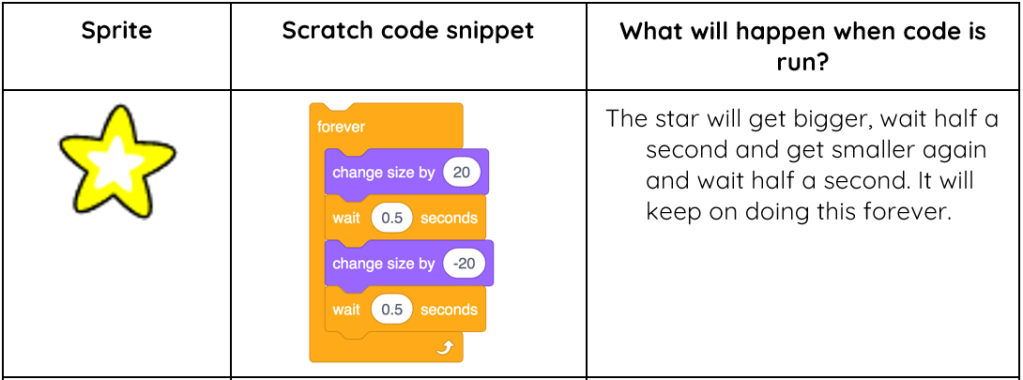
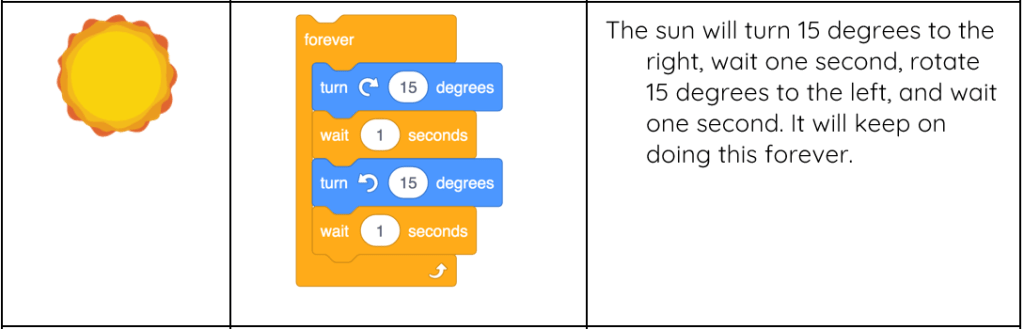
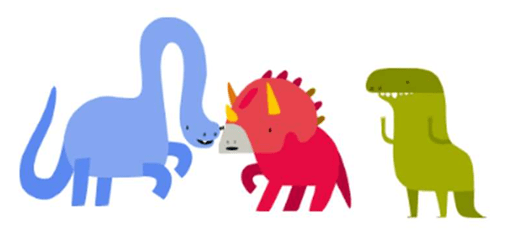
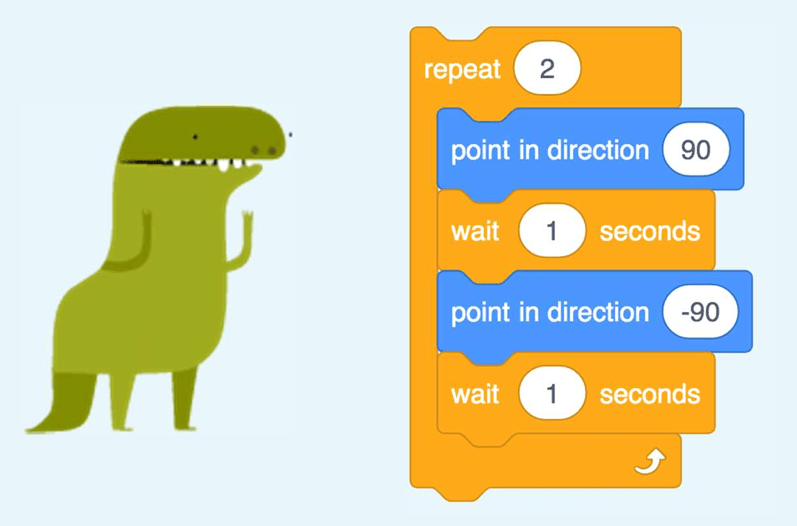
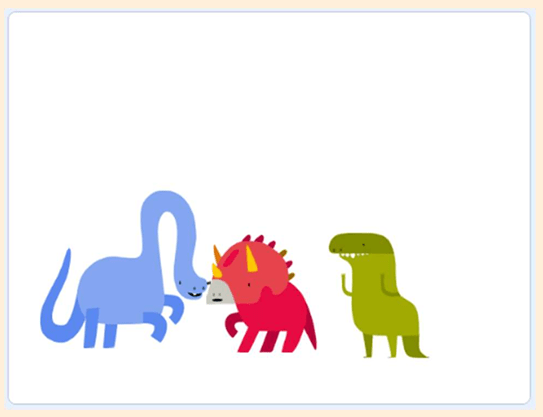
Look at the three dancing dinosaurs in this Scratch project.
What actions are they doing?
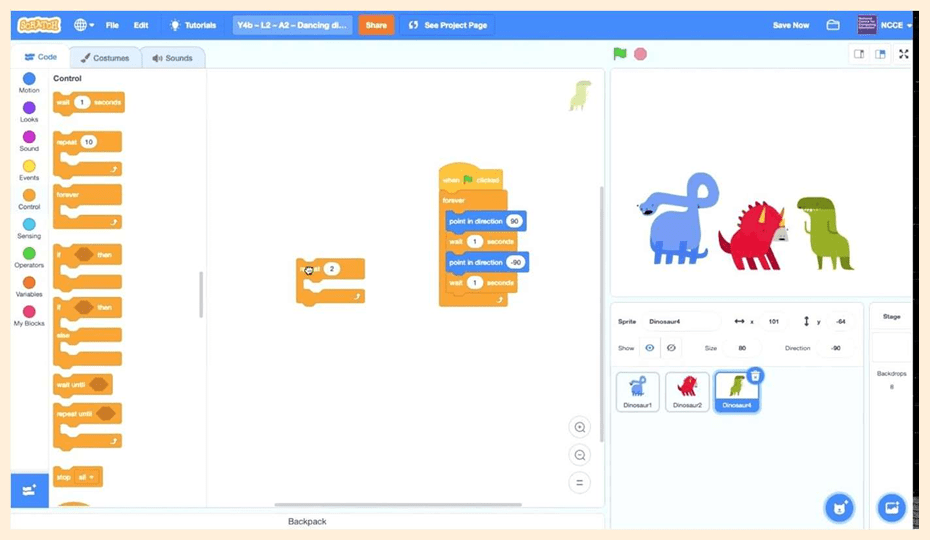
Click See inside to show the code for the three dancing dinosaurs.
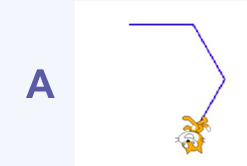
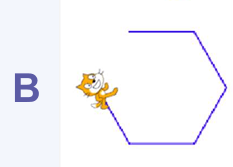
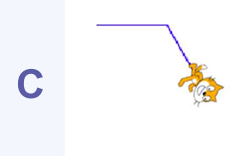
Look at the blue dinosaur first. Click on the code for the blue dinosaur and carefully examine what actions it is doing, and how many times it does them. To stop the code, click on the red octagon next to the green flag.
Now, do the same for the green and the red dinosaurs.
How many times do they repeat the actions?
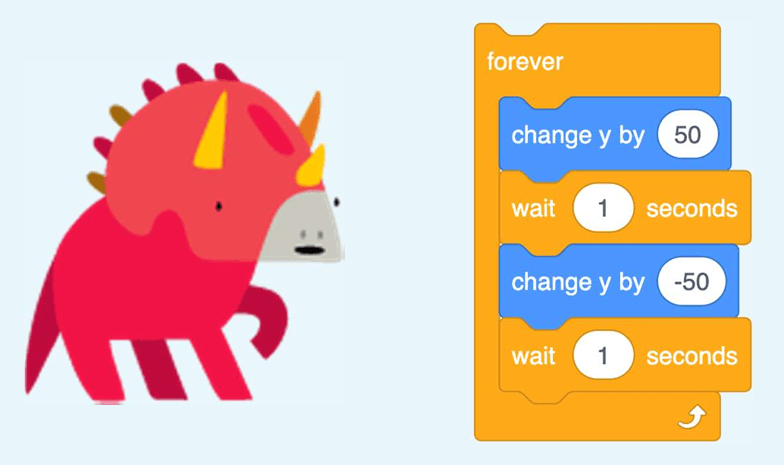
Have you noticed the repeat forever block inside the red dinosaur’s code?
What does it mean?
The actions will be repeated over and over again…
5.
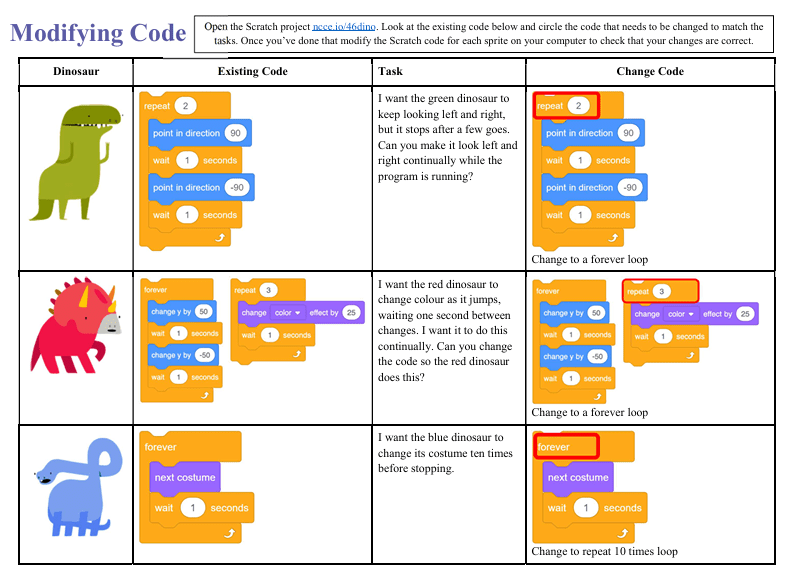
Complete the ‘Dancing dinosaurs’ worksheet.
Use the ‘Dancing dinosaurs’ worksheet. Look carefully at what each dinosaur is doing in turn (on the sheet), and then fill in the sheet. Carefully look at the number of times these actions are repeated.
Have you noticed that the blue and red dinosaurs repeat forever, but the green dinosaur stops after a few moves?
Can we get all the dinosaurs to repeat their moves forever?
We need to modify the code for the green dinosaur. We need to swap the count-controlled loop for an infinite loop!
Here is a bit of guidance…
Watch the video (or look at a live demonstrate) how to move the blocks out of the count-controlled loop and into a forever loop.
Loop Changing. (0:30 minutes long)
Reference Costumes. (0:49 minutes long)
Modifying code — different kinds of loops:
Use the ‘Modifying code’ worksheet to write down the algorithms, and then modify the Scratch code. (You need to circle the code that needs to be changed to match the tasks.)
Then modify the Scratch code for each sprite (using the “same “Dancing Dinosaurs” Scratch project used previously) on a computer to check that the changes are correct.
10.
Test your knowledge:
— Question 1 —
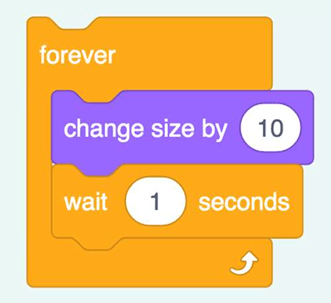
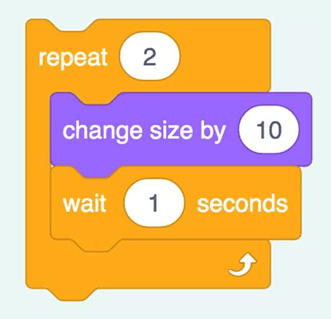
You want to make your dinosaur sprite a bit bigger and pause for a few times before it starts dancing. Which loop would you use?
Infinite Loop
Count-controlled Loop
ANSWER
A count-controlled loop would be more suitable, as an infinite loop would mean the character would keep getting bigger until it is too big to see properly.
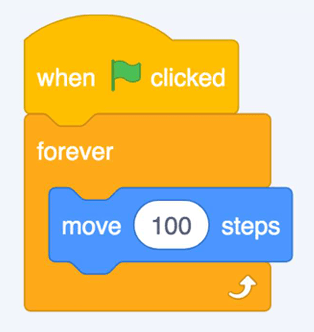
— Question 2 —
You want to make a bird sprite fly backwards and forwards across the top of the screen. Which loop would you use?
Infinite Loop
Count-controlled Loop
ANSWER
An infinite loop would be more suitable, as it would keep the bird flying. A count-controlled loop would mean that the bird would fly a short way and then stop.
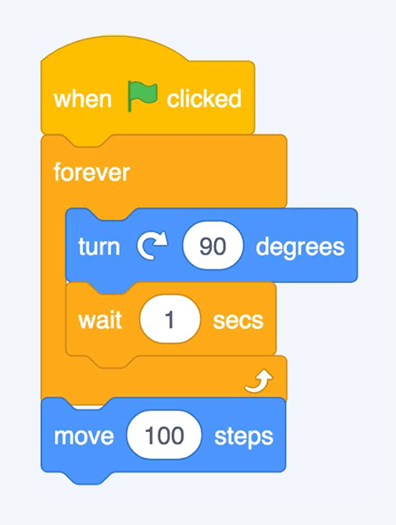
— Question 3 —
What is the problem with this code?
ANSWER
The move 100 block is outside the forever loop, so it will never be run.
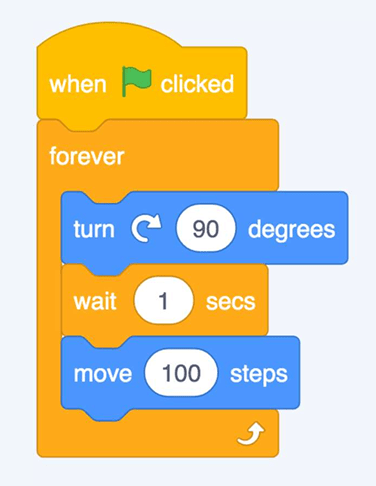
— Question 4 —
What will happen when the green flag is pressed?
ANSWER
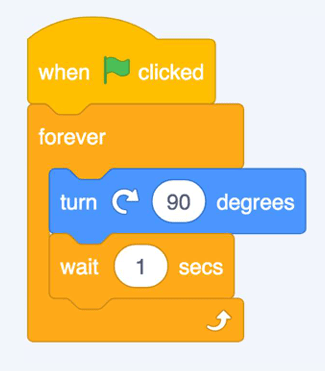
The sprite will turn, wait, and move, and keep repeating the sequence, as all the blocks are within the forever loop.
— Question 5 —
If there are two processes on the code area, what will happen when the green flag is pressed?
ANSWER
Both processes would be started, so the sprite would move and turn at the same time. (In Scratch, the green flag can be used to start lots of different things happening at the same time.)
11.
ANSWERS
12.
Use this worksheet to create the codes in Scratch.
This lesson is based on teachcomputing.org lessons.
Today, you are going to….
list an everyday task as a set of instructions including repetition
predict the outcome of a snippet of code
modify a snippet of code to create a given outcome
1.
Computer programmers use codes and algorithms to tell computers what to do. One type of coding that we can use is called “block coding”.
2.
The videos below explain what block coding is.
ALL Scratch Blocks Explained in 2 Minutes. (2:10 minutes long)
Beginners Guide to Scratch – Blocks Explained! (5:51 minute long)
Scratch explained by a child…
3.
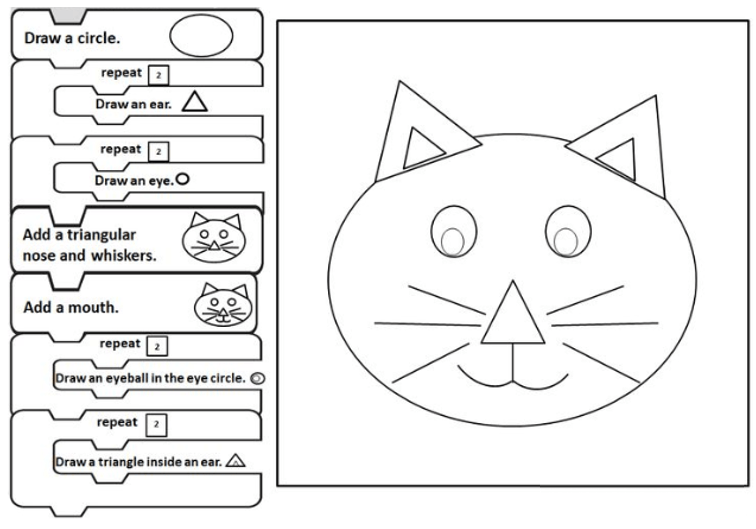
In coding, a loop is a command used to repeat a part of code until the desired process is complete.
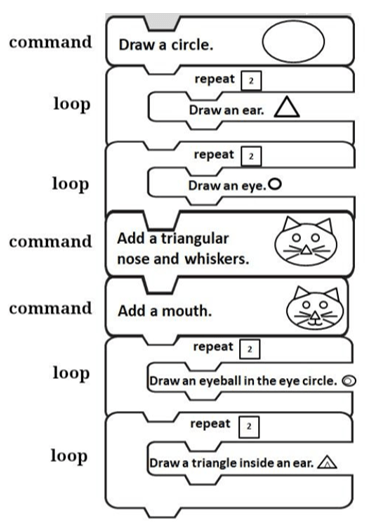
In the coding blocks that we used to draw the cat we used “commands” and “loops”?
4.
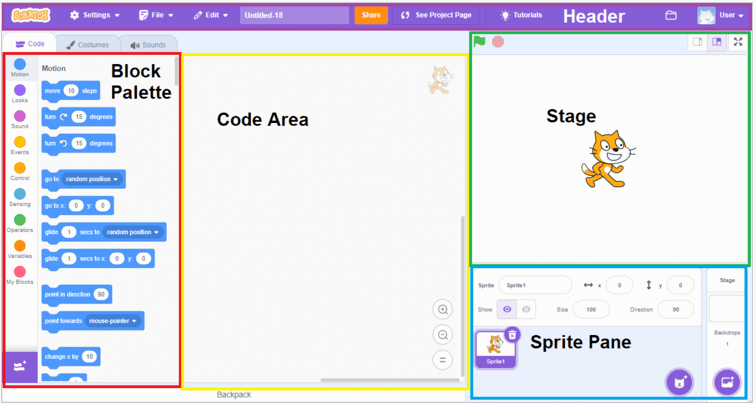
We can create moving images and even games, using websites like SCRATCH.
Scratch is a programming website that makes it easy to create interactive art, stories, and games. In the next lesson you will create a moving image, using Scratch.
5.
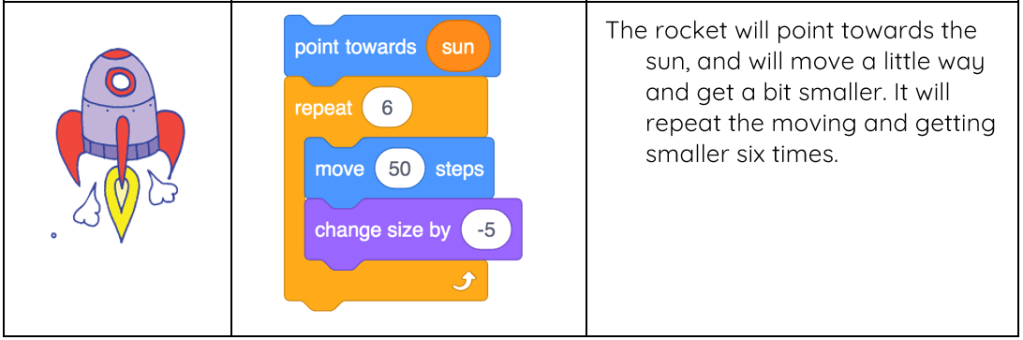
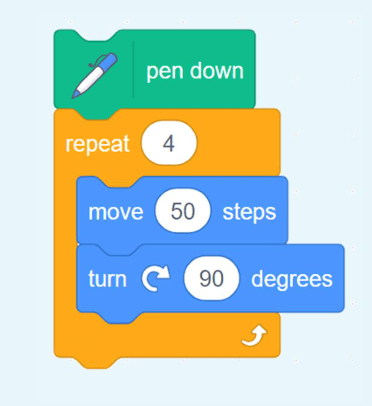
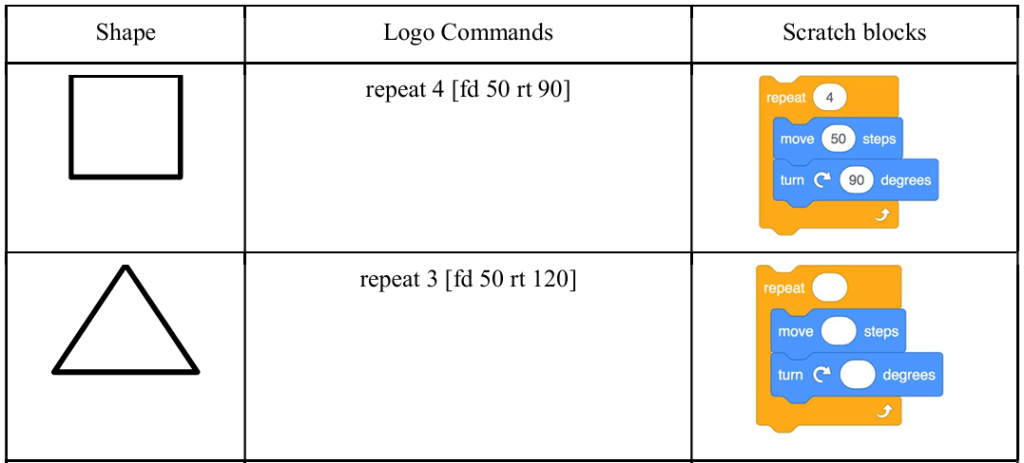
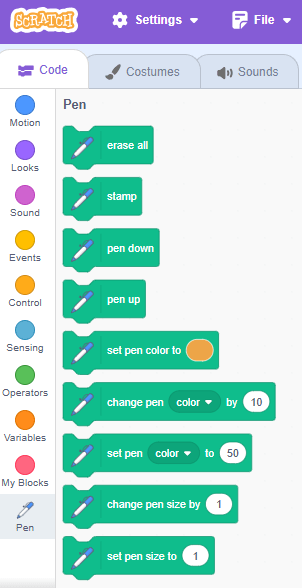
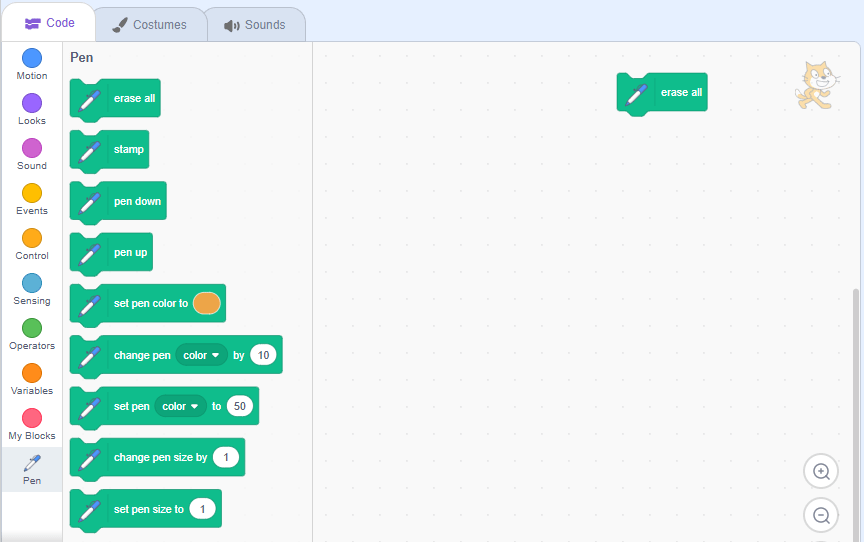
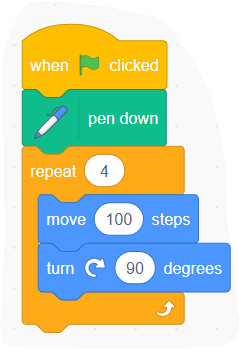
Code blocks in Scratch
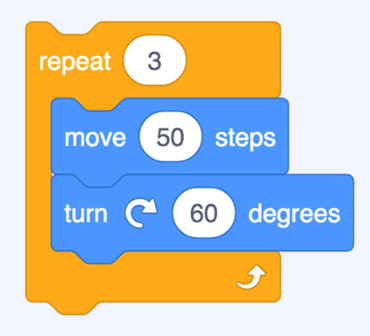
This sequence of code is from this programming tool, Scratch. It uses coloured blocks of code.
What will this code snippet do?
What each block might do…
The pen down block might use a pen to draw on screen.
The repeat block might repeat something four times.
The move steps block may instruct how to move.
The turn degrees block may instruct something to turn.
Can you predict what might be created on-screen once the code has been run?
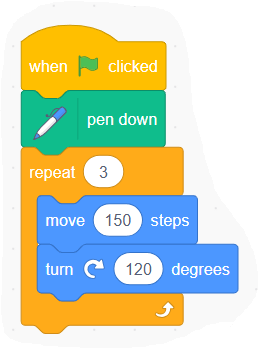
The code blocks shown will draw a square on the screen. The repeat happens four times, and each turn is through 90 degrees.
6.
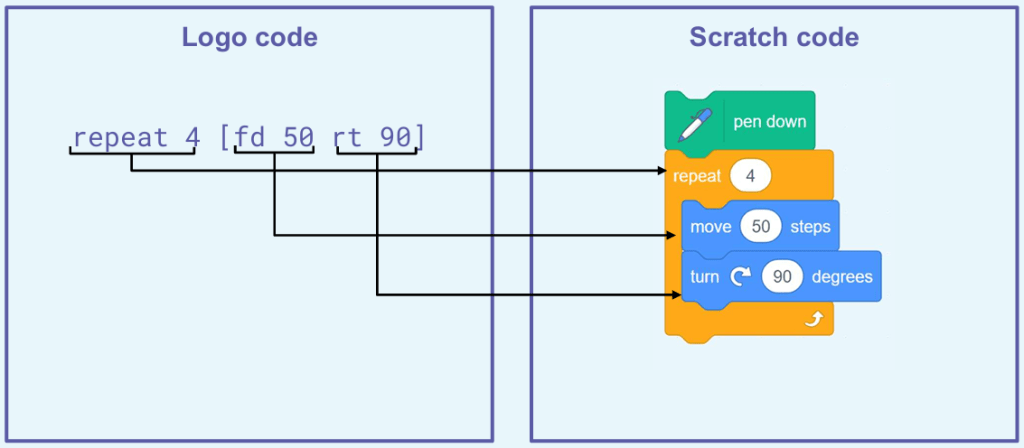
Here is another way of programming , called Logo.
What similarities can you see in these code snippets?
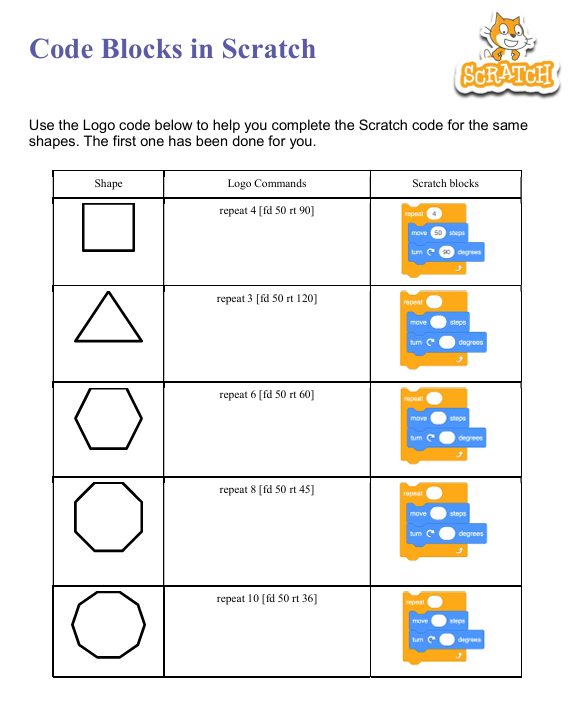
7.
Complete the ‘Code blocks in Scratch’ on the worksheet. You need to create Scratch code snippets by using the Logo code snippets as a guide.
Code blocks in Scratch
Use the Logo code snippets on the ‘Code blocks in Scratch’ worksheet to help you complete the Scratch code snippets.
What is Block-Based Programming? | Block Coding for Kids. (1:44 minutes long)
Block Coding for Kids. (3:53 minutes long)
2.
Remember:
3.
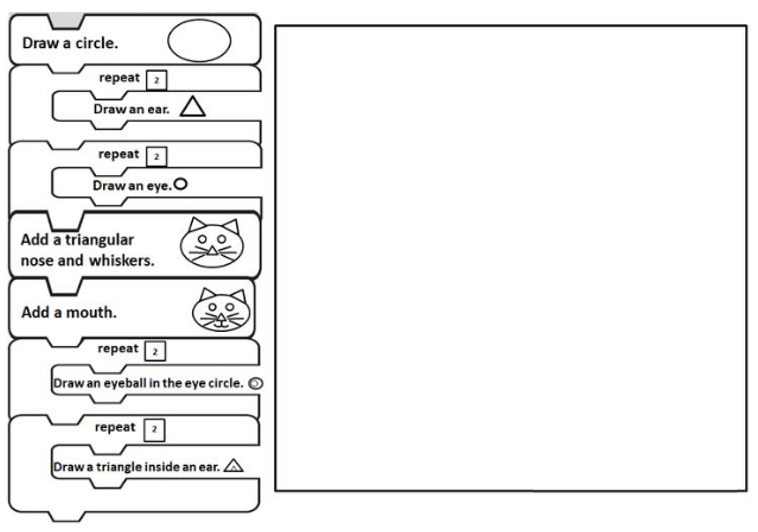
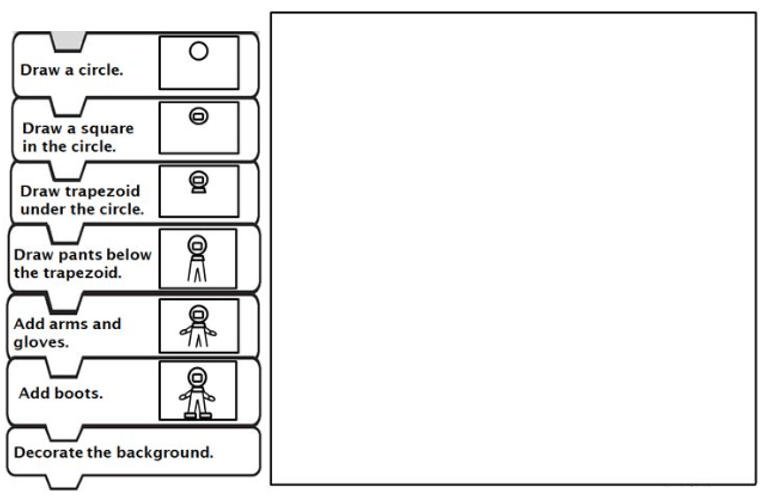
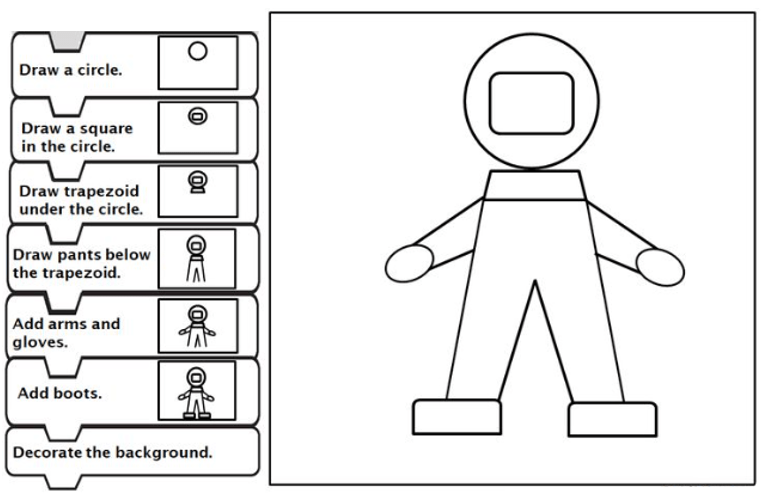
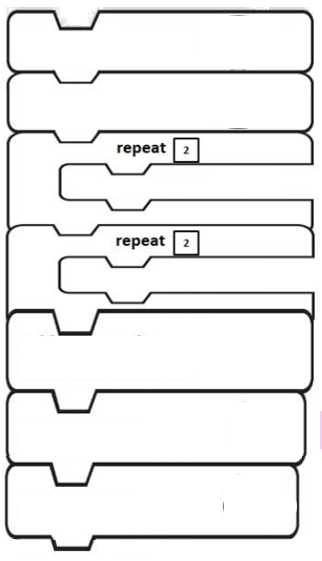
We will now complete worksheet to learn how block coding works. The worksheet shows us how to draw pictures using algorithms. The algorithms are shown in the form of coding blocks. Each coding block gives an instruction, or command.
4.
5.
6.
In coding, a loop is a command used to repeat a part of code until the desired process is complete.
Have you noticed that there are “commands” and “loops” in the coding blocks that we used to draw the cat?
7.
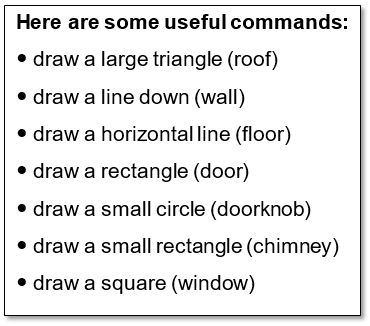
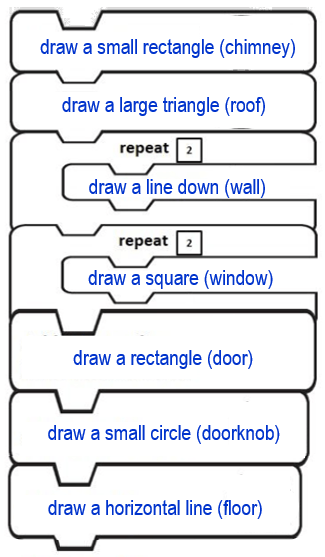
Using block coding, can you write an algorithm for drawing this house?
Here are the blocks that you will need:
8.
Complete the worksheet.
9.
Here is a bit more about Block Coding.
PROGRAMMING for kids 👦 Block Programming 💻 Part 2. (5:44 minutes long)
10.
We can create moving images and even games, using websites like SCRATCH.
Scratch is a programming website that makes it easy to create interactive art, stories, and games. In the next lesson you will create a moving image, using Scratch.
Watch video below. It explains what an algorithm is.
BBC Learning What Is An Algorithm. (1:07 minutes long)
2.
Also watch this video to learn more about what algorithms are.
Introduction to Algorithms | All About Computers | Tynker. (4:48 minutes long)
3.
A student will now demonstrate how a computer uses algorithms to perform certain tasks…
(Give a student instructions to make his way from point A to point B, and back to point A again, by giving instructions in the form of an algorithm. E.g.: 2 steps forward, turn L, 5 steps forward, turn R, etc.)
4.
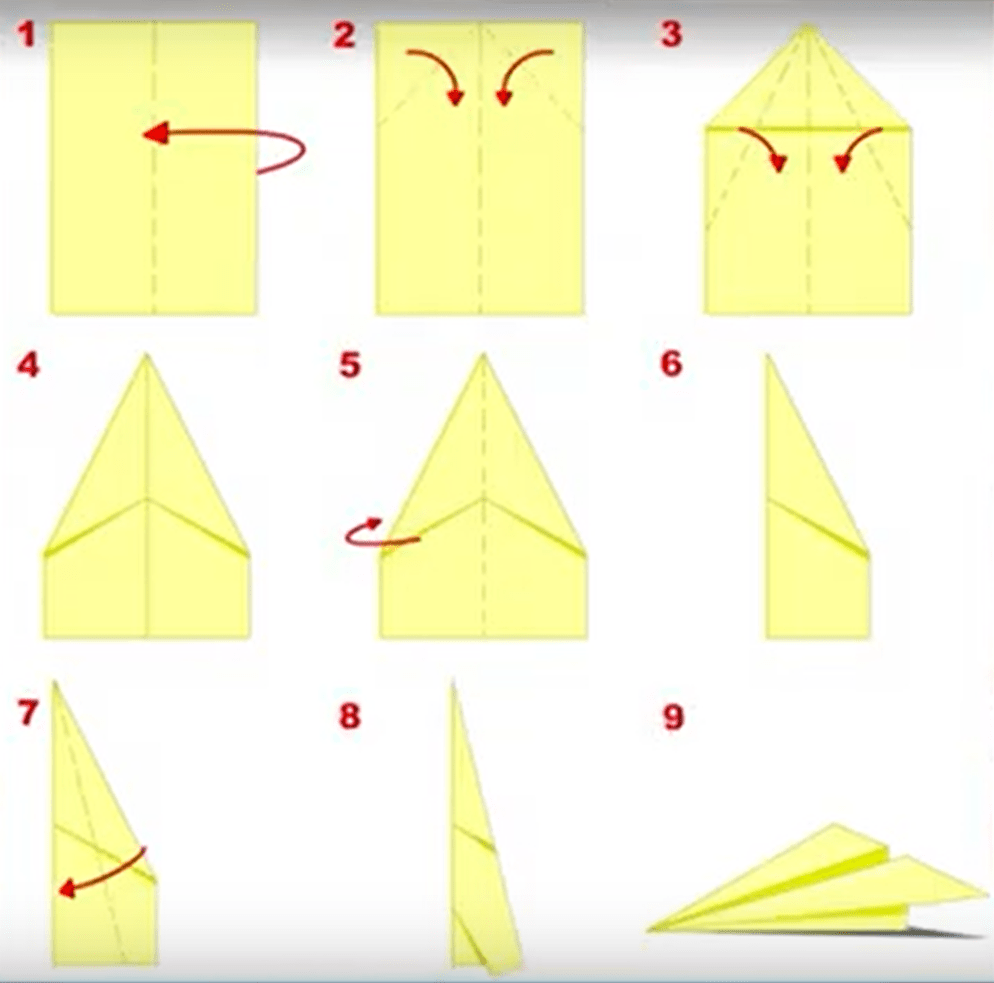
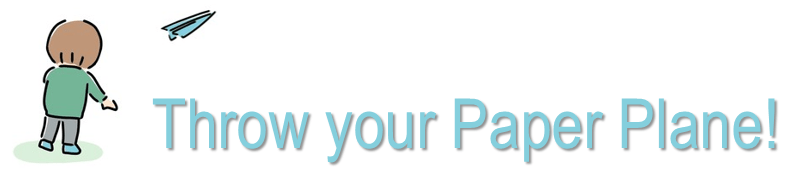
Use the algorithm (in the previous video, at 1:54 minutes)) for making a paper aeroplane!
1) Take an A4 sheet of paper, plus a pen.
2) First write your name all over the paper!
3) Then, follow the steps to fold the aeroplane.
5.
Line up in front of the class and throw your paper planes for fun!
6.
Now you need to follow the algorithm for drawing a computer! Draw while following the instructions in the video below.
(Give each student another peace of A4 paper.)
How To Draw A Computer Step By Step 🖥️ – Easy. (1:54 minutes long)
7.
Do you want to follow a more complicated algorithm? Complete the drawing as instructed in the video below.
Drawing Tutorial | How to Draw a Computer 🖥️. (3:59 minutes long)
8.
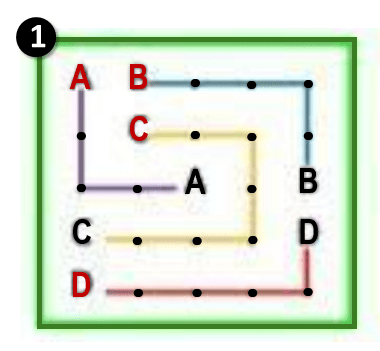
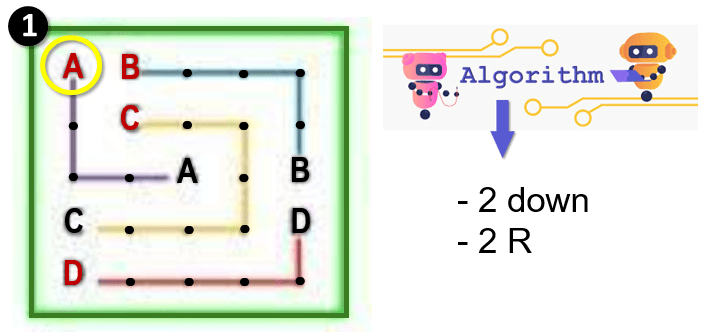
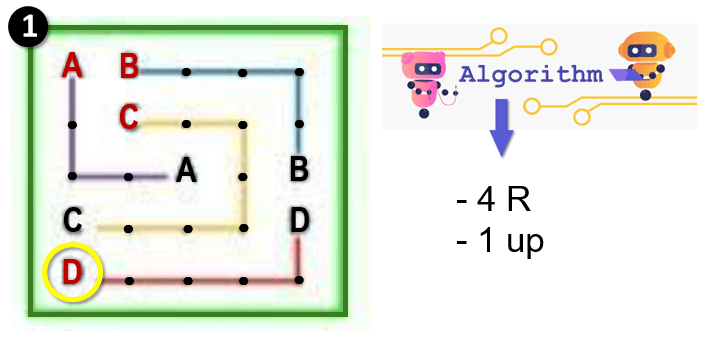
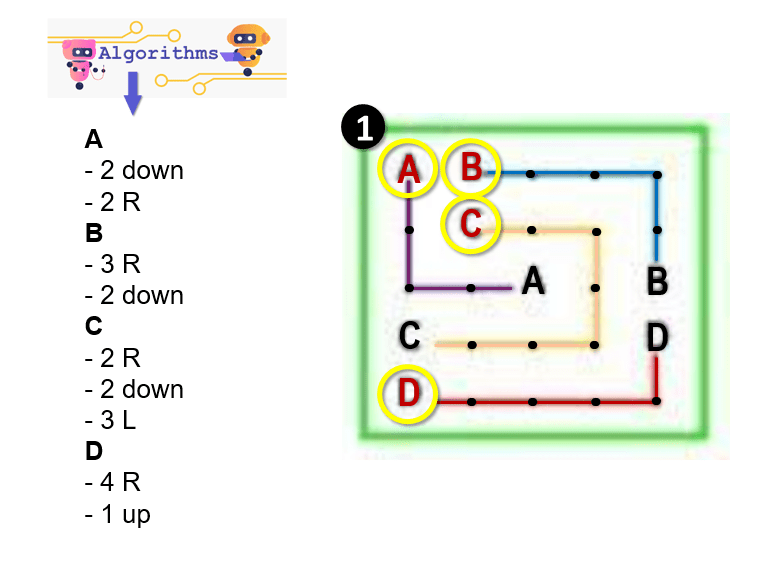
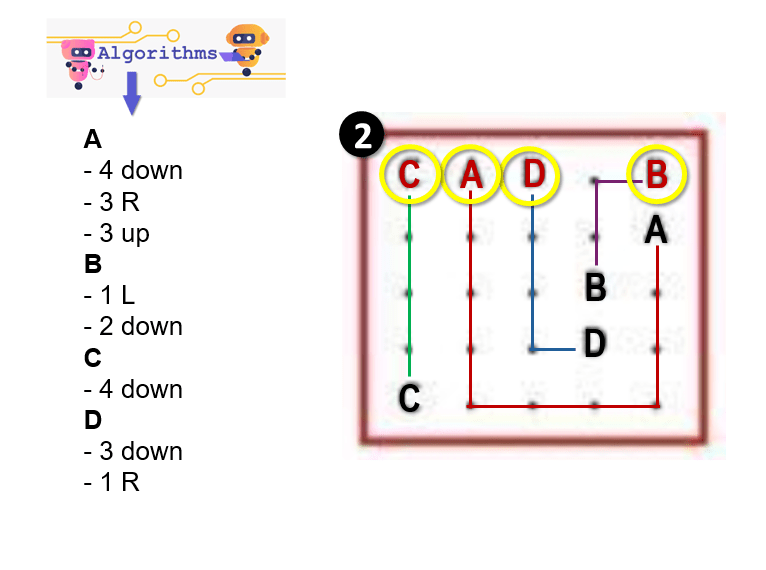
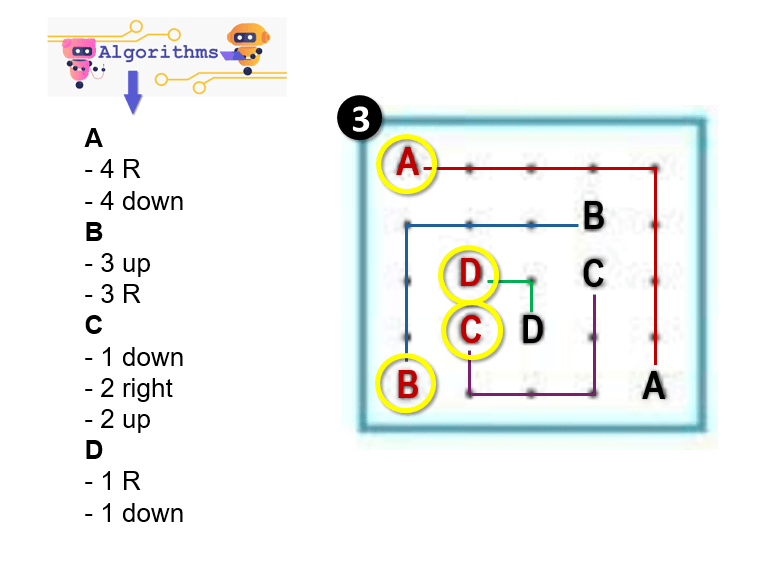
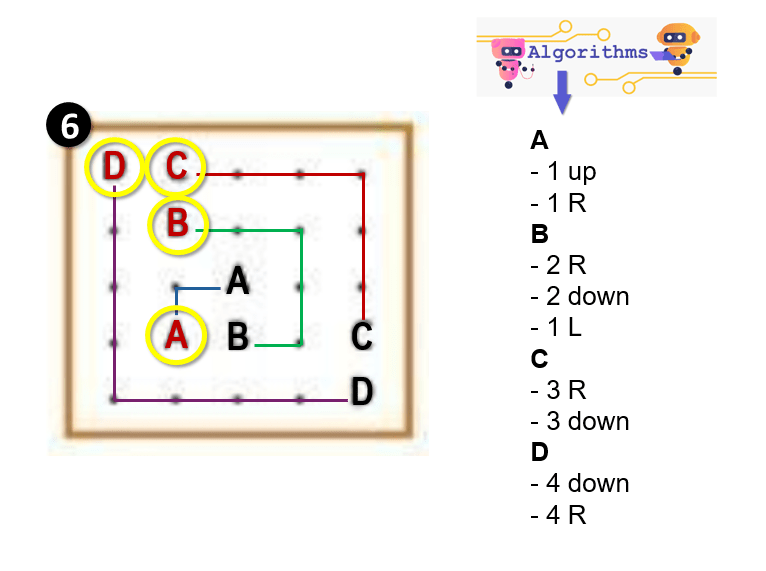
Let’s look at another type of algorithm. Can you write the arrow codes to help the Robot find his home…
9.
Also write the arrow codes to help Mario find his home…
10.
Building Algorithms | All About Computers | Tynker. (3:56 minutes long)
Watch the video below to see how to insert more pages on Google Sites.
Google Sites: Creating & Managing Pages. (2:53 minutes long)
2.
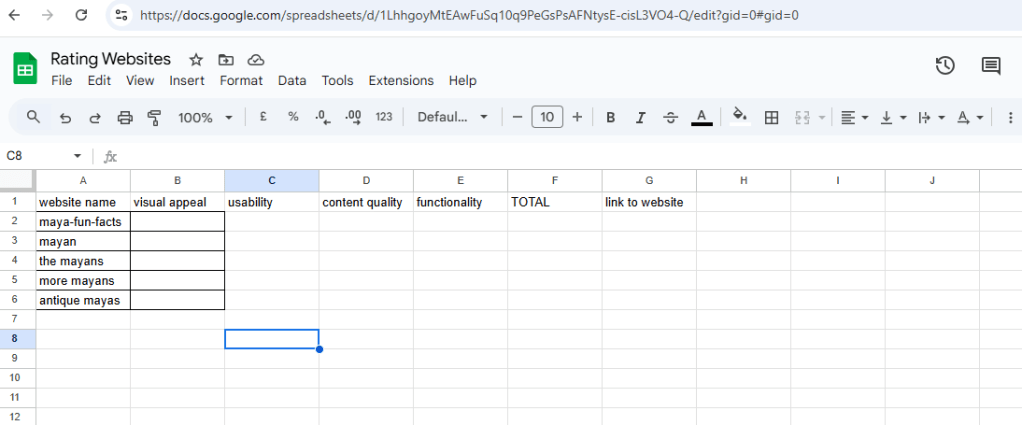
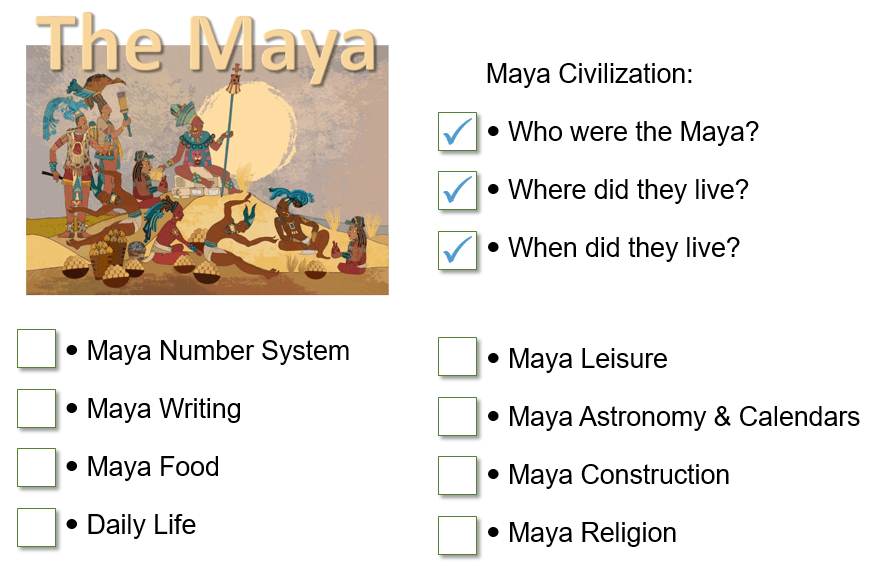
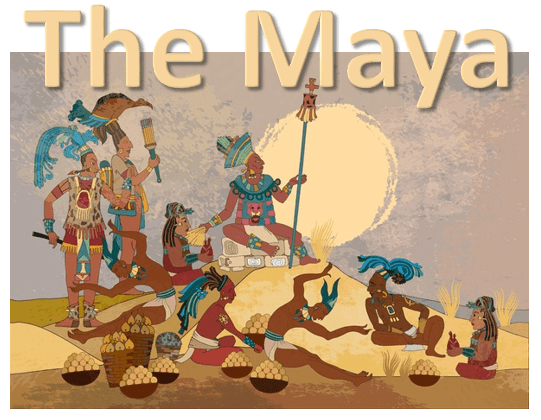
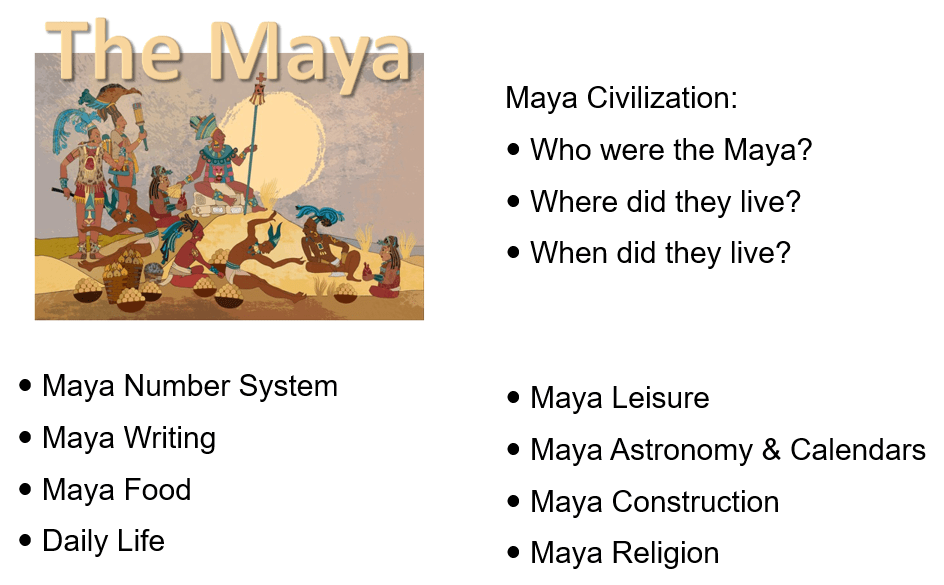
Consult your content planning sheet to recall which six categories about the Maya you will include in your website. (You used the sheet below to choose which categories you will include.)
3.
Use Google Sites to continue working on your website.
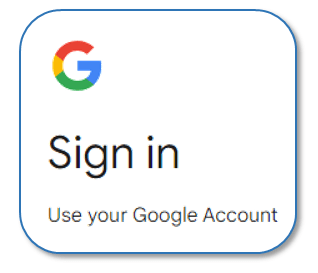
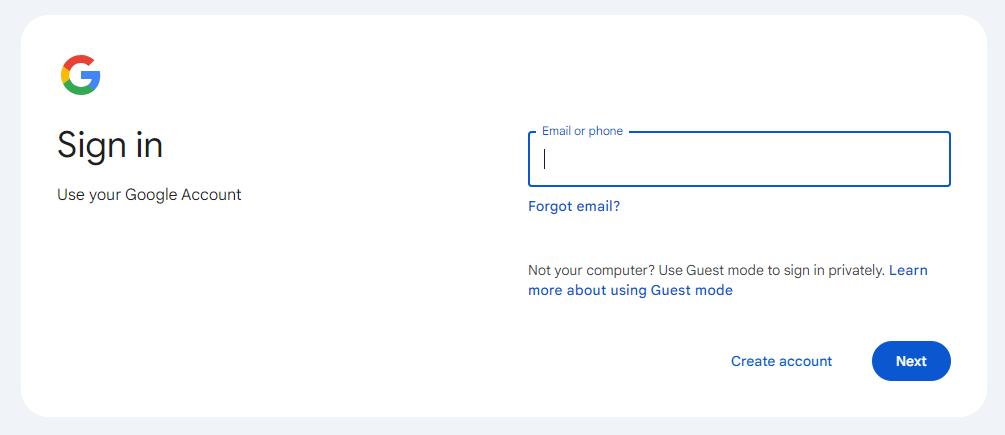
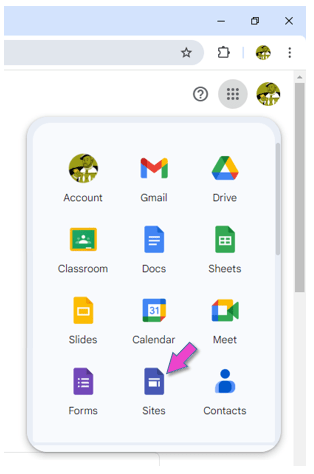
Sign into your Google account. Click on this icon to sign into the account:
4.
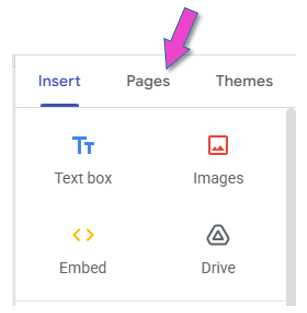
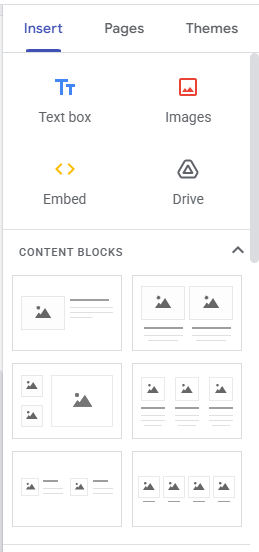
You need to use the panel on the right to insert additional pages.
Click on PAGES.
Then click on the plus sign.
5.
The text below could be useful when entering text to your webpages.
This lesson is partly based on teachcomputing.org lessons.
Today, you are going to….
continue making the homepage for your website
learn how to insert text on a webpage
learn how to insert images on a webpage
learn about image copyright
decide which other pages you want to include in your website
1.
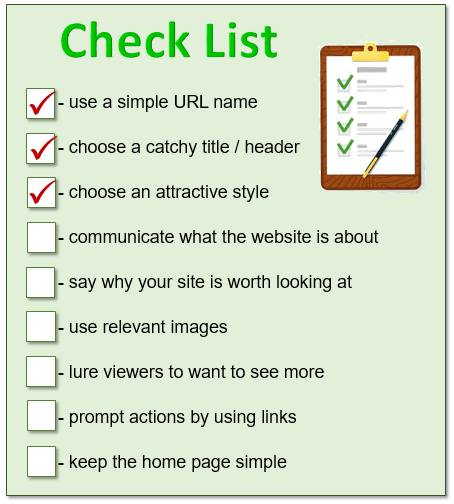
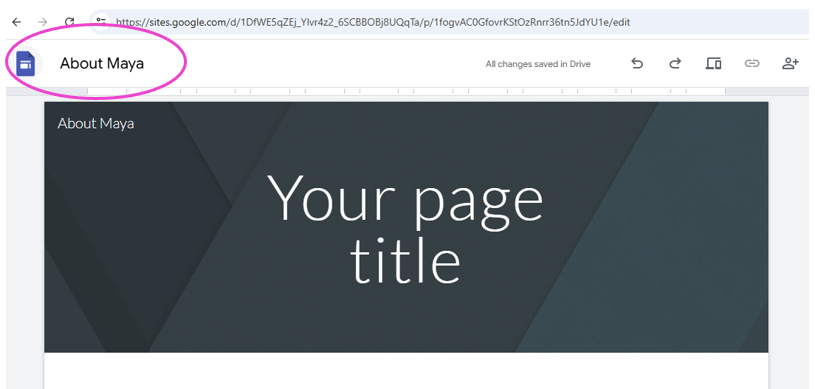
Your website have a URL name, a catchy header and you have chosen an attractive style. Now you need to work through the rest of the list…
2.
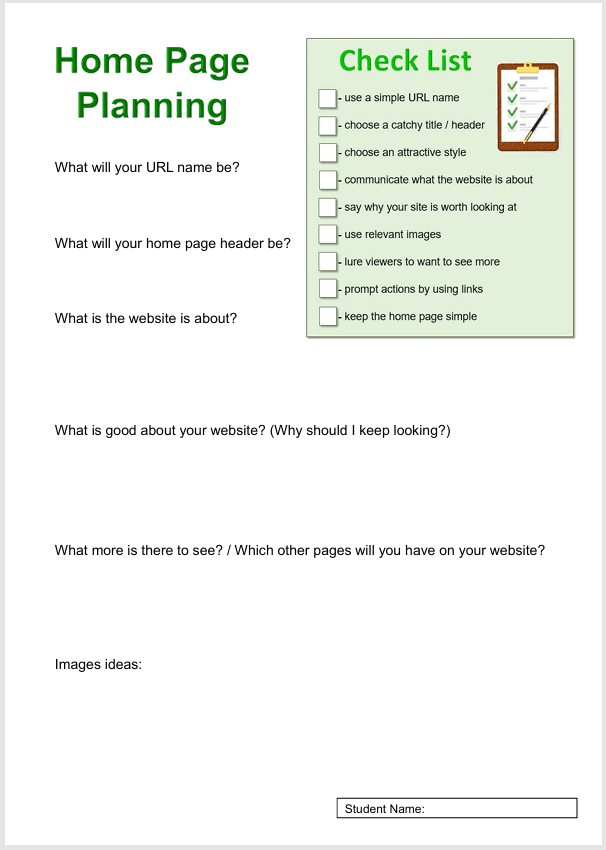
Have you completed the worksheet (to plan what next to put on your home page)?
3.
It is time to put text and images on your home page, to tell your viewers more about your website.
The following are important to keep in mind when creating a website and its home page:
4.
The video below explains briefly how to insert text on Google Sites.
Google Sites: Adding Text. (2:54 minutes long)
5.
You also need to insert images to show what your website is all about. The video below explains briefly how to insert images on Google Sites.
Google Sites: Inserting Images. (2:17 minutes long)
6.UNDER CONSTRUCTION
Include info from “lesson 3” about copy right of images….
7.
Consider carefully “exactly what about the Maya” your website will cover…
8.
Apart from “who the Maya was”, “where they lived”, and “where they lived”, include six other categories about the Maya in your website. (Use the sheet below to choose which categories you will include.)
investigate how to make a website with Google Sites
choose a name for your website
choose a theme for your website
make the homepage header
1.
You are going to use a CMS to make your own website!
Can you remember what CMS stands for?
content management system
We will use Google Sites to make a website on….
2.
The following are important to keep in mind when creating a website and its home page:
3.
Below is a video that explains briefly how to use Google Slides.
Google Sites: Creating a Site. (2:22 minutes long)
4.
USING GOOGLE SITES
Creating an effective website with Google Sites all about clarity, design, and flow. Planning is very important. You are going to make the website, following the step-by-step instructions below.
STEP1
Sign into your Google account.
Click on this icon to sign into the account:
5.
STEP2
Open Google Sites.
6.
STEP3
Click on BLANK SITE.
7.
STEP4
Decide what your site a name will be.
How to choose a domain name…
Choosing a domain name is one of the most important steps when creating a website. Here are some key tips to help you pick the perfect one:
Keep It Short & Simple
Shorter names are easier to remember and type. Avoid long or complex words.
Use Keywords (If Relevant)
If possible, include keywords related to your WEBSITE (e.g., “MagicMayan.com”).
Avoid Numbers & Hyphens
They make domains harder to remember and type. For example: “Top-10-Reviews.com” vs. “TopReviews.com” (The second one is better).
Pick the Right Domain Extension (.com, .net, .org, etc.)
For example, “.com” is the most popular and easiest to remember. Also consider country-specific extensions (e.g., “.uk”, “.es”) if targeting a local audience.
Check Availability & Avoid Trademarks
Use a domain registrar to see if your name is available. Avoid names that are too similar to existing brands to prevent legal issues.
For interests’ sake, click on the link below to see if your chosen name has already been used as a domain name:
(We are just checking for interest sake, because your domain name will include “queenscollege” and will only be visible to people with Queen’s College google accounts.)
8.
STEP5
Give your site a name.
9.
STEP6
Choose a theme for your website.
Google Sites: Themes & Page Design. (2:20 minutes long)
10.
STEP7
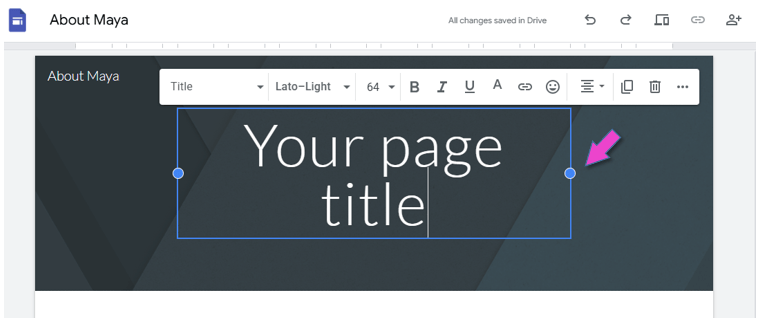
Create the header for the home page.
Decide on a header (or title).
The header must show what your website is all about.
Do not assume visitors to your site know what the website is about. So, include a concise header on your homepage to communicate what the website is about.
Google Sites: Customizing the Header. (3:05 minutes long)
Insert the text:
You can make the header bold or change the colour, size or font.
You can change the header type:
11.
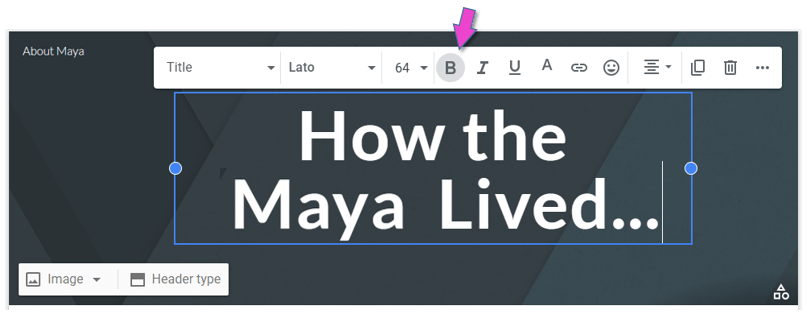
STEP8
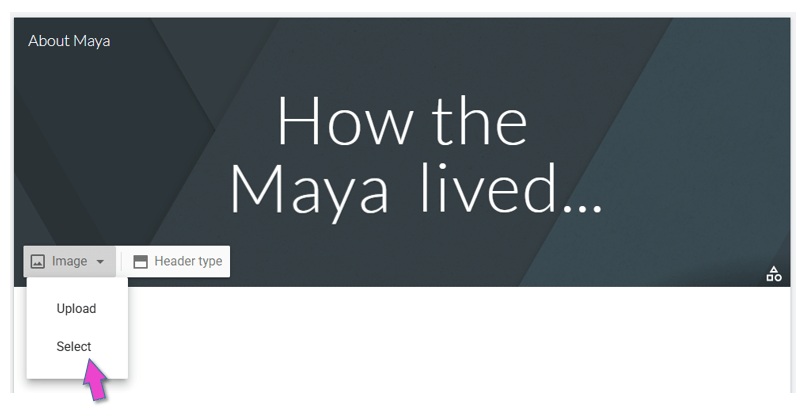
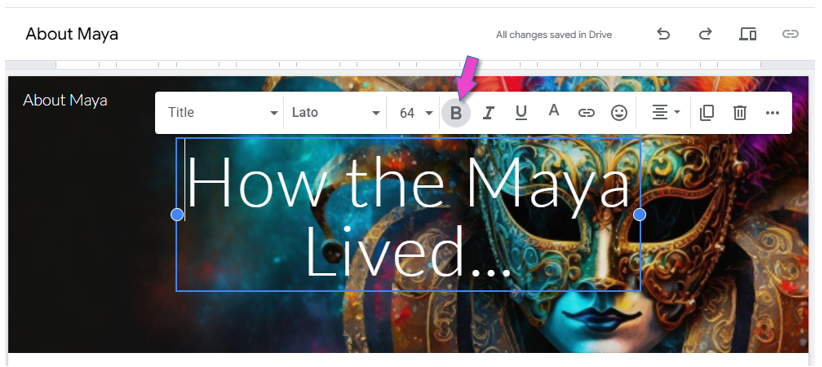
Create the headerimage for the home page.
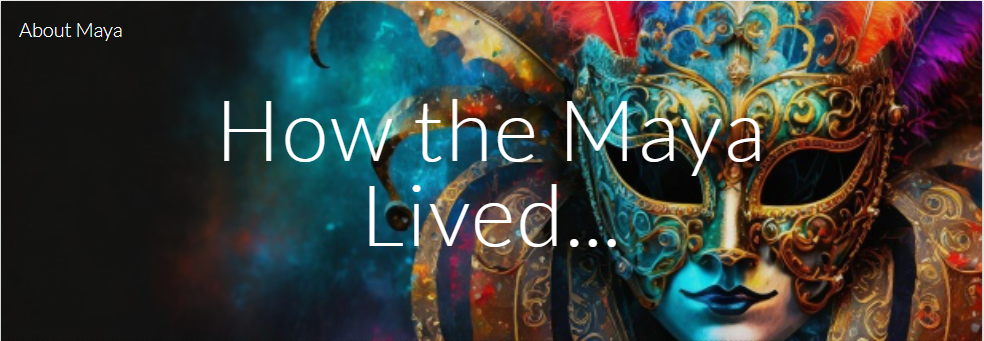
A header image can significantly improve the visual impact of your website! It is the first element that visitors see. So, your header image plays a crucial role in shaping the initial impression that visitors will have of your website. It can create interest, trust and engagement.
Insert an image in the header, as background:
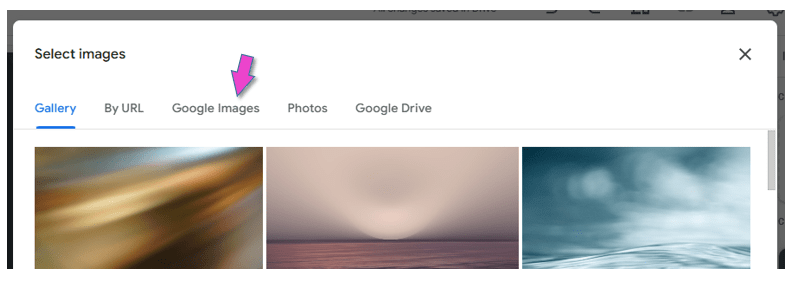
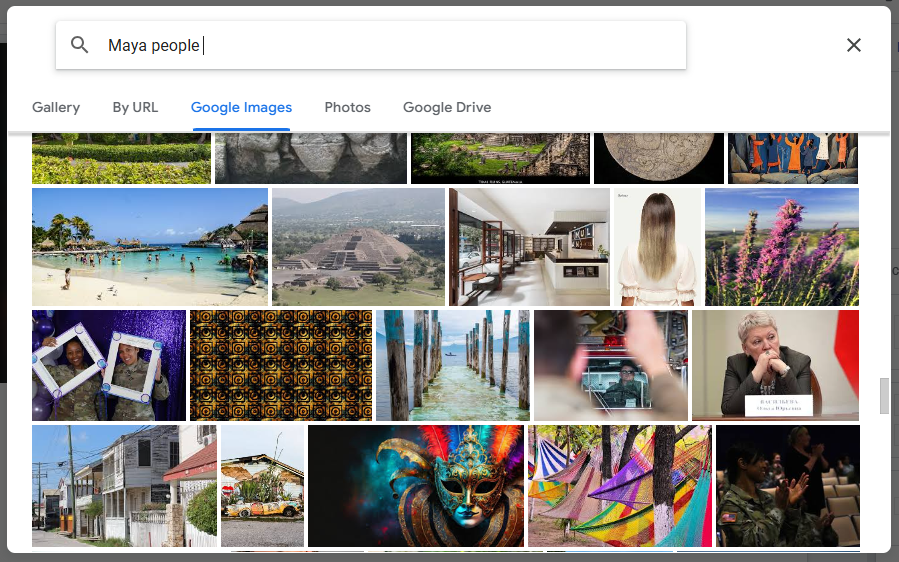
Search and select an image from Google:
The title should be put in bold, because the picture is quite dark:
It is very important that you choose a readable font and color, that stands out against the background.
12.
Share your Site with me!
13.
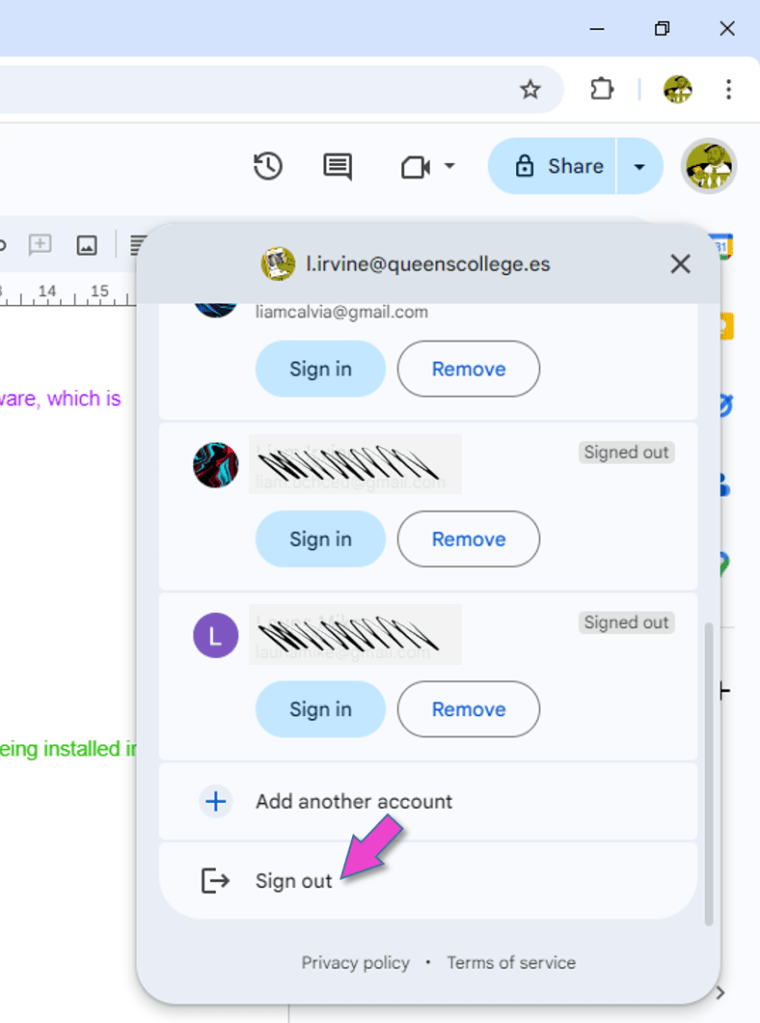
Sign out of your Google account.
This is VERY important, because everybody can log into the computers in the ICT room with the primary password!!!
14.
You can now tick the first 3 boxes on your tick list!
15.
Use the worksheet to plan what next to put on your home page.
The last part of this lesson is based on teachcomputing.org lessons.
Today, you are going to….
revise how the internet works
explore key components of websites
test your knowledge on websites
1.
Let’s revise how the internet works!
How the Internet Works in 4 Minutes | Animation Video. (4:03 minutes long)
(Advanced information…)
2.
What is a website?
A website is a collection of related web pages hosted on a server and accessible through the internet.
3.
What makes a website?
Websites can be made up of lots of different web pages. The pages are related and together they make a website.
4.
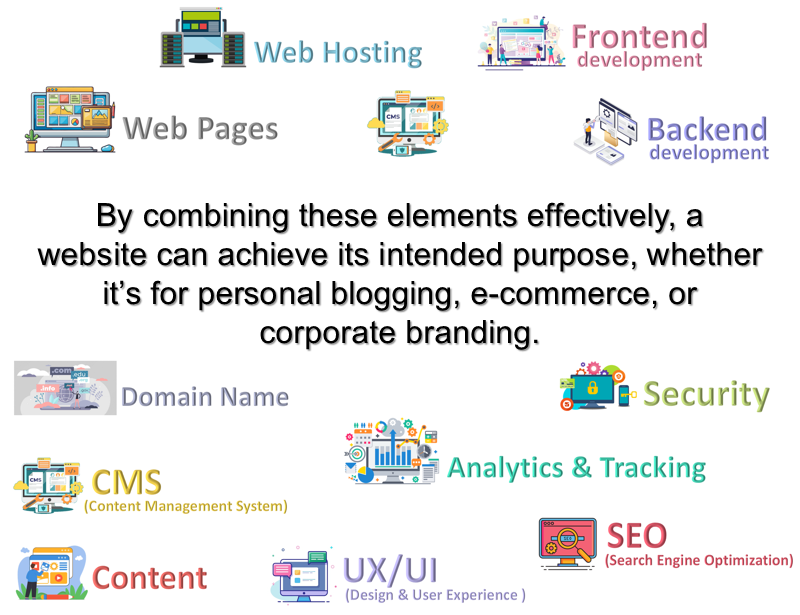
What are the key components that make up a website?
Here are the key components that make up a website:
Domain Name & Web Hosting, Content & Web Pages, Frontend & Backend, Content, Management System (CMS), Design and User Experience (UX/UI), SEO (Search Engine Optimization), Analytics and Tracking, Security
By combining these elements effectively, a website can achieve its intended purpose, whether it’s for personal blogging, e-commerce, or corporate branding.
(It makes it easy for users to find the website instead of typing a long server IP address.)
7.
This is a service that stores your website’s files and makes them accessible on the internet.
There are different types of web hosting:
1) Shared Hosting: Multiple websites share a single server.
2) Dedicated Hosting: One server is dedicated to a single website.
3) Cloud Hosting: Resources hosted across multiple servers.
8.
This is the information and media presented on the website.
Content includes:
Text (articles, product descriptions, blog posts)
Images (photos, illustrations)
Videos and audio files
Interactive elements (forms, maps, quizzes)
9.
These are the individual documents or pages within a website.
Examples include:
1) Homepage: The main page users see first.
2) About Page: Details about the organization or individual.
3) Contact Page: Contains contact forms or contact details.
Webpages are typically coded in HTML, styled with CSS, and made interactive with JavaScript.
10.
This is the visible part of the website that users interact with.
Key Technologies used in the “frontend” are:
1) HTML: Structures content.
2) CSS: Styles the content (colors, fonts, layout). (CSS is the acronym of “Cascading Style Sheets”. CSS is a computer language for laying out and structuring web pages.)
This is the server-side infrastructure that powers the website.
Key technologiesused in the “backend” are:
1) Programming Languages: PHP, Python, Ruby, Java, etc.
2) Databases: Store and manage content (e.g., MySQL, MongoDB).
3) Server: Manages requests and delivers web pages.
12.
This is a platform for managing website content without needing to code.(CMS allows non-technical users to easily update the website.)
Examples: WordPress, Drupal, Joomla, Shopify, Google Sites.
You will use a CMS make your own website! (You will use Google Sites, which is a very basic CMS.)
13.
This refers to the layout, navigation, and usability of the website.
UX / UI includes:
1) Responsiveness (adapts to mobile and desktop screens).
2) Accessibility (usable for people with disabilities).
3) Visual appeal (modern and professional design).
14.
These are techniques to improve a website’s visibility in search engines.
SEO includes:
1) Optimizing content with keywords.
2) Fast loading speeds.
3) Mobile-friendliness.
4) Quality backlinks.
15.
These are measures to protect the website and users.
(Website security prevents hacking, data breaches, and malware.)
Examples:
1) SSL Certificate (encrypts data transfer).
2) Firewalls.
3) Secure coding practices.
16.
These are tools to monitor user behavior and website performance.
(Analytics & Tracking help improve content, design, and marketing strategies.)
Examples: Google Analytics, Heatmaps, Conversion Tracking.
17.
18.
Do you know the key components of a website?
19.
More on Media…
It is very important that the content on a website is used responsibly.
What is copyright?
Copyright is the “property right” of authors (and creators) to control, protect, and use their artistic works as they wish.
It is easy to copy, change, or download content from the internet. Copyright law protects the control you have over the things that you create. It also protects the work of others.
If you want to use someone else’s work you should:
Ask permission
Give credit to the person who made it
Buy it — if it has a cost attached (e.g. from an online resource library)
How to use images Responsibly and Respectfully
Sometimes it is possible to copy part of someone’s work. For example, if you are using part of someone’s content e.g. a picture for your school work. This is acceptable.
School children are not expected to pay for images they find online BUT… You just have to remember:
You can only use part of the work
You can’t make money from it
It needs to look completely different in your piece of work than in the original piece
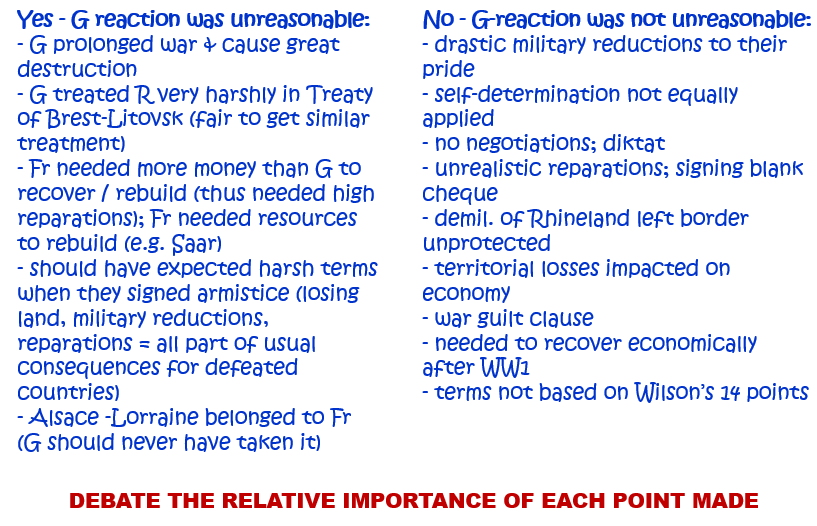
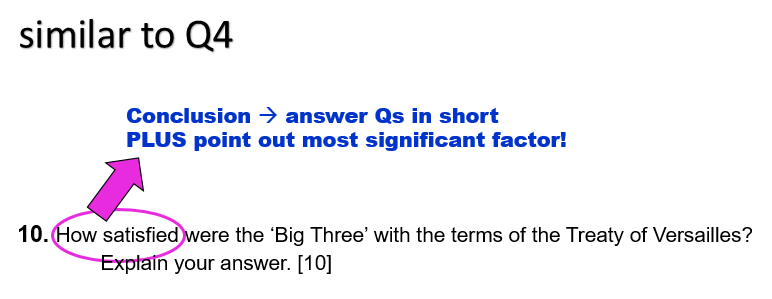
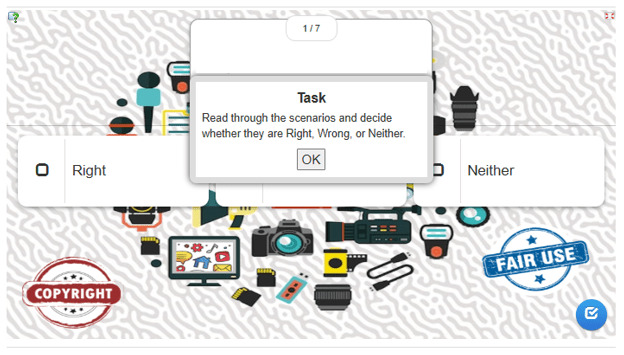
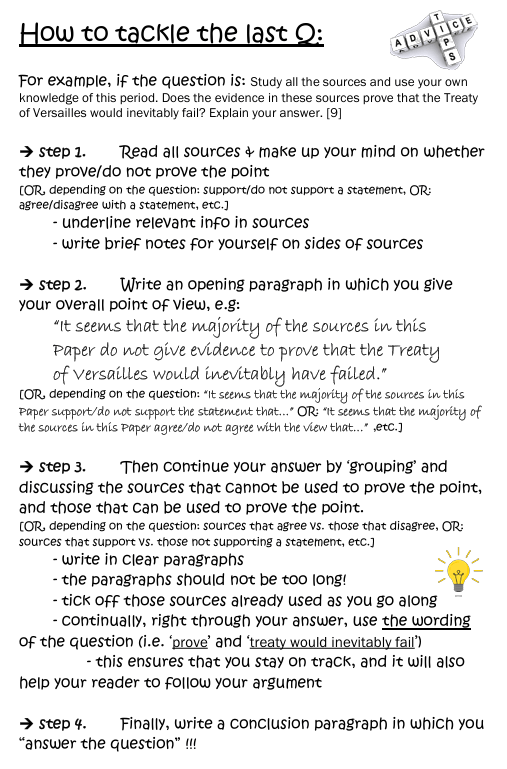
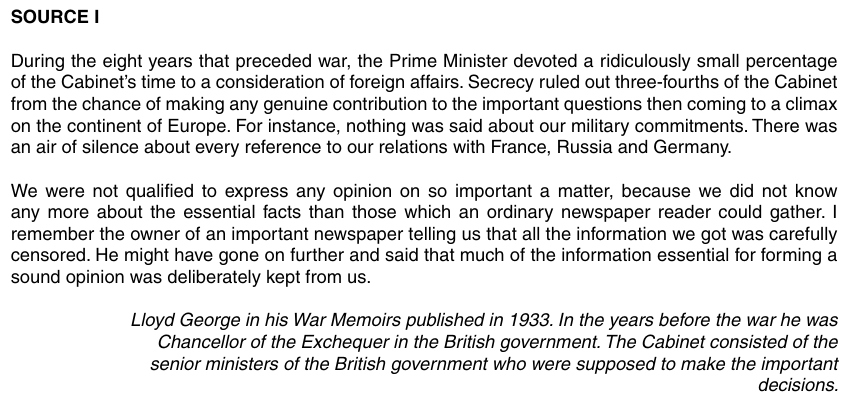
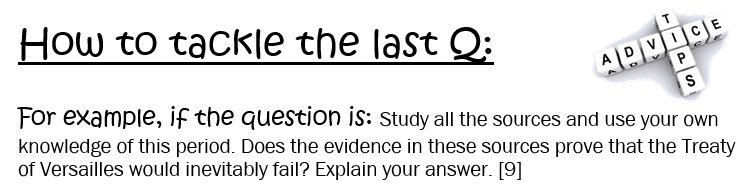
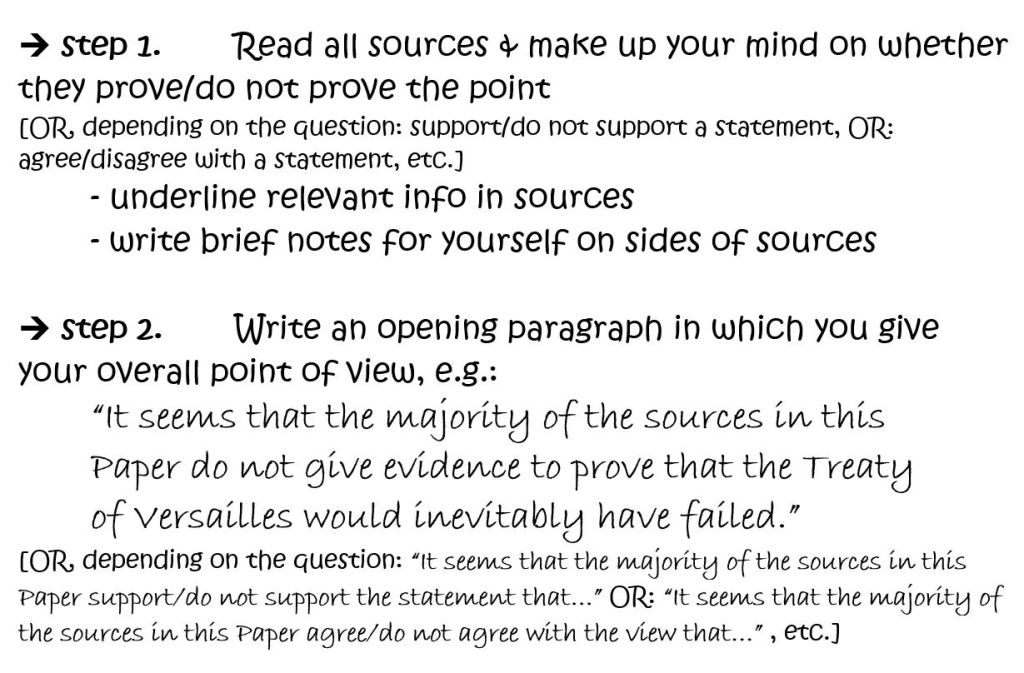
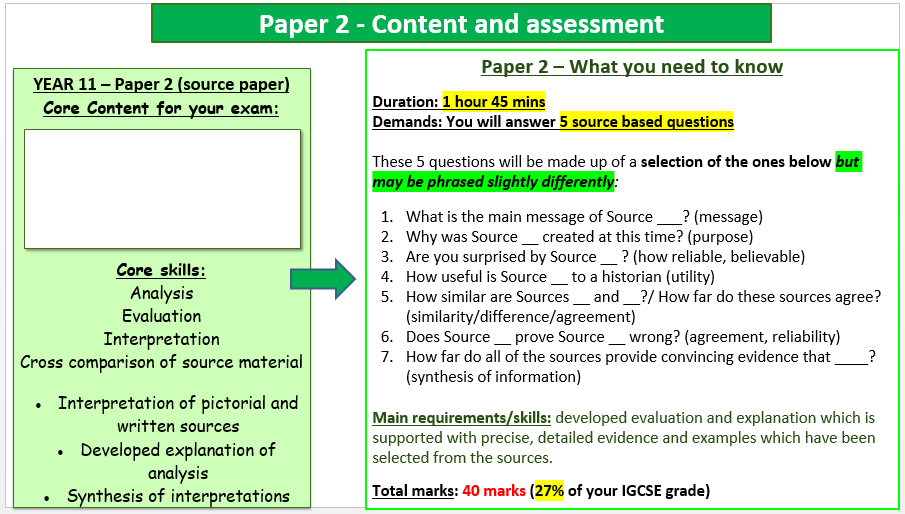
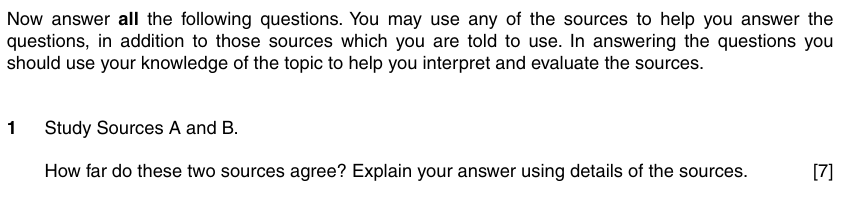
Today we will look at typical Paper 2 exam questions, in preparation for your Paper 2 examination….
We will:
analyse exam questions
analyse sources
plan essay answers
write essay answers
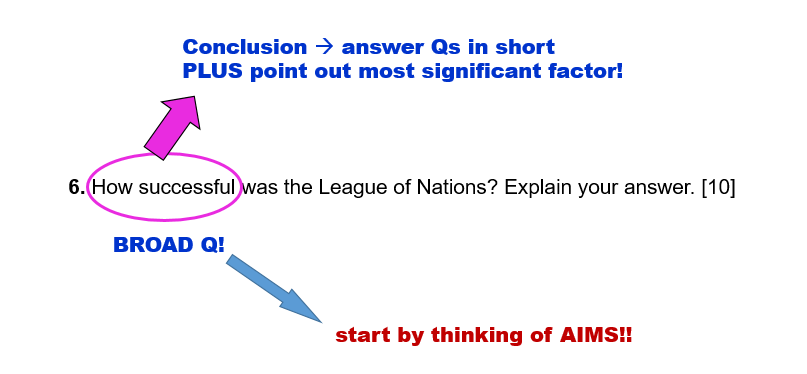
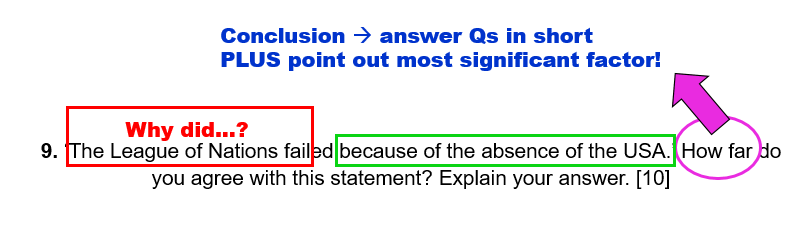
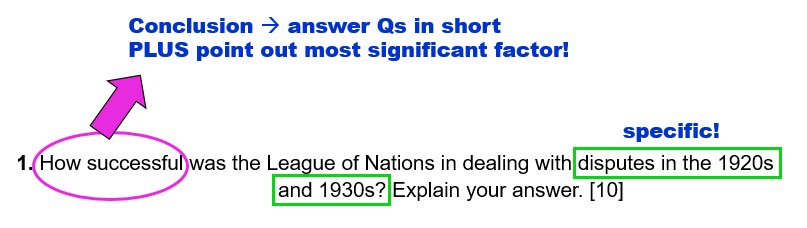
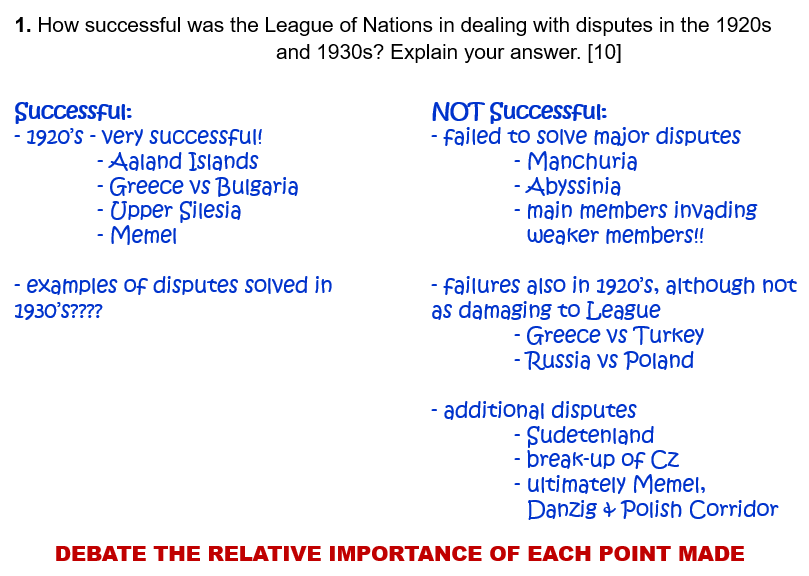
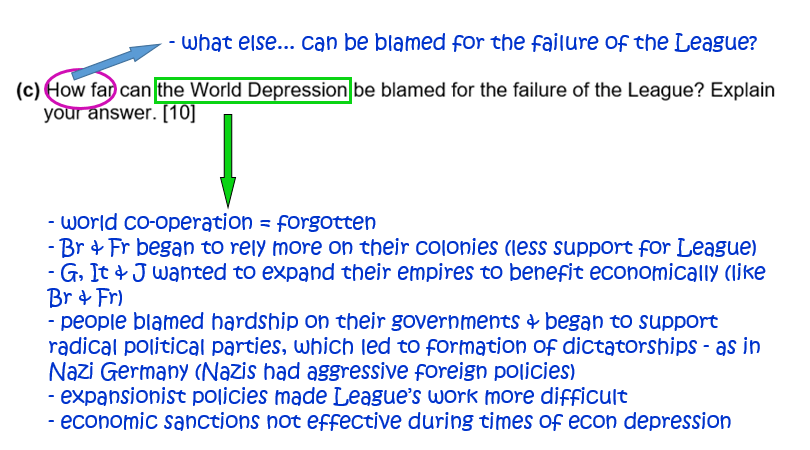
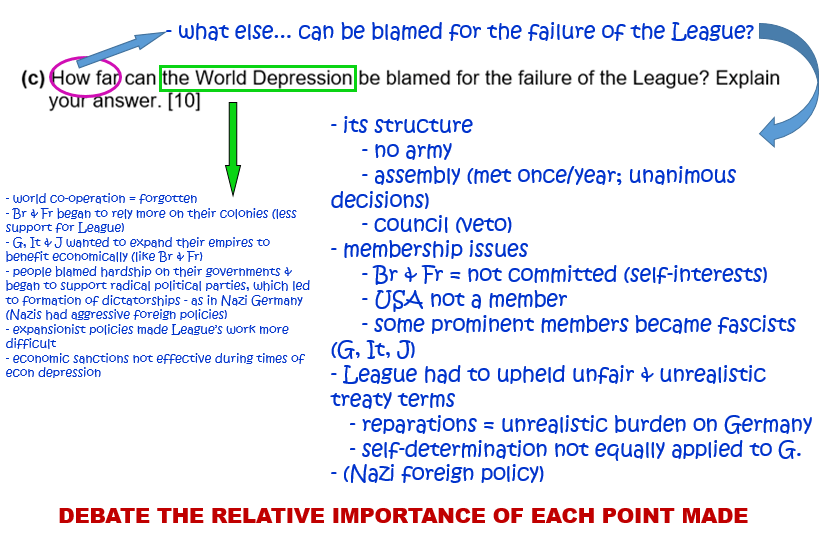
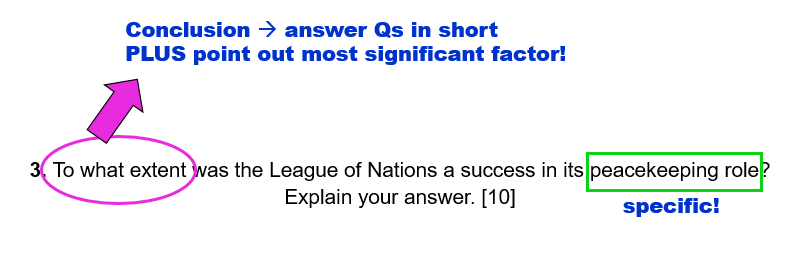
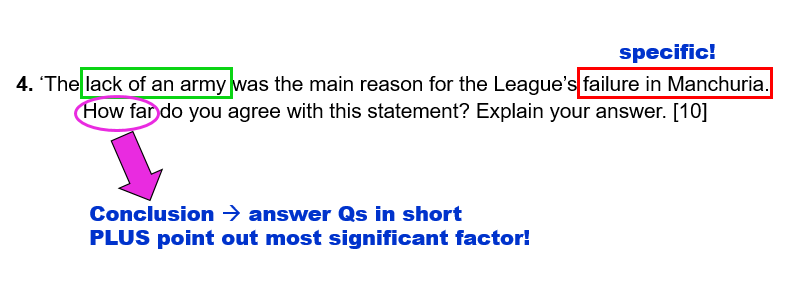
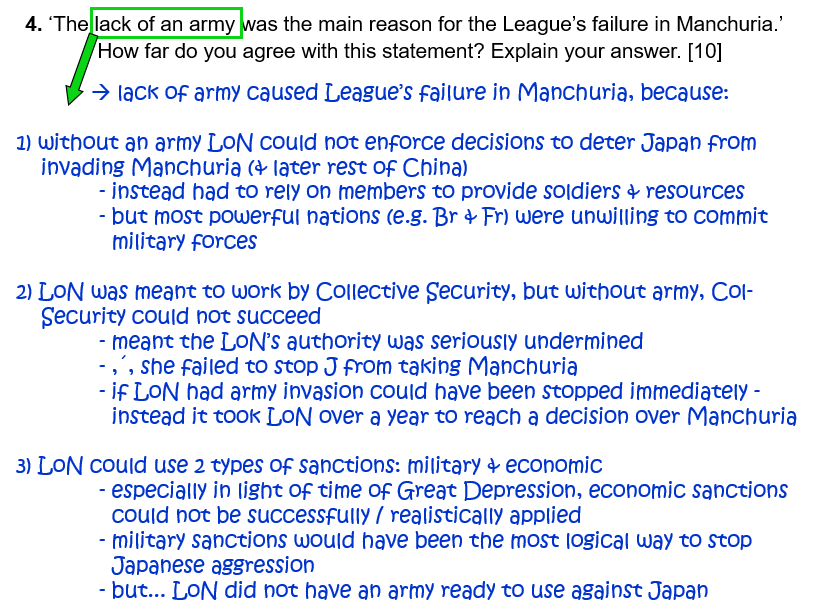
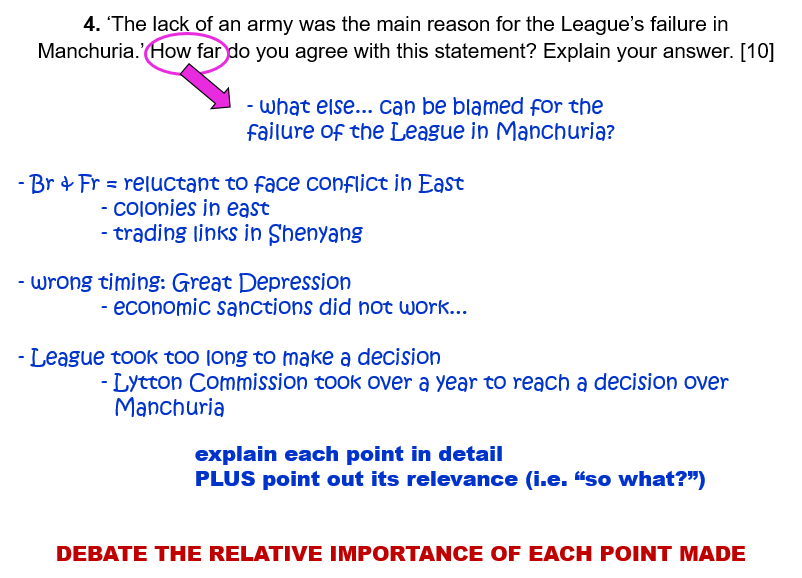
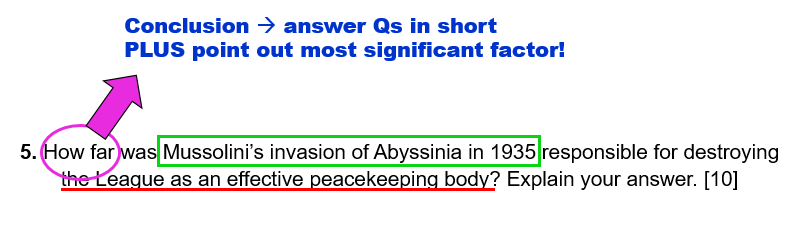
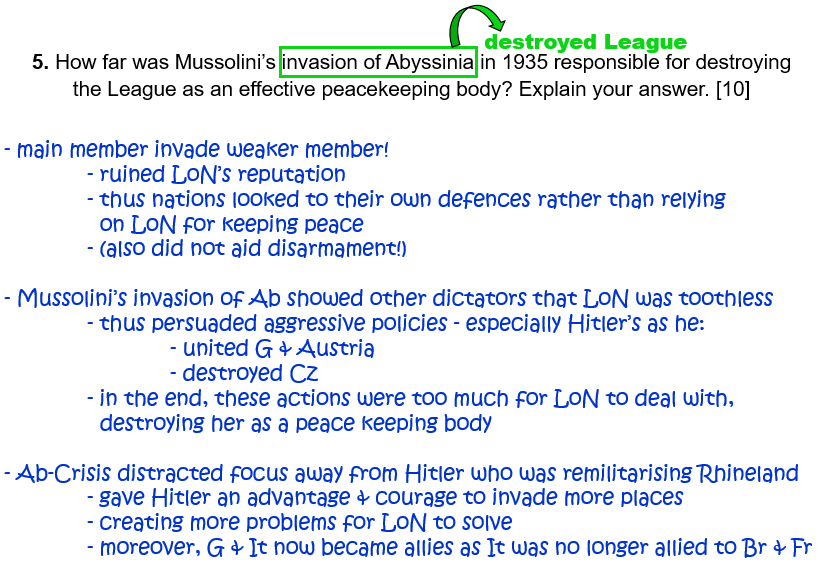
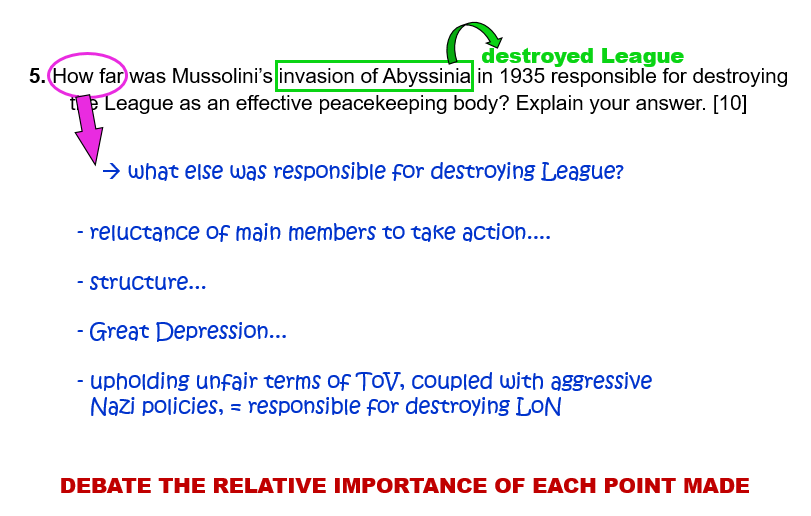
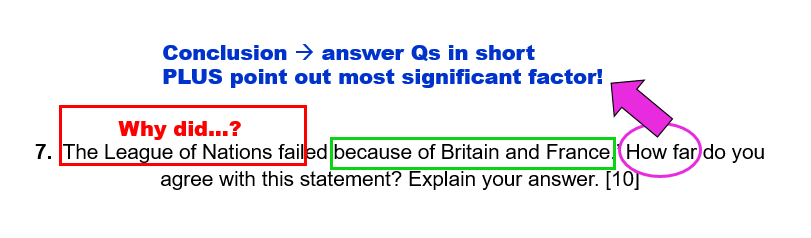
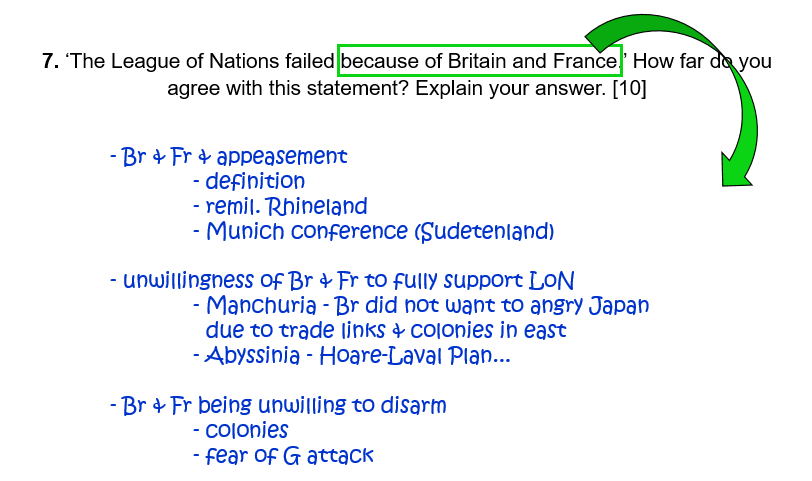
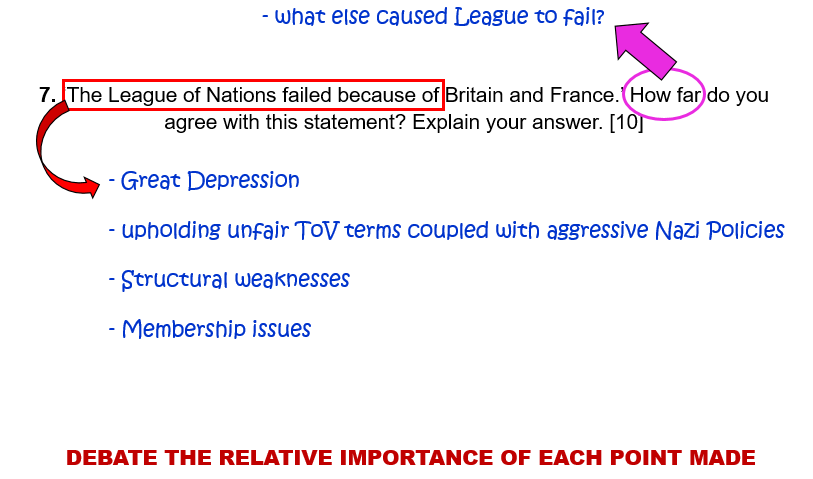
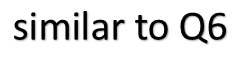
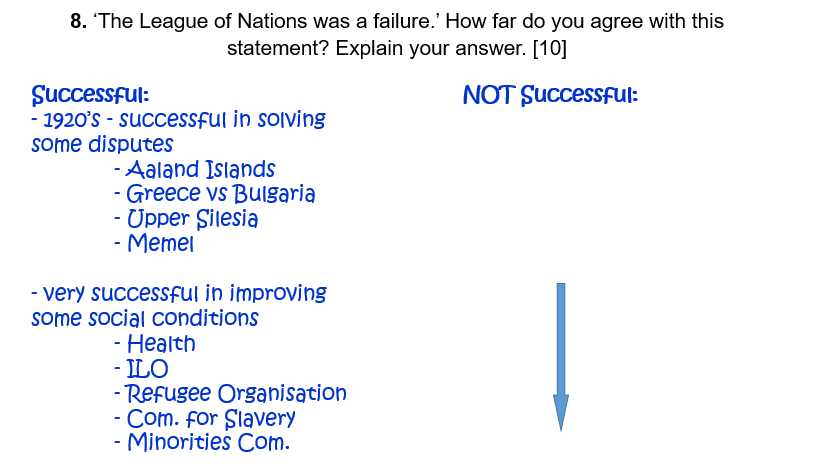
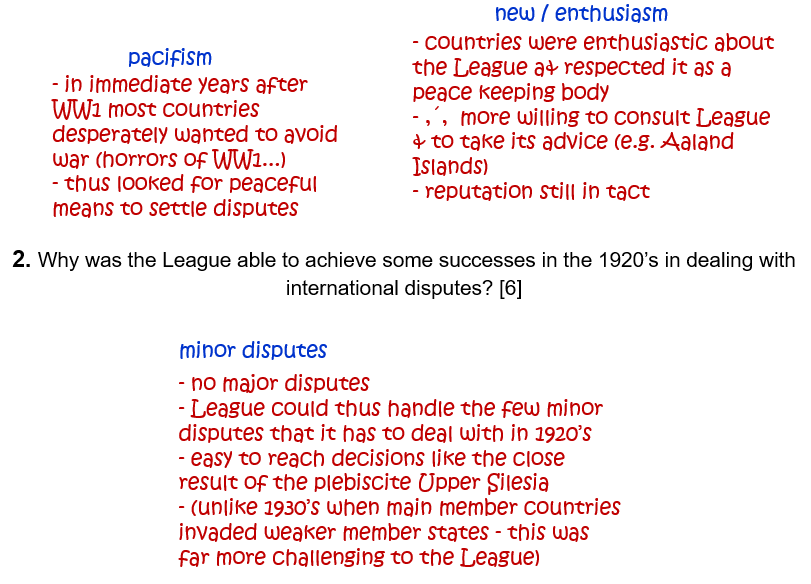
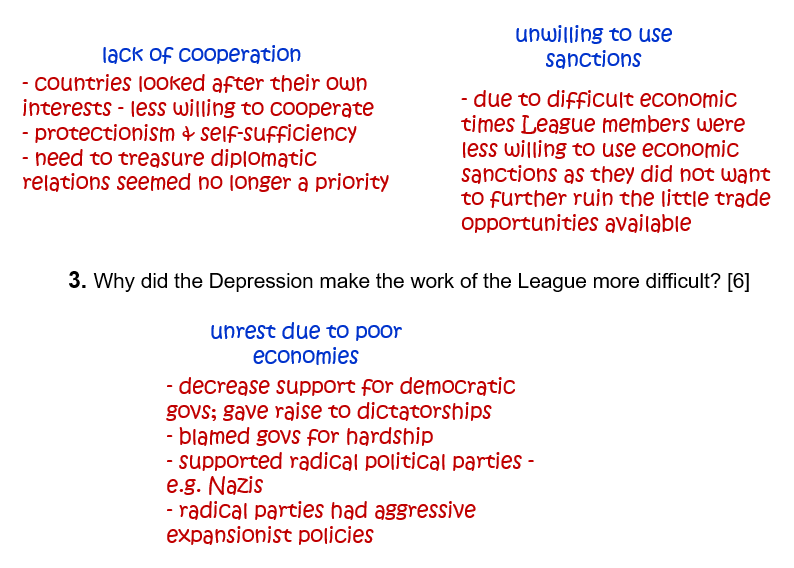
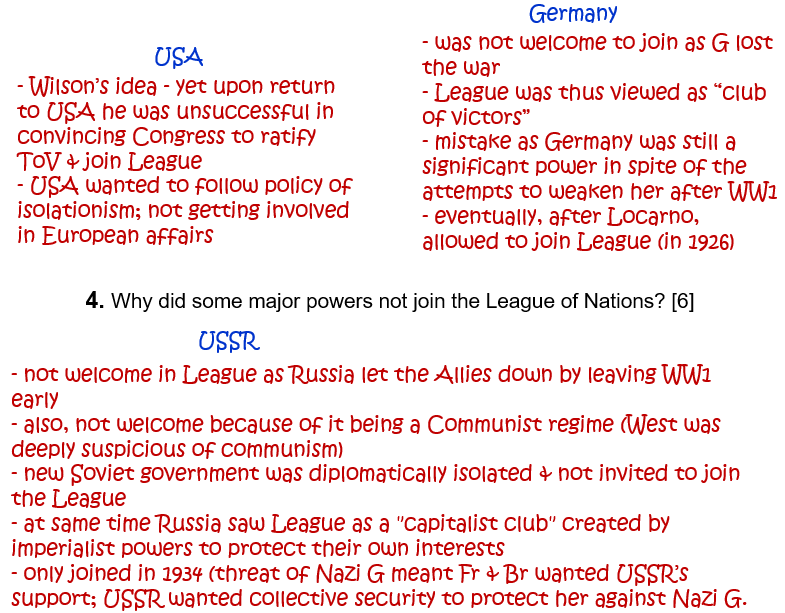
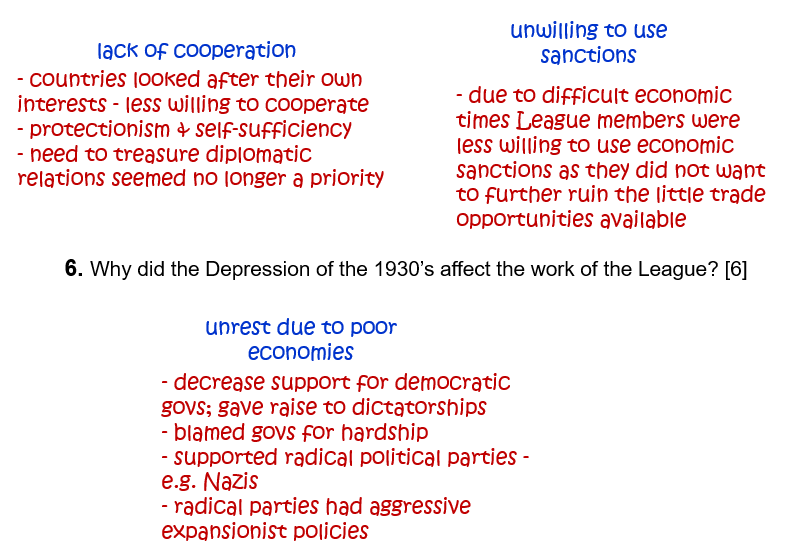
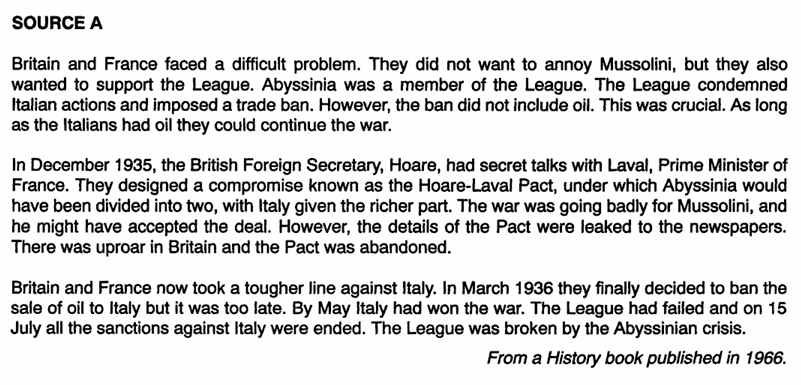
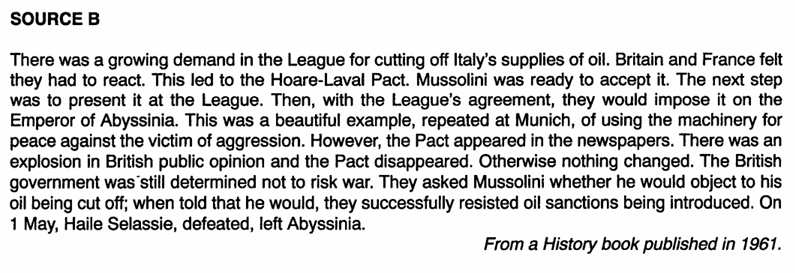
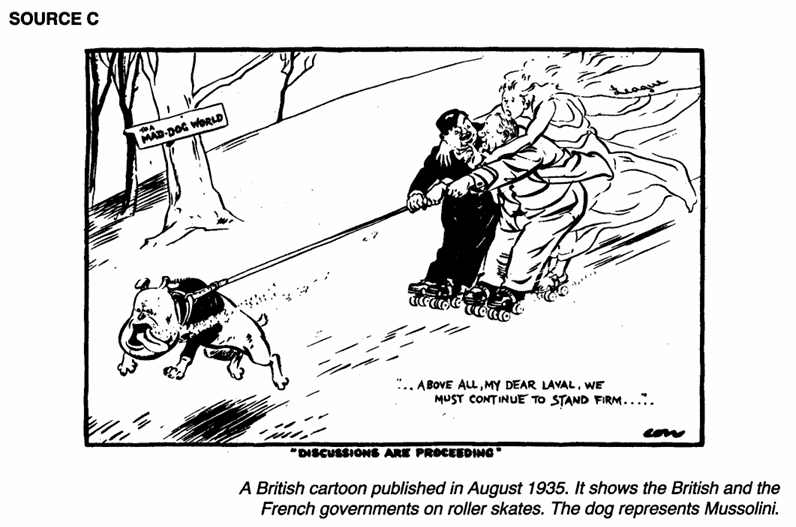
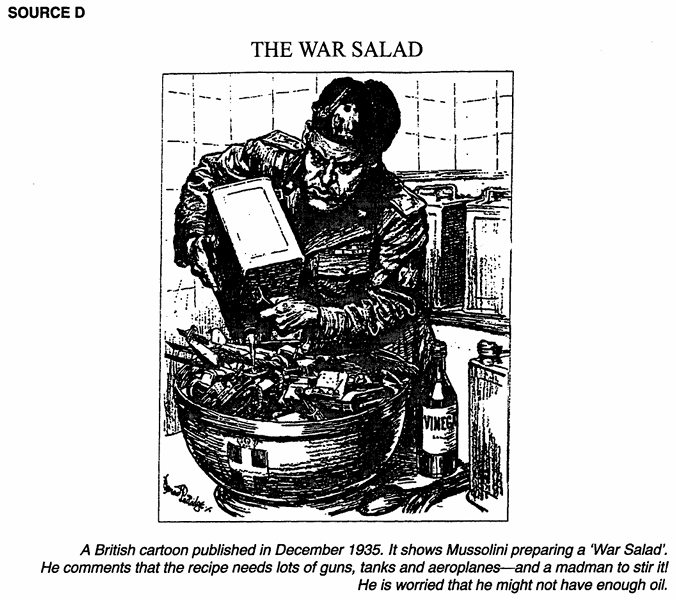
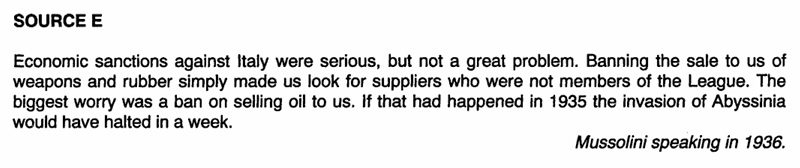
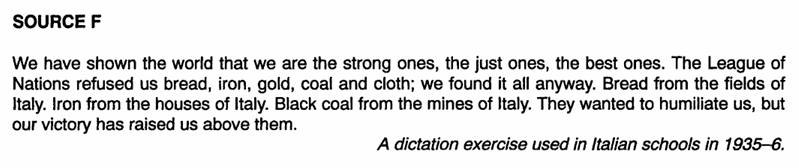
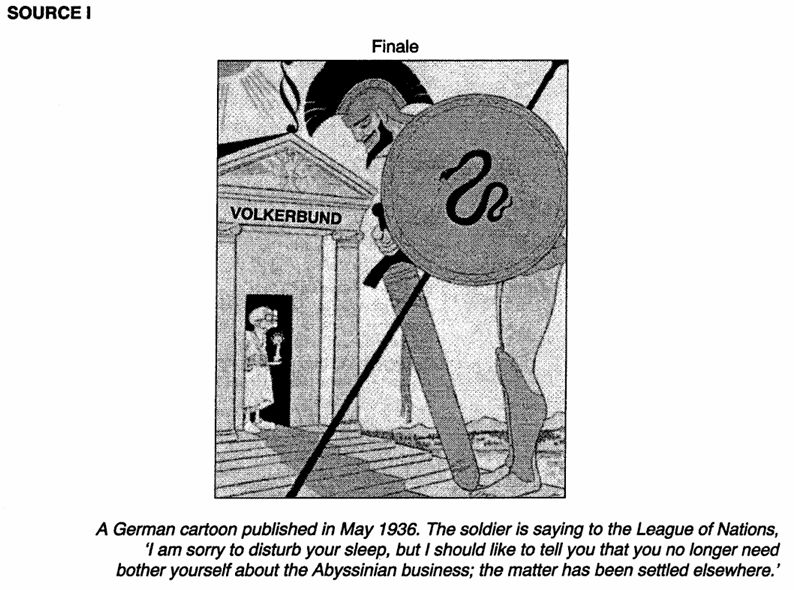
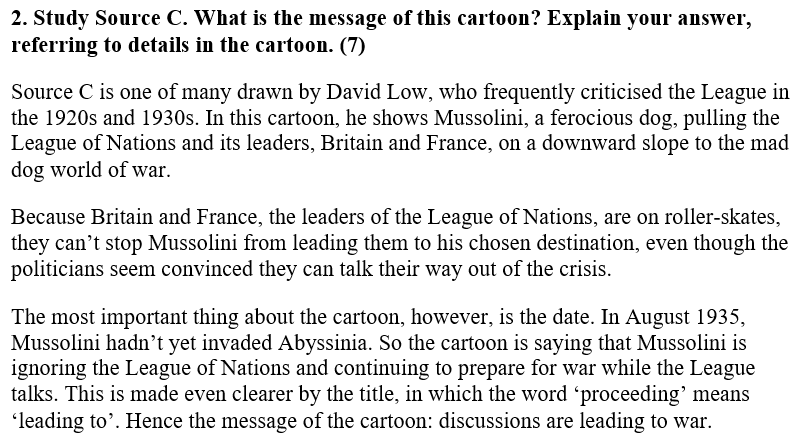
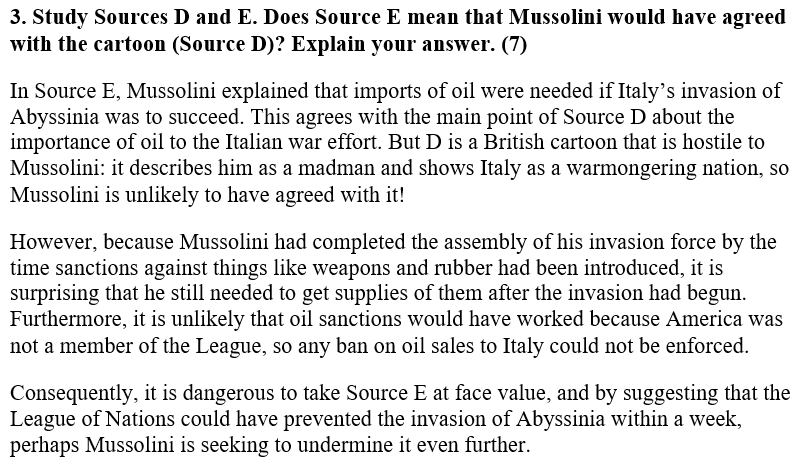
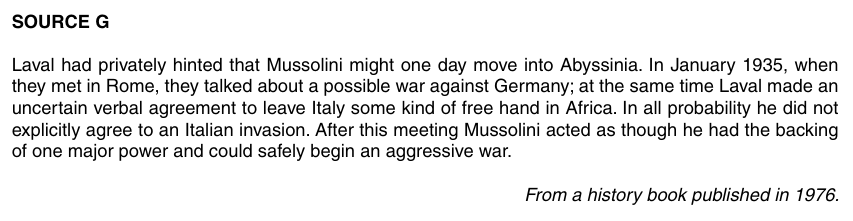
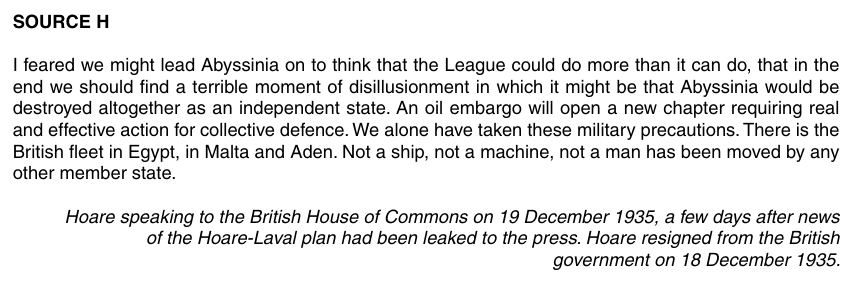
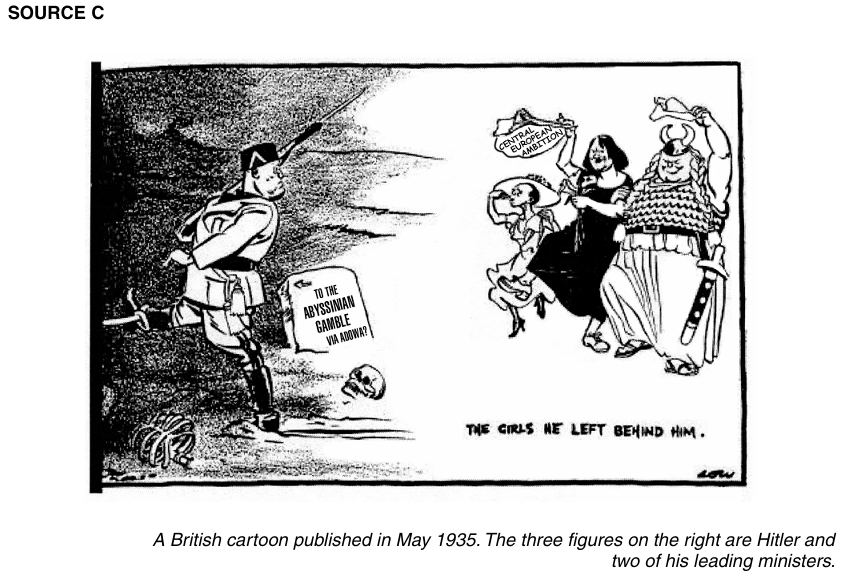
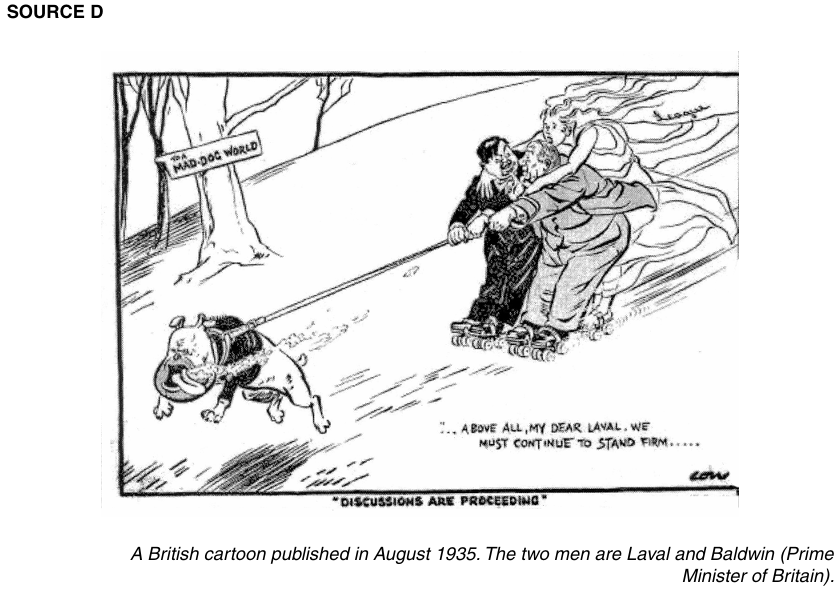
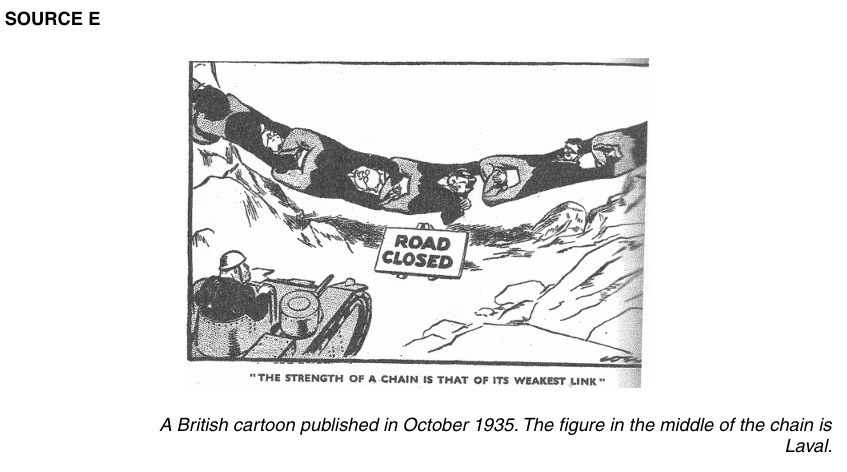
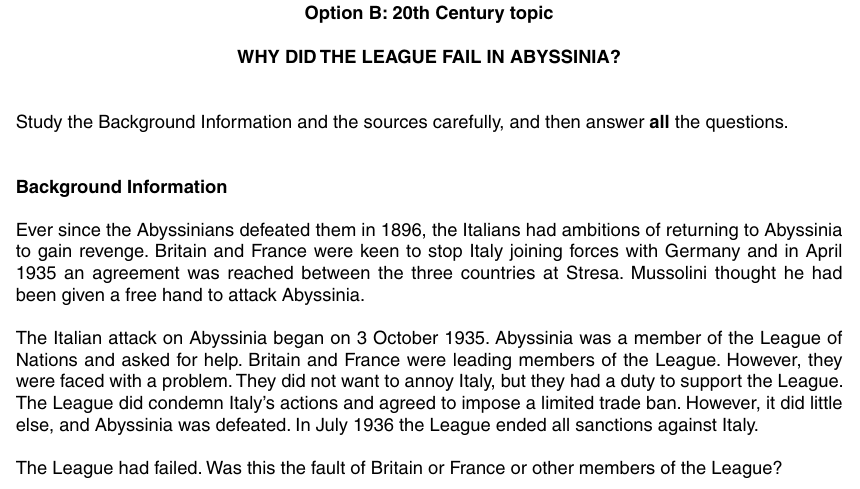
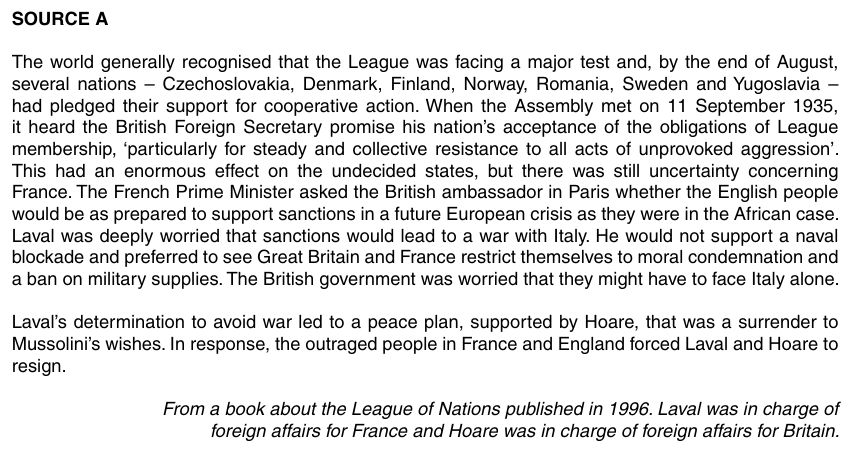
Your homework for today was to revise the “The League of Nations” topic…
1.
2.
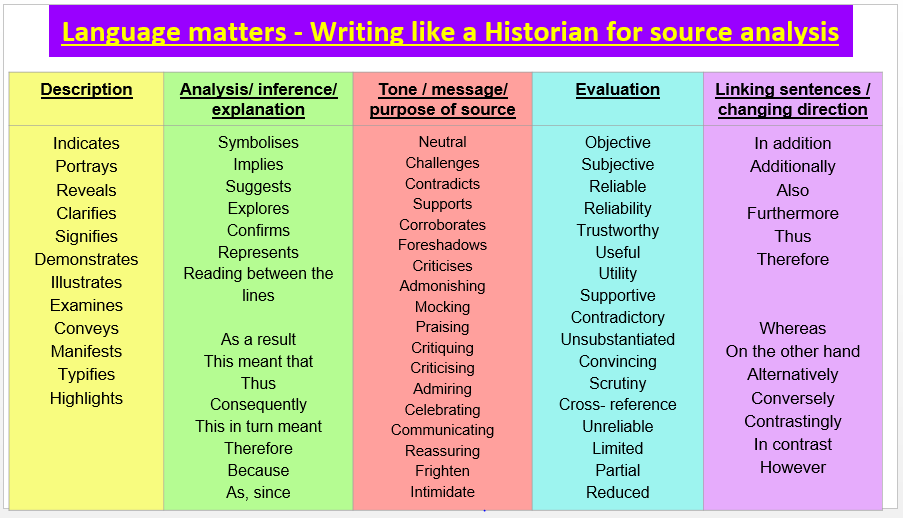
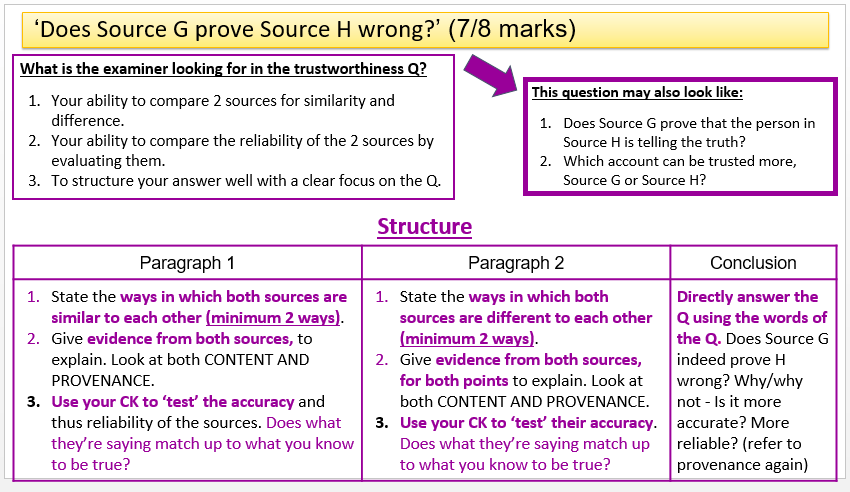
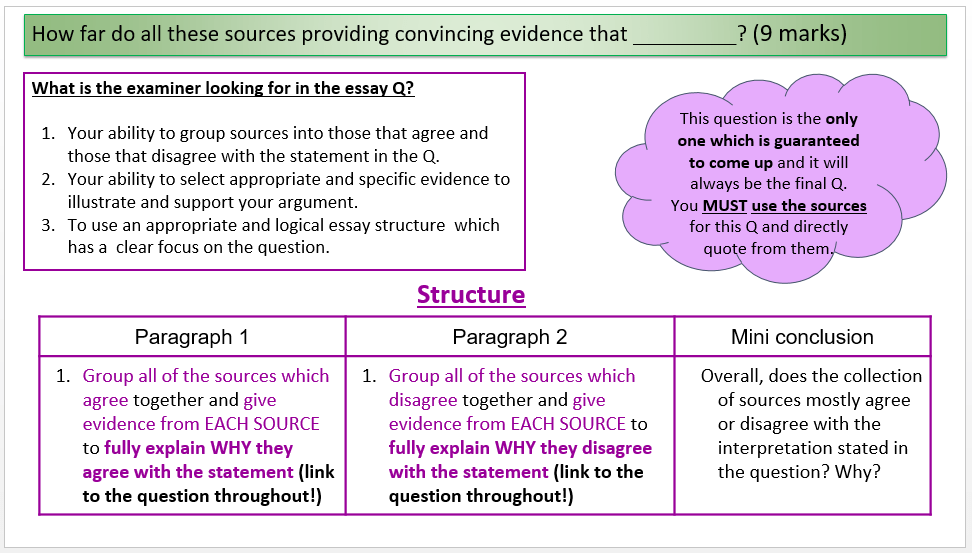
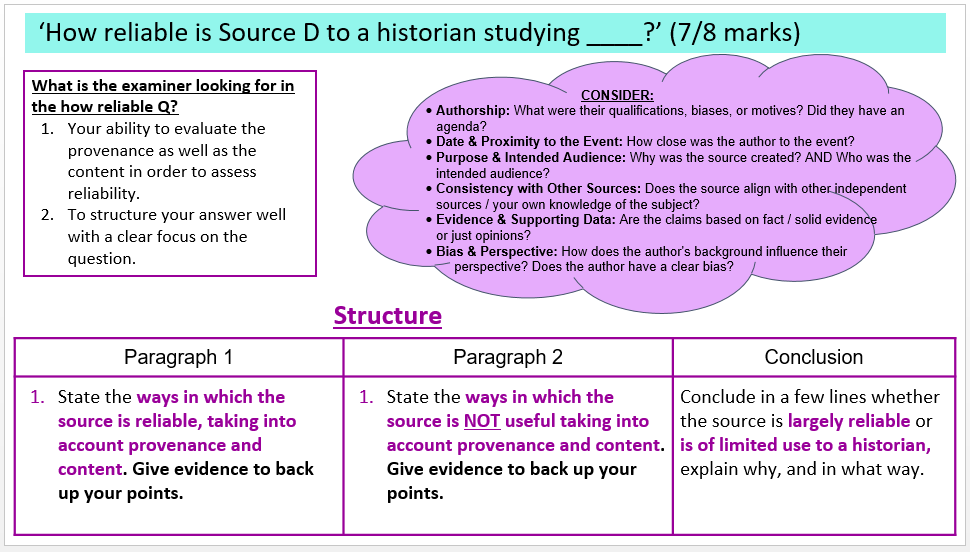
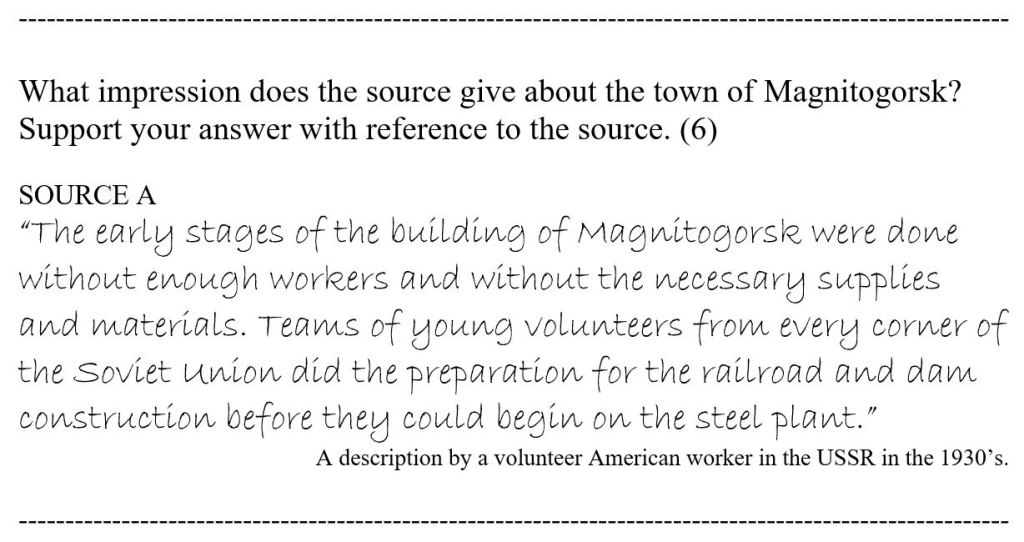
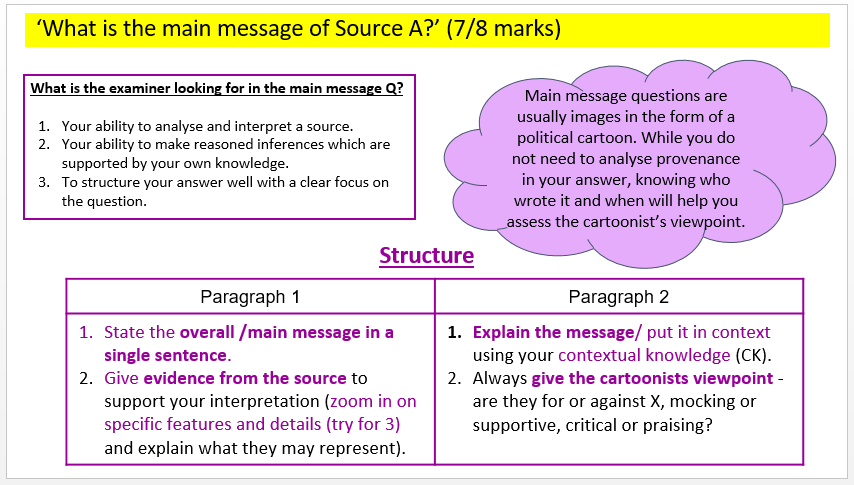
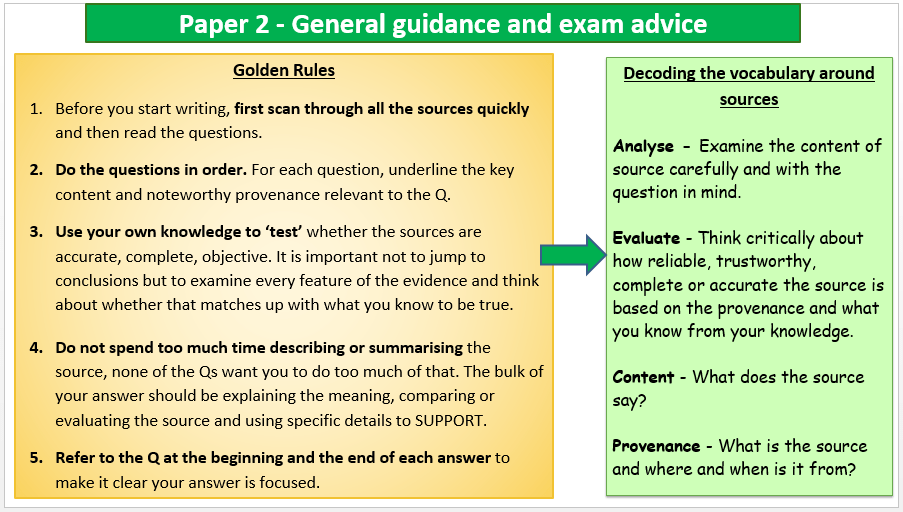
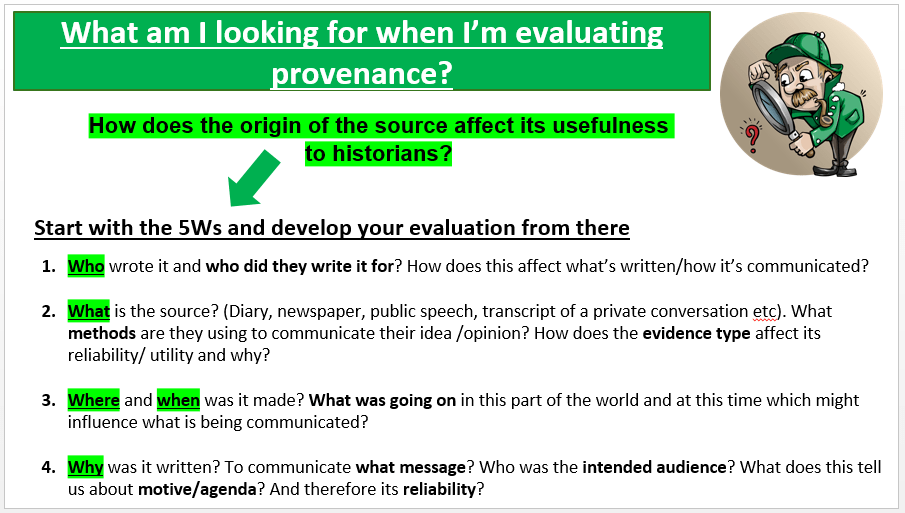
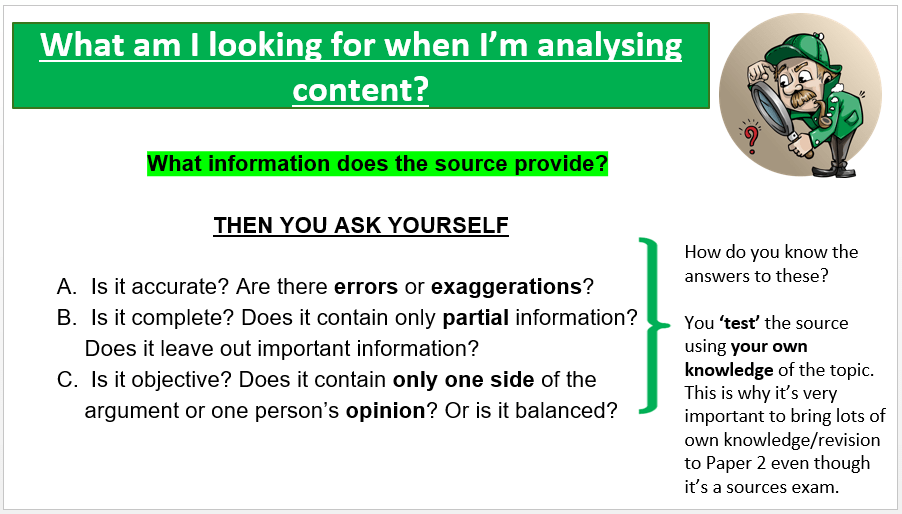
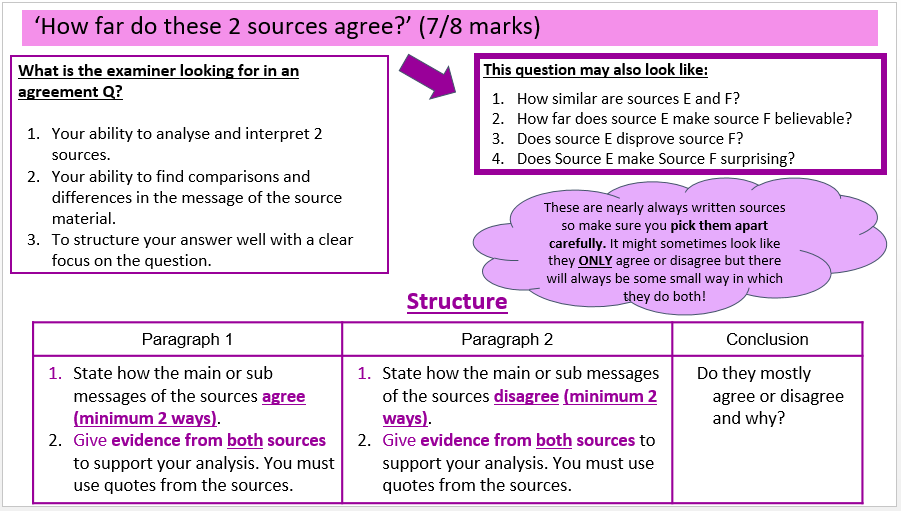
Giving evidence (when answering source questions) is crucially important… Below is an exercise to help you to know how to incorporate evidence in your answers.
Look at the following question and then put the possible answers in order of worst to best:
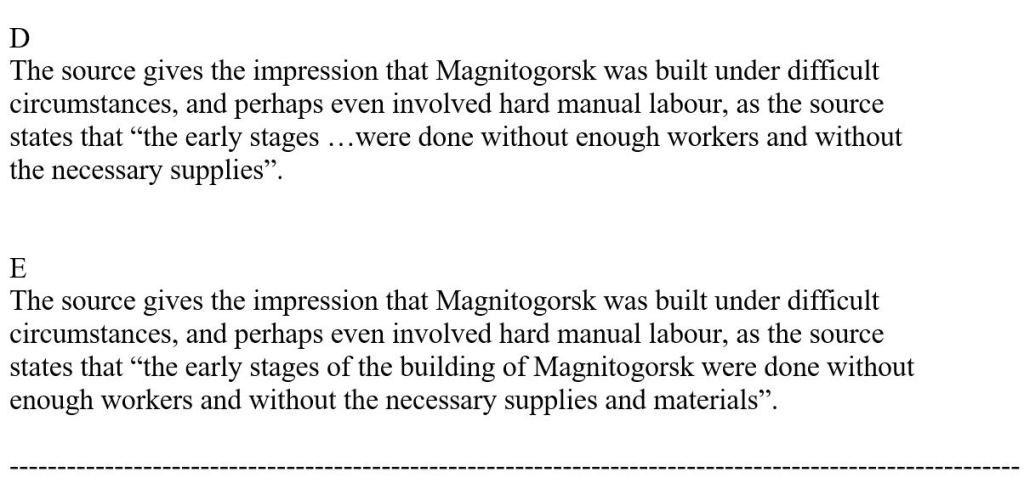
POSSIBLE ANSWERS
SOLUTION
A
This is a poor answer as it provides no evidence to back-up the statement.
E
This answer gives evidence, but the quote could be much shorter.
B
This answer gives evidence, but the quote does not “make sense” in the sentence, as it has just been added to the end of the statement.
C
This answer is good. It gives evidence, added to the end of the statement, but the way it is added is acceptablebecause the evidence is given in brackets.
E
This answer is the best. It gives evidence, in the form of a short quote, that forms part of the sentence. Therefore, it makes perfect sense.